Getting Started
Warning
Before operating the Nova Carter robot, read all of the following safety guidelines carefully. You must follow all of these guidelines during operation of the robot.
Robot Operator Safety
The Nova Carter robot is small and lightweight, weighing less than 100 kg even with its full payload. The main hazard is impact from the robot itself, where moderate harm could result from a worst-case direct collision. Robot operators must take the following precautions:
Familiarize yourself with the Nova Carter controls and dynamics in an open area away from bystanders.
Be aware of the speed at which Nova Carter can accelerate, decelerate, and turn.
Be aware that stopping Nova Carter quickly while it’s moving forward can cause it to overshoot and move backwards.
In the event of a safety incident, inspect the Nova Carter for the following:
Damage to the robot chassis (including dents and punctures to the housing or drivetrain).
Damage to the sensors that emit IR (including scratches and pits on the optical window).
If there is damage, do not power on Nova Carter. Use the tow handle to move the robot and contact your Segway representative immediately. Nova Carter has a tow handle for manual transport located above the caster wheels.
A red emergency stop (ESTOP) button is located above the caster wheels below the tow handle. Pushing the ESTOP button disconnects power to the motors, but the Carter robot can continue to coast in the direction it was previously moving. It can also roll if placed on a sloped surface while the ESTOP is pressed.
Do not open or remove any panels from the robot, and do not loosen or remove any sensors.
Unboxing Nova Carter
After receiving your Nova Carter robot from Segway, follow the guide below to unpack and power on the robot.
Make sure you are familiar with or have completed the following:
Remove Nova Carter from its packaging.
Remove the protective Lidar cover (colored red) using a 2.5 mm hex driver, and re-install any bolts which were removed.
Familiarize yourself with the following parts of Nova Carter:
Wall charger and its connection to the robot. You can connect Nova Carter to its charger when it is powered on or off.
Note
The robot does not respond to movement commands while plugged into the wall charger.
E-Stop button at the rear of the robot and its operation. Press to engage, twist clockwise to disengage.
IO panel at rear of robot with USB-C, DisplayPort, and Ethernet connections. These connect directly to the Jetson, and can be used for development, rapid data transfer, or to re-flash the Jetson AGX Orin.
Status indicator LED bar at the front. This shows yellow on boot, green when Jetson is actively communicating with the wheelbase, and red if there is an error or E-Stop button is pressed.
Power on the robot using the button at its front. The LED panels at each corner of the robot flash white. After Jetson has finished booting, they transition to green. If the status indicator light flashes red, disengage the E-Stop.
Connecting the Robot to your WiFi Network
Follow these steps to connect the Nova Carter to the local WiFi network:
Connect the robot to a display using the DisplayPort on the rear IO panel.
Note
A recommended best practice is to engage the E-Stop button any time you connect external cables to the robot, to prevent it from responding to any movement commands.
Connect the keyboard with touchpad to the USB-C port on the rear IO panel.
Log in to the robot (contact the NVIDIA Solutions team for the robot password).
Follow the WiFi instructions for Ubuntu.
After connecting to the internet it is required to reboot the system. Press the power button or run:
sudo reboot
Connecting the PC to the Robot
To control, deploy, launch, and debug applications, you have to connect your PC to the robot.
First, you must get the IP address of the robot. Assuming you have the robot connected to a display and a keyboard with touchpad from the previous section, follow these instructions:
Use
CTRL+ALT+tto open a terminal.Find the IP address of the WiFi by running
ifconfig wlan0. You should see an output similar to the screenshot below. The IP address is highlighted with a red rectangle.
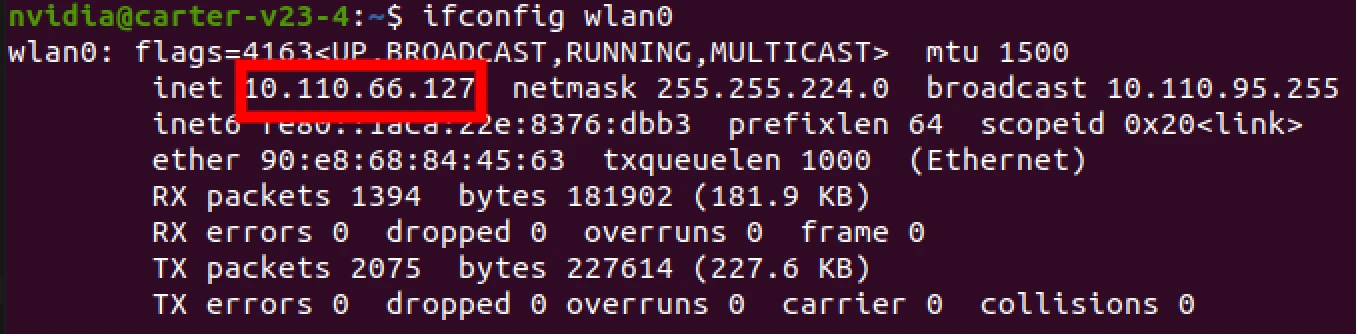
Record the IP address (in the above case it is
10.110.66.127). This IP address will be used for connecting in all further tutorials and may need to be retrieved again if it changes.From your PC run the following command to SSH into the robot. Make sure to use a PC that is connected to the same WiFi network as your robot. Enter the robot password when asked for it.
$ ssh <USER>@<ROBOT_IP>
Note
Make sure to replace <USER> and <ROBOT_IP> with the values for your
robot. In the above case, it would be ssh nvidia@10.110.66.127.
Note
The login will timeout for security reasons. Also, the DisplayPort will turn off after a while due to inactivity, so retry if the screen goes black.
Nova Orin Initialization
Verify if Nova Orin software is the latest version by comparing the installed package with the candidate:
$ apt policy nova-orin-init
nova-orin-init:
  Installed: 1.3.2+b4
  Candidate: 1.3.2+b4
  Version table:
 *** 1.3.2+b4 600
        600 https://isaac.download.nvidia.com/nova-init jammy/main arm64 Packages
If the installed version is lower than the candidate, follow the nova init upgrade process here. Otherwise proceed to the next step.
Verify that sensors are functioning by running:
nova_preflight_checker
It is expected for all tests to pass. Refer to the Nova PFC documentation for more details.
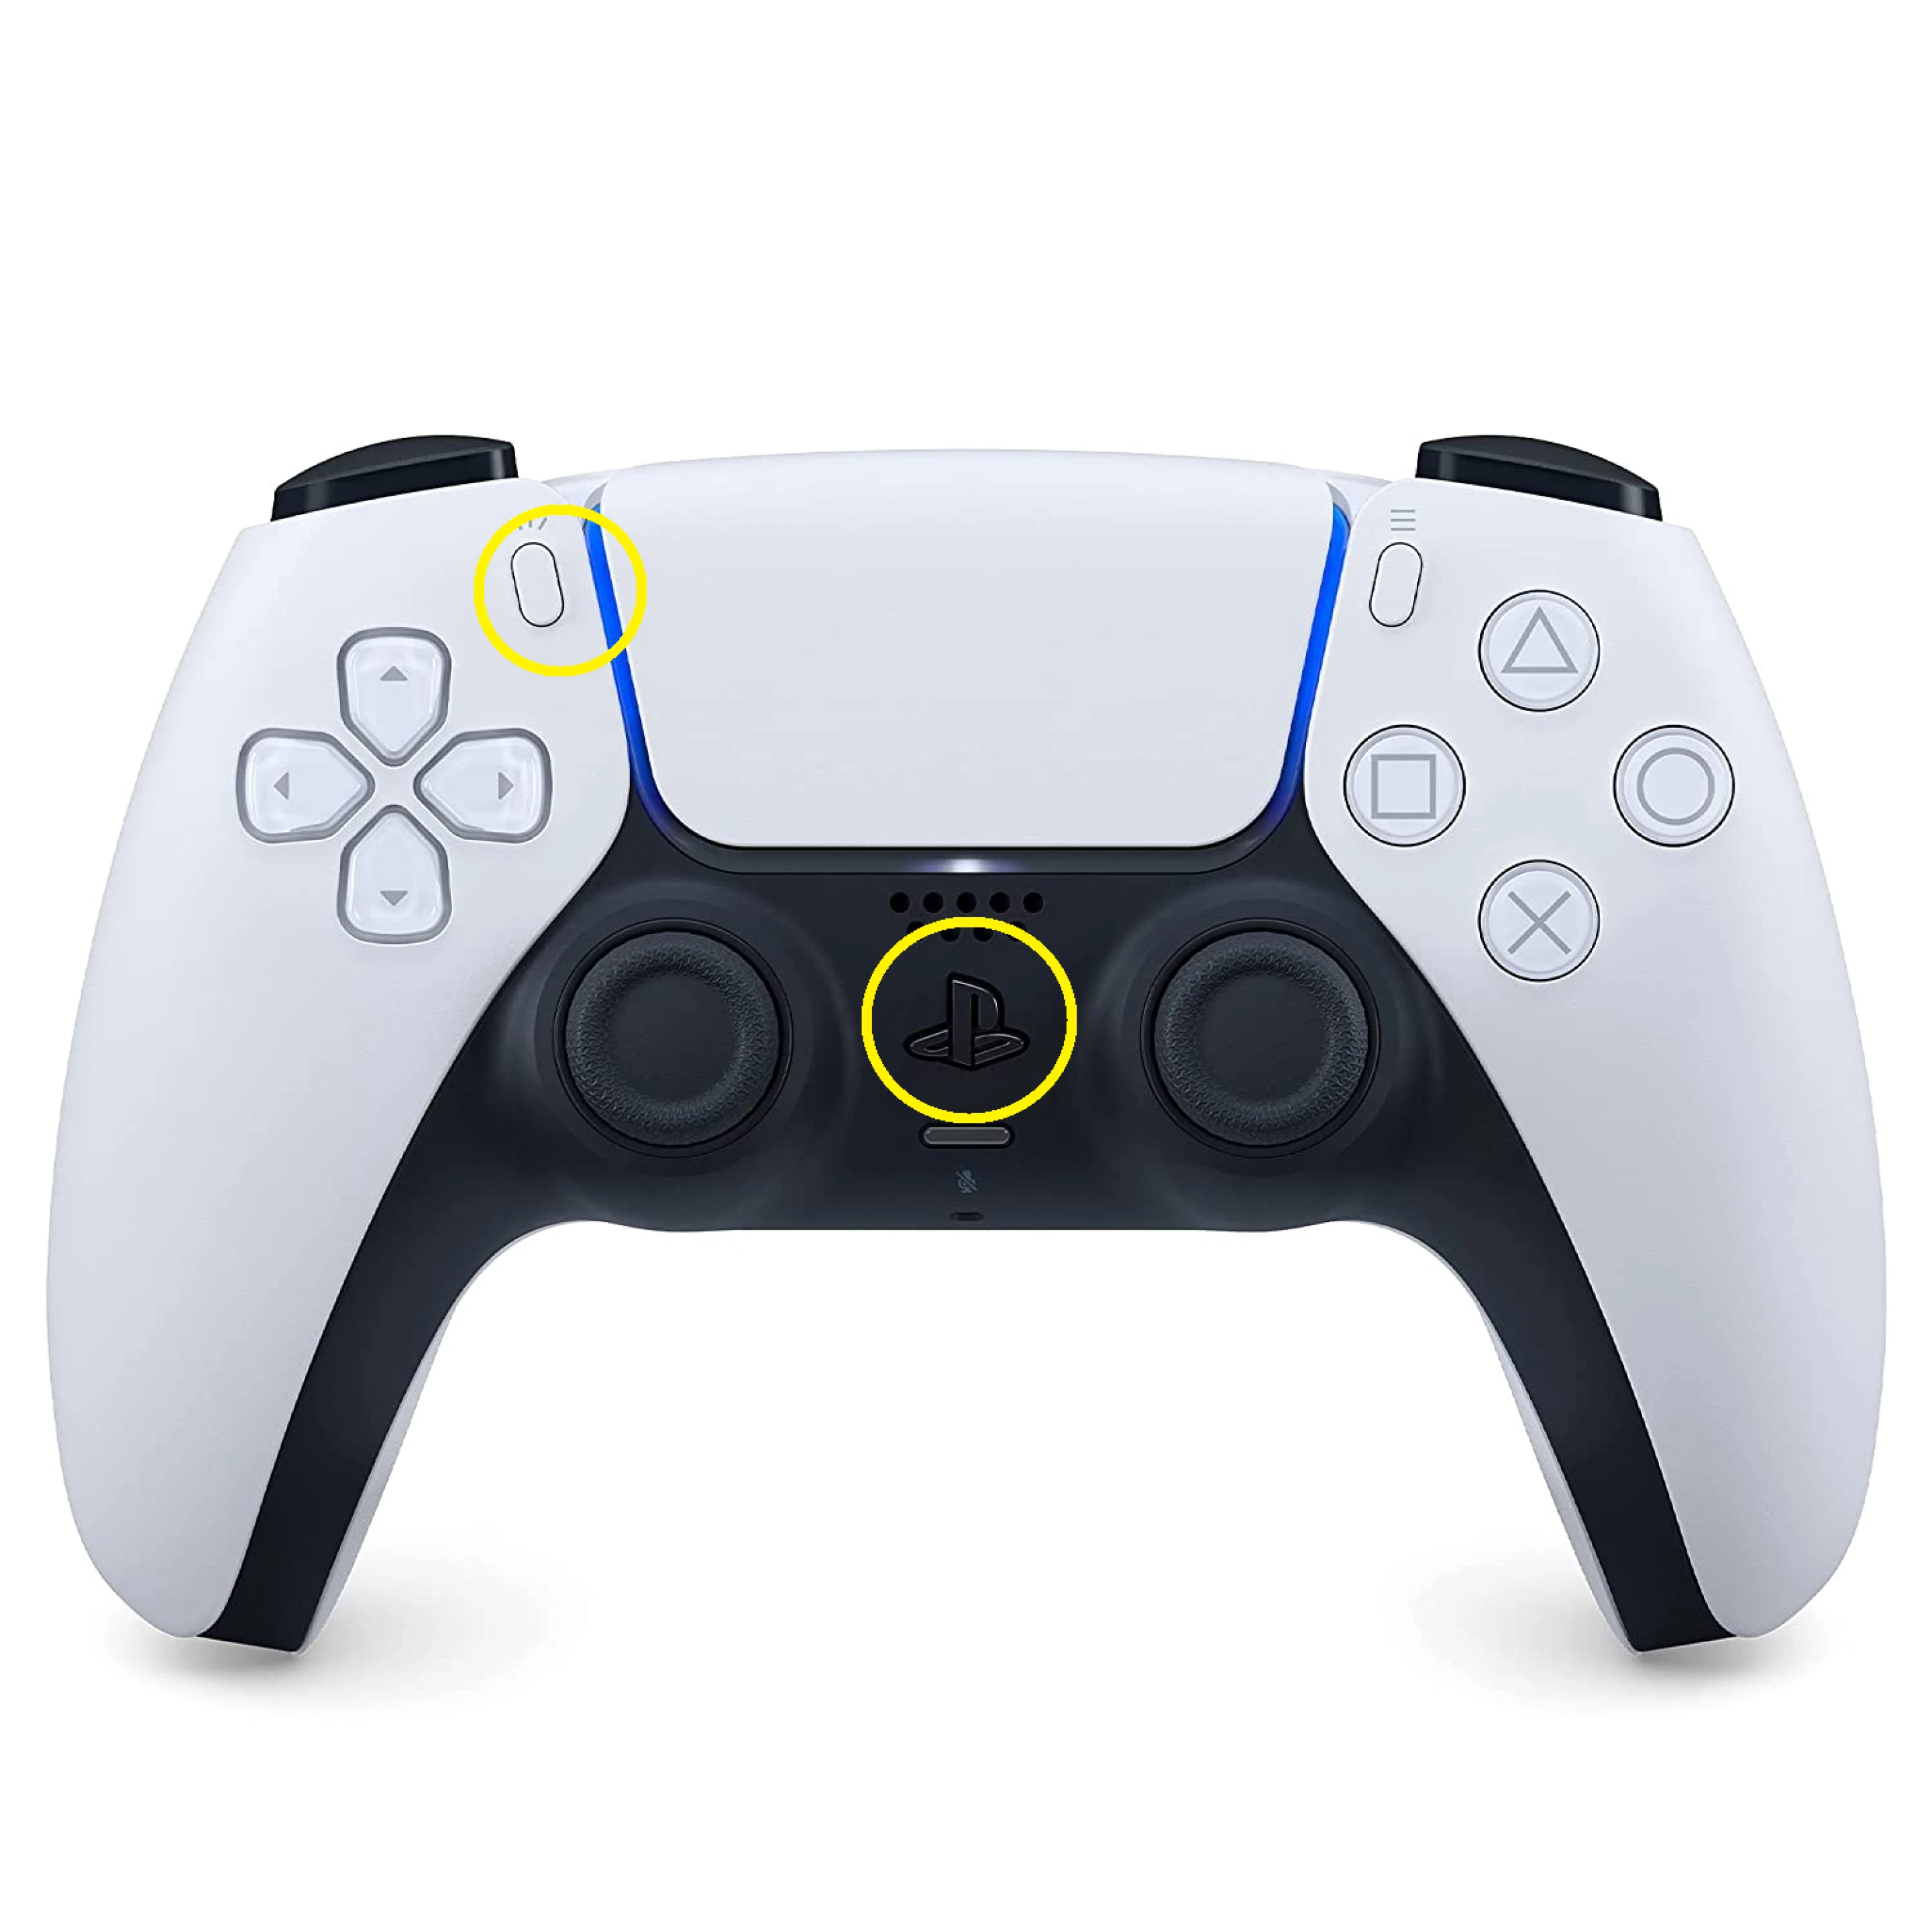
Pairing the Joystick Controller
A PS5 joystick controller is shipped with the robot. To connect the joystick with the robot, put the controller in pairing mode, by pressing and holding down the two buttons shown in the image below until the controller lights start blinking:
SSH into the robot and pair the controller to the robot.
ssh <USER>@<ROBOT IP>

# This should list the available devices
$ sudo bluetoothctl
**[bluetooth]#** scan on
Discovery started
[CHG] Controller 90:E8:68:84:35:24 Discovering: yes
[NEW] Device D4:20:B0:42:66:4F D4-20-B0-42-66-4F
[NEW] Device D4:20: B0:42:5C:CC D4-20-B0-42-5C-CC
[NEW] Device D4:20:B0:42:64:1A D4-20-B0-42-64-1A
[NEW] Device 7C:66:EF:5D:36:B1 Wireless Controller
[NEW] Device D4:20:B0:42:C6:80 D4-20-B0-42-C6-80
[NEW] Device D4:20:B0:42:5B:37 D4-20-B0-42-5B-37

# The mac address used should match the one named Wireless Controller, in
# this case it is.
**[bluetooth]#** scan off
7C:66:EF:5D:36:B1

# Upon successful pairing, it should ask you to type yes/no to trust the
# device. Type "yes".
**[bluetooth]#** pair 7C:66:EF:5D:36:B1
**[bluetooth]#** trust 7C:66:EF:5D:36:B1
**[bluetooth]#** exit
Note
Once the controller is connected, the LEDs on the controller should stay solid blue; flashing blue LEDs indicate the controller is trying to connect.
Note
In the terminal run ls /dev/input/js0. If the connection was successful it
prints out /dev/input/js0. If the connection was not successful the
command prints out \ ls: cannot access '/dev/input/js0': No such file or
directory\.
The controller should now be connected. You should not need to pair again. If you want to connect again after the controller turns off press the PS button as shown below.

Docker Configuration
To run applications on Nova Carter, you shall configure docker as below.
Add the
nvidiauser to the docker group to enable using docker without sudo:# Add your user to the docke group sudo usermod -aG docker $USER # Verify that command succeeded id nvidia | grep docker # Log out and log in for the changes to take effect newgrp docker
Stop the Docker service.
sudo systemctl stop docker
Move the existing Docker folder.
sudo du -csh /var/lib/docker/ && \
    sudo mkdir /mnt/nova_ssd/docker && \
    sudo rsync -axPS /var/lib/docker/ /mnt/nova_ssd/docker/ && \
    sudo du -csh  /mnt/nova_ssd/docker/
Use a text editor (e.g. Vi) to edit
/etc/docker/daemon.jsonsudo vi /etc/docker/daemon.json
Insert
"data-root"line similar to the following:{ "runtimes": { "nvidia": { "path": "nvidia-container-runtime", "runtimeArgs": [] } }, "default-runtime": "nvidia", "data-root": "/mnt/nova_ssd/docker" }
Rename the old Docker data directory.
sudo mv /var/lib/docker /var/lib/docker.old
Restart the Docker daemon.
sudo systemctl daemon-reload && \
    sudo systemctl restart docker && \
    sudo journalctl -u docker
Checking the Battery Status
Before using the robot check the battery level. Run:
$ nova_battery_status
host version build date: [23-09-19]
host version build time: [14:21:54]
Communication interface adding CAN_INTERFACE
Please guarantee the 'canbus_pre.sh' file has been taken into the
'/home/sdcard/firmware' directory, if can register has not been configed HAL
CANBUS init success!
Scheduler Num 0 Start. Task Num = 1. Period = 100000
Scheduler Num 1 Start. Task Num = 1. Period = 50000
Scheduler Num 2 Start. Task Num = 1. Period = 20000

battery: 54%
Prerequisites
If you consider using Nova Carter only through the pre-built docker image, continue to Visualization Setup. Otherwise, you should complete Isaac ROS Development Environment, repositories, and visualization setup before proceeding to run the applications.
Isaac ROS Development Environment Setup (Optional)
Set up your development environment by following the instructions in getting started.
Clone
isaac_ros_commonunder${ISAAC_ROS_WS}/src.cd ${ISAAC_ROS_WS}/src && \ git clone -b release-3.2 https://github.com/NVIDIA-ISAAC-ROS/isaac_ros_common.git isaac_ros_common
(Optional) Install dependencies for any sensors you want to use by following the sensor-specific guides.
Note
We strongly recommend installing all sensor dependencies before starting any quickstarts. Some sensor dependencies require restarting the Isaac ROS Dev container during installation, which will interrupt the quickstart process.
Note
Ensure you have set up the SSD and migrated the Docker directory to SSD. Instructions can be found here.
Note
We recommend that you connect the Nova Carter through Ethernet in this step. Building a Docker image for the development environment takes longer time in the first time you run it. Expect faster spin-up of the development environment after the first cached build.
Repositories Setup (Optional)
Clone
nova_carterrepository under${ISAAC_ROS_WS}/src:cd ${ISAAC_ROS_WS}/src && \ git clone --recursive -b release-3.2 https://github.com/NVIDIA-ISAAC-ROS/nova_carter.git nova_carter
Create a file called
.isaac_ros_common-configwith the following context:cd ${ISAAC_ROS_WS}/src/isaac_ros_common/scripts echo -e "CONFIG_IMAGE_KEY=ros2_humble.nova_carter\nCONFIG_DOCKER_SEARCH_DIRS=(../../nova_carter/docker ../docker)" > .isaac_ros_common-config
Create a file called
.isaac_ros_dev-dockerargswith the following context:cd ${ISAAC_ROS_WS}/src/isaac_ros_common/scripts && \ echo -e "-v /etc/nova/:/etc/nova/\n-v /opt/nvidia/nova/:/opt/nvidia/nova/\n-v /mnt/nova_ssd/recordings:/mnt/nova_ssd/recordings" > .isaac_ros_dev-dockerargs
Launch the Docker container using the
run_dev.shscript:cd ${ISAAC_ROS_WS}/src/isaac_ros_common && \ ./scripts/run_dev.sh
Clone the dependency repositories using the
vcstoolfile in thenova_carterrepository:cd /workspaces/isaac_ros-dev vcs import --recursive --workers 1 --delay 5.0 src < src/nova_carter/nova_carter.repos
Visualization Setup
To visualize and evaluate outputs from running applications, you should follow these steps on your remote machine.
Complete the Foxglove setup guide. Make sure to follow the instructions of installing additional Nvblox Foxglove extension.
Download all Foxglove layout configurations available in nova_carter repository.