
isaac_ros_ess #
Source code available on GitHub.
Quickstart#
Set Up Development Environment#
Set up your development environment by following the instructions in getting started.
(Optional) Install dependencies for any sensors you want to use by following the sensor-specific guides.
Note
We strongly recommend installing all sensor dependencies before starting any quickstarts. Some sensor dependencies require restarting the development environment during installation, which will interrupt the quickstart process.
Download Quickstart Assets#
Download quickstart data from NGC:
Make sure required libraries are installed.
sudo apt-get install -y curl jq tar
Then, run these commands to download the asset from NGC:
NGC_ORG="nvidia"
NGC_TEAM="isaac"
PACKAGE_NAME="isaac_ros_ess"
NGC_RESOURCE="isaac_ros_ess_assets"
NGC_FILENAME="quickstart.tar.gz"
MAJOR_VERSION=5
MINOR_VERSION=0
VERSION_REQ_URL="https://api.ngc.nvidia.com/v2/resources/$NGC_ORG/$NGC_TEAM/$NGC_RESOURCE/versions"
AVAILABLE_VERSIONS=$(curl -s \
    -H "Accept: application/json" "$VERSION_REQ_URL")
LATEST_VERSION_ID=$(echo $AVAILABLE_VERSIONS | jq -r "
    .recipeVersions[]
    | .versionId as \$v
    | \$v | select(test(\"^\\\\d+\\\\.\\\\d+\\\\.\\\\d+$\"))
    | split(\".\") | {major: .[0]|tonumber, minor: .[1]|tonumber, patch: .[2]|tonumber}
    | select(.major == $MAJOR_VERSION and .minor <= $MINOR_VERSION)
    | \$v
    " | sort -V | tail -n 1
)
if [ -z "$LATEST_VERSION_ID" ]; then
    echo "No corresponding version found for Isaac ROS $MAJOR_VERSION.$MINOR_VERSION"
    echo "Found versions:"
    echo $AVAILABLE_VERSIONS | jq -r '.recipeVersions[].versionId'
else
    mkdir -p ${ISAAC_ROS_WS}/isaac_ros_assets && \
    FILE_REQ_URL="https://api.ngc.nvidia.com/v2/resources/$NGC_ORG/$NGC_TEAM/$NGC_RESOURCE/\
versions/$LATEST_VERSION_ID/files/$NGC_FILENAME" && \
    curl -LO --request GET "${FILE_REQ_URL}" && \
    tar -xf ${NGC_FILENAME} -C ${ISAAC_ROS_WS}/isaac_ros_assets && \
    rm ${NGC_FILENAME}
fi
Build isaac_ros_ess #
Activate the Isaac ROS environment:
isaac-ros activateInstall the prebuilt Debian package:
sudo apt-get update
sudo apt-get install -y ros-lyrical-isaac-ros-ess && \
   sudo apt-get install -y ros-lyrical-isaac-ros-ess-models-install
Download and install the pre-trained ESS model files:
ros2 run isaac_ros_ess_models_install install_ess_models.sh --eula
Install Git LFS:
sudo apt-get install -y git-lfs && git lfs install
Clone this repository under
${ISAAC_ROS_WS}/src:cd ${ISAAC_ROS_WS}/src && \ git clone -b release-5.0 https://github.com/NVIDIA-ISAAC-ROS/isaac_ros_dnn_stereo_depth.git isaac_ros_dnn_stereo_depth
Activate the Isaac ROS environment:
isaac-ros activateUse
rosdepto install the package’s dependencies:sudo apt-get update
rosdep update && rosdep install --from-paths ${ISAAC_ROS_WS}/src/isaac_ros_dnn_stereo_depth/isaac_ros_ess --ignore-src -y
Download and install the pre-trained ESS model files:
ros2 run isaac_ros_ess_models_install install_ess_models.sh --eula
Build the package from source:
cd ${ISAAC_ROS_WS} && \
   colcon build --packages-up-to isaac_ros_ess --base-paths ${ISAAC_ROS_WS}/src/isaac_ros_dnn_stereo_depth/isaac_ros_ess
Source the ROS workspace:
Note
Make sure to repeat this step in every terminal created inside the Isaac ROS environment.
Since this package was built from source, the enclosing workspace must be sourced for ROS to be able to find the package’s contents.
source install/setup.bash
Note
Limitations on x86_64: ESS plugins only run with GPU with sm80 and above. This limits the GPU devices on x86_64 to devices with compute_80 and above. For CUDA compute capability details, refer to cuda-gpus.
Run Launch File#
Continuing inside the Isaac ROS environment, install the following dependencies:
sudo apt-get update
sudo apt-get install -y ros-lyrical-isaac-ros-examples
Run the following launch file to spin up a demo using quickstart rosbag:
To run ESS at a threshold of 0.0 (fully dense output):
ros2 launch isaac_ros_examples isaac_ros_examples.launch.py launch_fragments:=ess_disparity \
   engine_file_path:=${ISAAC_ROS_WS:?}/isaac_ros_assets/models/dnn_stereo_disparity/dnn_stereo_disparity_v4.1.0_onnx_trt10.16/ess.engine \
   ess_plugin_file_path:=${ISAAC_ROS_WS:?}/isaac_ros_assets/models/dnn_stereo_disparity/dnn_stereo_disparity_v4.1.0_onnx_trt10.16/plugins/$(uname -m)/ess_plugins.so \
   threshold:=0.0
Open a second terminal and attach to the container:
isaac-ros activate
In the second terminal, play the ESS sample rosbag downloaded in the quickstart assets:
ros2 bag play -l ${ISAAC_ROS_WS}/isaac_ros_assets/isaac_ros_ess/rosbags/ess_rosbag \
   --remap /left/camera_info:=/left/camera_info_rect /right/camera_info:=/right/camera_info_rect
Note
This tutorial requires a compatible RealSense camera from the list of available cameras
Ensure that you have already set up your RealSense camera using the RealSense setup tutorial. If you have not, set up the sensor and then restart this quickstart from the beginning.
Continuing inside the Isaac ROS environment, install the following dependencies:
sudo apt-get update
sudo apt-get install -y ros-lyrical-isaac-ros-examples ros-lyrical-isaac-ros-realsense
Complete steps to set up the ESS model as described in the quickstart.
Continuing inside the Isaac ROS environment, run the following launch file to spin up a demo using RealSense stereo camera:
To run at a threshold of 0.4:
ros2 launch isaac_ros_examples isaac_ros_examples.launch.py launch_fragments:=realsense_stereo_rect,ess_disparity \
   engine_file_path:=${ISAAC_ROS_WS}/isaac_ros_assets/models/dnn_stereo_disparity/dnn_stereo_disparity_v4.1.0_onnx_trt10.16/ess.engine \
   ess_plugin_file_path:=${ISAAC_ROS_WS}/isaac_ros_assets/models/dnn_stereo_disparity/dnn_stereo_disparity_v4.1.0_onnx_trt10.16/plugins/$(uname -m)/ess_plugins.so \
   threshold:=0.4 realsense_config_file:=$(ros2 pkg prefix isaac_ros_ess --share)/config/realsense.yaml
ros2 launch isaac_ros_examples isaac_ros_examples.launch.py launch_fragments:=realsense_stereo_rect,ess_disparity \
   engine_file_path:=${ISAAC_ROS_WS}/isaac_ros_assets/models/dnn_stereo_disparity/dnn_stereo_disparity_v4.1.0_onnx_trt10.16/light_ess.engine \
   ess_plugin_file_path:=${ISAAC_ROS_WS}/isaac_ros_assets/models/dnn_stereo_disparity/dnn_stereo_disparity_v4.1.0_onnx_trt10.16/plugins/$(uname -m)/ess_plugins.so \
   threshold:=0.4 realsense_config_file:=$(ros2 pkg prefix isaac_ros_ess --share)/config/realsense.yaml
Ensure that you have already set up your ZED camera using ZED setup tutorial.
Continuing inside the Isaac ROS environment, install dependencies:
sudo apt-get update
sudo apt-get install -y ros-lyrical-isaac-ros-examples ros-lyrical-isaac-ros-depth-image-proc ros-lyrical-isaac-ros-stereo-image-proc ros-lyrical-isaac-ros-zed
To run at a threshold of 0.4:
ros2 launch isaac_ros_examples isaac_ros_examples.launch.py launch_fragments:=zed_stereo_rect,ess_disparity \
   engine_file_path:=${ISAAC_ROS_WS}/isaac_ros_assets/models/dnn_stereo_disparity/dnn_stereo_disparity_v4.1.0_onnx_trt10.16/ess.engine \
   ess_plugin_file_path:=${ISAAC_ROS_WS}/isaac_ros_assets/models/dnn_stereo_disparity/dnn_stereo_disparity_v4.1.0_onnx_trt10.16/plugins/$(uname -m)/ess_plugins.so \
   threshold:=0.4 zed_config_file:=$(ros2 pkg prefix isaac_ros_ess --share)/config/zed.yaml \
   interface_specs_file:=${ISAAC_ROS_WS}/isaac_ros_assets/isaac_ros_ess/zed2_quickstart_interface_specs.json
ros2 launch isaac_ros_examples isaac_ros_examples.launch.py launch_fragments:=zed_stereo_rect,ess_disparity \
engine_file_path:=${ISAAC_ROS_WS}/isaac_ros_assets/models/dnn_stereo_disparity/dnn_stereo_disparity_v4.1.0_onnx_trt10.16/light_ess.engine \
ess_plugin_file_path:=${ISAAC_ROS_WS}/isaac_ros_assets/models/dnn_stereo_disparity/dnn_stereo_disparity_v4.1.0_onnx_trt10.16/plugins/$(uname -m)/ess_plugins.so \
threshold:=0.4 zed_config_file:=$(ros2 pkg prefix isaac_ros_ess --share)/config/zed.yaml \
interface_specs_file:=${ISAAC_ROS_WS}/isaac_ros_assets/isaac_ros_ess/zed2_quickstart_interface_specs.json
Note
If you are using the ZED X series, replace zed2_quickstart_interface_specs.json with zedx_quickstart_interface_specs.json in the above command.
Visualize Output#
Open a terminal and attach to the container:
isaac-ros activate
Install
cv_bridge:
sudo apt-get install -y ros-lyrical-cv-bridge
In the terminal, visualize and validate the disparity output using the visualizer script:
ros2 run isaac_ros_dnn_stereo_decoder isaac_ros_dnn_stereo_visualizer.pyWith threshold set to 0.4, the example result is:
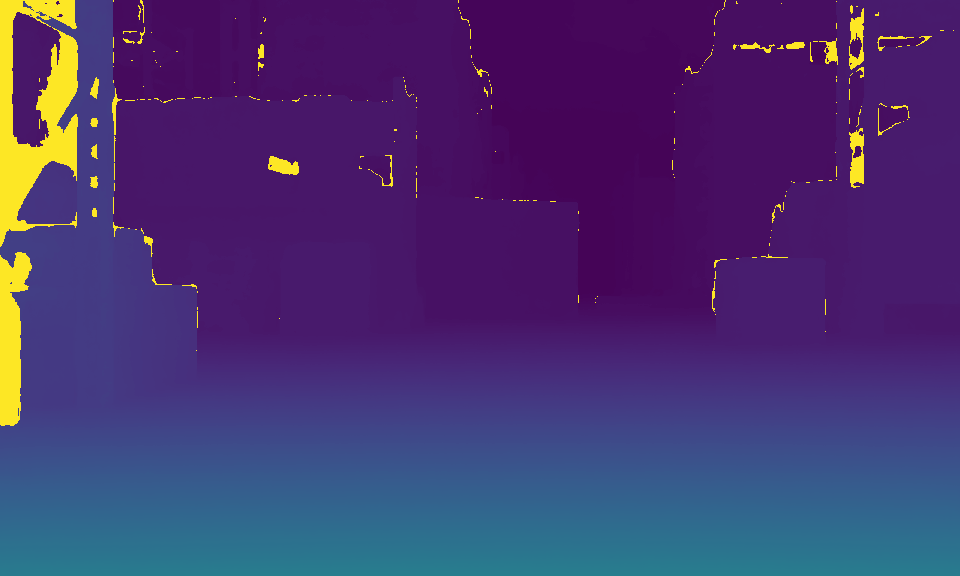
With threshold set to 0.0, the example result is:

Connect Foxglove Studio and setup an Image panel to visualize depth image using topic /depth.
Try More Examples#
To continue your exploration, check out the following suggested examples:
Troubleshooting#
Package not found while launching the visualizer script#
Symptom#
$ ros2 run isaac_ros_dnn_stereo_decoder isaac_ros_dnn_stereo_visualizer.py
Package 'isaac_ros_dnn_stereo_decoder' not found
Solution#
Use the colcon build --packages-up-to isaac_ros_dnn_stereo_decoder command to build
isaac_ros_dnn_stereo_decoder; do not use the --symlink-install option. Run
source install/setup.bash after the build.
Problem reserving CacheChange in reader#
Symptom#
When using a rosbag as input, isaac_ros_ess throws an error if the
input topics are published too fast:
[component_container-1] 2022-06-24 09:04:43.584 [RTPS_MSG_IN Error] (ID:281473268431152) Problem reserving CacheChange in reader: 01.0f.cd.10.ab.f2.65.b6.01.00.00.00|0.0.20.4 -> Function processDataMsg
Solution#
Make sure that the rosbag has a reasonable size and publish rate.
Isaac ROS Troubleshooting#
For solutions to problems with Isaac ROS, review here.
API#
Overview#
The isaac_ros_ess package offers functionality to generate a stereo
disparity map from stereo images using a trained ESS model. Given a pair
of stereo input images, the package generates a continuous disparity
image for the left input image.
The package uses the DNNStereoDecoderNode
from the isaac_ros_dnn_stereo_decoder package to process the model output and generate the disparity map.
Usage#
ros2 launch isaac_ros_ess isaac_ros_ess.launch.py engine_file_path:=<your ESS engine plan absolute path> ess_plugin_file_path:=<your ESS plugin library (.so) absolute path>
Input Restrictions#
The input left and right images must have the same dimension and resolution, and the resolution must be no larger than 1920x1200.
Output Interpretations#
The
isaac_ros_esspackage outputs a disparity image with dimension same as the ESS model output dimension.ESS Model
Output Dimension
ess.onnx960 x 576
light_ess.onnx480 x 288
The input images are rescaled to the ESS model input dimension before inferencing. There are two outputs from the ESS model with the same dimension: disparity output and confidence output. The disparity is filtered with confidence using a pre-configured threshold. Pixels with confidence less than the threshold is replaced with -1.0 as invalid before the inference result is published. For fully dense disparity output without confidence thresholding, set the threshold to 0.0.
The left and right
CameraInfoare used to composite astereo_msgs/DisparityImage. If you only care about the disparity image, and don’t need the baseline and focal length information, you can pass dummy camera messages.