Isaac Sim Examples#
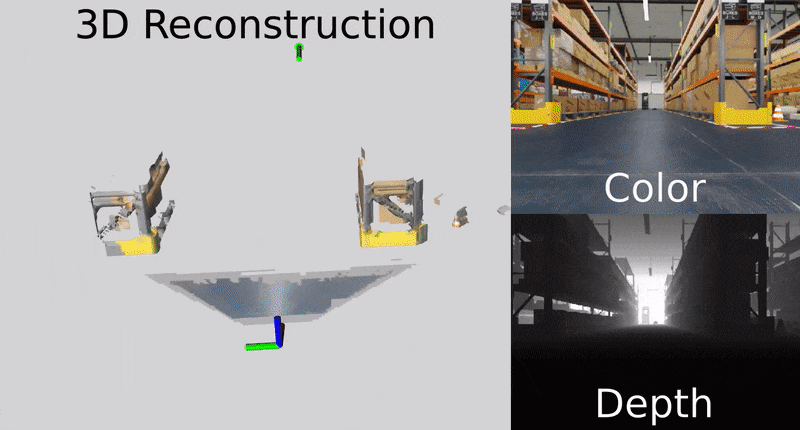
This page contains tutorials for running Isaac ROS Nvblox on simulated data streaming out of Isaac Sim. The tutorial builds a reconstruction from simulated (depth) image data. The reconstruction is converted to a 2D costmap that is passed to Nav2 and used for navigation. The tutorial describes options for using Isaac ROS Visual SLAM and Isaac ROS DNN Stereo Depth for pose and depth estimation respectively, and for reconstruction in the presence of people and other dynamic objects.
Hardware Requirements#
Simulating the scene and robot sensors requires an RTX-enabled GPU of sufficient capability and memory capacity. In particular, we recommend an “ideal” machine in the Isaac Sim requirements.
Note
The sample scene is at the path:
https://omniverse-content-production.s3-us-west-2.amazonaws.com/Assets/Isaac/5.1/Isaac/Samples/NvBlox/nvblox_sample_scene.usd
It simulates the output for a 3d lidar and three stereo cameras (depth + color images) by default. If your system is experiencing compute or memory issue while running the scene, disabling Isaac Create Render Product for some of the sensors can reduce the system load.
Prerequisites#
These are the steps common to running all Nvblox examples in Isaac Sim. You must:
Complete the Getting Started.
Complete the Isaac ROS Isaac Sim Setup Guide.
Install#
Complete the nvblox quickstart.
Isaac Sim Example#
This example runs a nvblox-based reconstruction with Isaac Sim supplying images, ground-truth depth, and poses from Isaac Sim. The reconstruction is used for navigation with Nav2.
Terminal #1:
Opening a terminal from the Isaac Sim launcher GUI, as described in Isaac ROS Isaac Sim Setup Guide.
Start the simulation by running:
./isaac-sim.sh
Open the scene at the path:
https://omniverse-content-production.s3-us-west-2.amazonaws.com/Assets/Isaac/5.1/Isaac/Samples/NvBlox/nvblox_sample_scene.usd
Play the scene to start the ROS communication from sim.
Terminal #2:
Activate the Isaac ROS environment (if not started in the install step):
isaac-ros activateNavigate (inside the Isaac ROS environment) to the workspace folder and source the workspace:
cd /workspaces/isaac_ros-dev
source install/setup.bash
Install
nav2for enabling navigation.sudo apt-get install -y ros-jazzy-nav2-bringup ros-jazzy-nav2-route
Install and set the environment variable for Cyclone DDS:
sudo apt-get install -y ros-jazzy-rmw-cyclonedds-cpp
export RMW_IMPLEMENTATION=rmw_cyclonedds_cpp
Launch the example:
ros2 launch nvblox_examples_bringup isaac_sim_example.launch.py
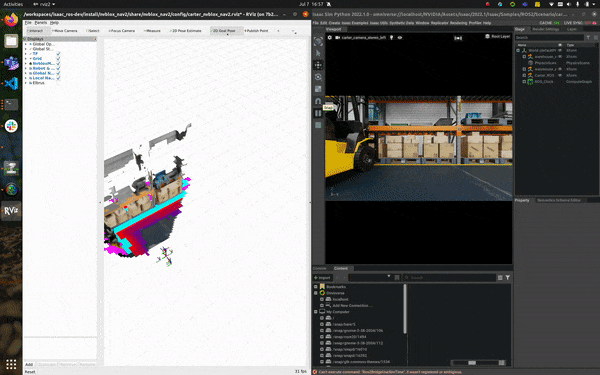
In RViz
Click on the 2D Goal Pose button. Validate that you see the mesh, costmap, and the robot moving towards the goal location, as shown at the top of this page.
Selecting the Sensors#
Nvblox can integrate data from 3d lidar and up to 3 cameras simultaneously.
To enable the 3d lidar or more cameras you may use the lidar and num_cameras arguments by
modifying the following command from Isaac Sim Example:
Terminal #2:
Launch the example:
ros2 launch nvblox_examples_bringup isaac_sim_example.launch.py \
lidar:=<"lidar"> num_cameras:=<"num_cameras">
where “lidar” can be set to
Trueto enable 3d lidar and “num_cameras” is either 0, 1 or 3. Setting “num_cameras” to 1 will enable the front stereo camera (default) and setting it to 3 will enable the side stereo cameras additionally.
Reconstruction With People#

This tutorial demonstrates how to perform dynamic people reconstruction in Nvblox using ground-truth people segmentation from Isaac Sim. For more information on how people reconstruction works, see Technical Details.
To run this example modify the following commands from Isaac Sim Example:
Terminal #1:
Opening a terminal from the Isaac Sim launcher GUI, as described in Isaac ROS Isaac Sim Setup Guide.
Start the simulation by running:
./isaac-sim.sh
Open the scene at the path:
https://omniverse-content-production.s3-us-west-2.amazonaws.com/Assets/Isaac/5.1/Isaac/Samples/NvBlox/nvblox_sample_scene.usd
Toggle /World/Humans to choose to have the scene with people.
Play the scene to start the ROS communication from sim.
Note
Because the animation requires execution of Python scripts, running the scene with the UI asks you to confirm that you want to enable script execution. Click Yes to make it possible to start the scene and the people animation.
Terminal #2:
Launch the example:
ros2 launch nvblox_examples_bringup isaac_sim_example.launch.py \
mode:=people_segmentation num_cameras:=1
Note
Multi-camera and lidar data integration is not supported in
people_segmentationmode.
Reconstruction With Dynamic Scene Elements#
This tutorial demonstrates how to build a reconstruction with dynamic elements in the scene (people and non-people) using Isaac Sim data. For more information about how dynamic reconstruction works in Nvblox see Technical Details.
To run this example modify the following commands from Isaac Sim Example:
Terminal #1:
Opening a terminal from the Isaac Sim launcher GUI, as described in Isaac ROS Isaac Sim Setup Guide.
Start the simulation by running:
./isaac-sim.sh
Open the scene at the path:
https://omniverse-content-production.s3-us-west-2.amazonaws.com/Assets/Isaac/5.1/Isaac/Samples/NvBlox/nvblox_sample_scene.usd
Toggle /World/Dynamics to choose to have the scene with dynamics.
Play the scene to start the ROS communication from sim.
Terminal #2:
Launch the example:
ros2 launch nvblox_examples_bringup isaac_sim_example.launch.py \
mode:=dynamic
Note
Lidar data integration is not supported in dynamic mode.
Running on a Custom Scene#
To test the reconstruction on another scene:
Make sure you use the same robot USD so that the topic names and Isaac Sim ROS bridge is correctly set up.
Make sure that humans you add to the scene have the
personsemantic segmentation class. To do so, you can use the Semantics Schema Editor on the top prim of the additional humans.
Troubleshooting#
See Isaac Sim Issues.