Tutorial: Running Camera-based 3D Perception with Isaac Perceptor with the Nova Orin Developer Kit
This tutorial walks you through using Isaac Perceptor on the Nova Orin Developer Kit. Isaac Perceptor uses Isaac ROS components, including Visual SLAM to localize the robot, ESS and Nvblox to reconstruct 3D environments.
For this tutorial, you must have successfully completed the Tutorial: running all sensors on the Nova Orin Developer Kit.
Running the Application
SSH into the Nova Orin Developer Kit (instructions).
Build/install the required packages and run the app:
Pull the Docker image:
docker pull nvcr.io/nvidia/isaac/nova_developer_kit_bringup:release_3.2-aarch64
Run the Docker image:
docker run --privileged --network host \
    -v /dev/*:/dev/* \
    -v /tmp/argus_socket:/tmp/argus_socket \
    -v /etc/nova:/etc/nova \
    nvcr.io/nvidia/isaac/nova_developer_kit_bringup:release_3.2-aarch64 \
    ros2 launch nova_developer_kit_bringup perceptor.launch.py
1. Make sure you followed the Prerequisites and you are inside the Isaac ROS Docker container.
Install the required Debian packages:
sudo apt update
sudo apt-get install -y ros-humble-nova-developer-kit-bringup
source /opt/ros/humble/setup.bash
Install the required assets:
sudo apt-get install -y ros-humble-isaac-ros-peoplesemseg-models-install ros-humble-isaac-ros-ess-models-install
source /opt/ros/humble/setup.bash

ros2 run isaac_ros_ess_models_install install_ess_models.sh --eula
ros2 run isaac_ros_peoplesemseg_models_install install_peoplesemsegnet_vanilla.sh --eula
ros2 run isaac_ros_peoplesemseg_models_install install_peoplesemsegnet_shuffleseg.sh --eula
4. Declare
ROS_DOMAIN_IDwith the same unique ID (number between 0 and 101) on every bash instance inside the Docker container:export ROS_DOMAIN_ID=<unique ID>
Run the file:
ros2 launch nova_developer_kit_bringup perceptor.launch.py1. Make sure you followed the Prerequisites and you are inside the Isaac ROS Docker container.
Use
rosdepto install the package’s dependencies:sudo apt update rosdep update rosdep install -i -r --from-paths ${ISAAC_ROS_WS}/src/nova_developer_kit/nova_developer_kit_bringup/ \ --rosdistro humble -y
Install the required assets:
sudo apt-get install -y ros-humble-isaac-ros-peoplesemseg-models-install ros-humble-isaac-ros-ess-models-install
source /opt/ros/humble/setup.bash

ros2 run isaac_ros_ess_models_install install_ess_models.sh --eula
ros2 run isaac_ros_peoplesemseg_models_install install_peoplesemsegnet_vanilla.sh --eula
ros2 run isaac_ros_peoplesemseg_models_install install_peoplesemsegnet_shuffleseg.sh --eula
Build the ROS package in the Docker container:
colcon build --symlink-install --packages-up-to nova_developer_kit_bringup
source install/setup.bash
5. Declare
ROS_DOMAIN_IDwith the same unique ID (number between 0 and 101) on every bash instance inside the Docker container:export ROS_DOMAIN_ID=<unique ID>
Run the file:
ros2 launch nova_developer_kit_bringup perceptor.launch.py
Note
Launch the application following the mounting guide for correct mounting procedures and configuration changes.
Customizing Sensor Configurations
By default, as specified in the launch file perceptor.launch.py, all 3 stereo
cameras available on the Nova Orin Developer Kit (front, left, right) are used in
Isaac Perceptor algorithms.
You may use the stereo_camera_configuration launch argument to customize camera
configurations when running Isaac Perceptor.
For example, to use only front stereo camera for 3D reconstruction and visual SLAM you could run the following launch command:
ros2 launch nova_developer_kit_bringup perceptor.launch.py \
    stereo_camera_configuration:=front_configuration
For example, to use only front stereo camera for 3D reconstruction, visual SLAM and people reconstruction, you could run the following launch command:
ros2 launch nova_developer_kit_bringup perceptor.launch.py \
    stereo_camera_configuration:=front_people_configuration
For a detailed description of all available configurations refer to Tutorial: Stereo Camera Configurations for Isaac Perceptor.
Mapping and Localization
In order to create maps and localize, refer to Tutorial: Mapping and Localization with Isaac Perceptor.
Visualizing the Outputs
Make sure you complete Visualization Setup. This is required to visualize the Isaac nvblox mesh in a recommended layout configuration.
Open the Foxglove studio on your remote machine.
If you are not running a configuration with people reconstruction, open the
nova_developer_kit_perceptor.jsonlayout file downloaded in the previous step.If you are running a configuration with people reconstruction, open the
nova_developer_kit_perceptor_with_people.jsonlayout file downloaded in the previous step.
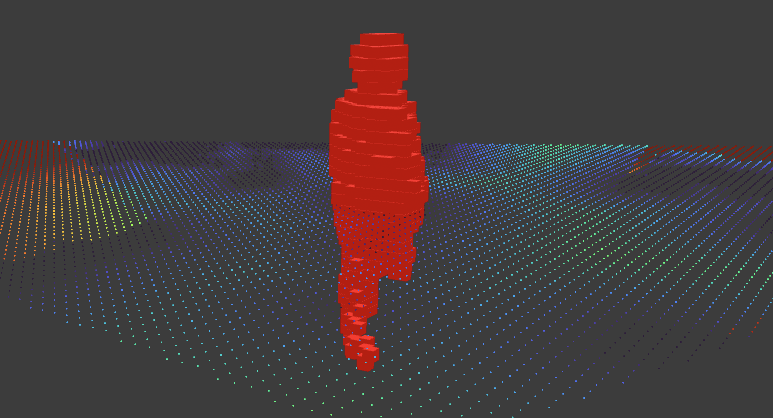
In Foxglove, it shows a visualization of the Nova Orin Developer Kit platform and Isaac nvblox mesh visualization of surrounding environments. Verify that you see a visualization similar to the image below. In the mesh, it shows the reconstructed colored voxels, the computed distance map from Isaac nvblox outputs. The colored voxels are uniformly reconstructed with a resolution of 5cm. The rainbow color spectrum reflects the proximity of each region to nearest obstacles. Regions closer to obstacle surfaces are marked in warmer colors (red, orange), while regions further away from obstacle surfaces are marked in cooler colors (blue, violet).

If running a configuration with people reconstruction, in addition, you can see highlighted red voxels shown in the reconstructed mesh. It visualizes people perceived in the field of view of one or more cameras. In the default
nova_developer_kit_perceptor_with_people.jsonlayout file, only/nvblox_node/dynamic_occupancy_layeris visualized and shown as the red voxels.
Note
For a better visualization experience, some topics requiring a large bandwidth are not available
to Foxglove studio. You can set use_foxglove_whitelist:=False as additional argument
when running the app. Most likely the image stream will be fairly choppy given its large
bandwidth. To learn more about topics published by Isaac nvblox, see
nvblox ROS messages.
For topics published by Isaac visual SLAM, see
cuvslam ROS messages.
Evaluating Isaac Perceptor
Follow these instructions to assert that Isaac Perceptor is performing as expected.
Isaac nvblox continuously measures computation efficiency metrics and will report them in the terminal on request. To turn on rate output change the following configurations from
falsetotruein the file$ISAAC_ROS_WS/src/isaac_perceptor/isaac_ros_perceptor_bringup/params/nvblox_perceptor.yaml:print_rates_to_console: true print_delays_to_console: true
Verify that you see metrics similar to the following:
nvblox Ratesreports how the frequencies of specific events happening in nvblox. For the 3-camera configuration, you are expected to seeros/depth_image_callbackat 60Hz, andros/color_image_callbackat 90Hz. For the 1-camera configuration, you are expected to seeros/depth_image_callbackat 30Hz, andros/color_image_callbackat 30Hz.
nvblox Rates (in Hz)
namespace/tag - NumSamples (Window Length) - Mean
-----------
ros/color                   100              13.2
ros/depth                   100              60.4
ros/depth_image_callback    100              60.8
ros/color_image_callback    100              90.8
ros/update_esdf             100              7.2
mapper/stream_mesh          100              4.5
ros/tick                    100              16.7
-----------
nvblox Delaysreports the average compute time a node takes in second based on a certain number of samples. You are expected to seeros/esdf_integrationat 100 ~ 200 ms.
nvblox Delays
namespace/tag - NumSamples (Window Length) - Mean Delay (seconds)
-----------
ros/esdf_integration        100              0.174
ros/depth_image_integration 100              0.152
ros/color_image_integration 100              0.129
ros/depth_image_callback    100              0.106
ros/color_image_callback    100              0.068
-----------
To further evaluate the quality of Isaac Perceptor, you can perform the following tests.
Choose objects above 10cm with various heights, and place them in front of any camera specified in the
stereo_camera_configurationlaunch argument. Vary the distance to the camera (e.g. 1m, 3m, 5m, 7m). Verify that you see the object in the distance map visualization. Additionally, you may also use the Measure Tool in the top panel to measure the distance between the object surface and the camera center.For instance, a pallet at the height of 10cm and a box at the height of 50cm are placed in front of the front stereo camera. We vary its distance to the robot at 0.4m, 1.0m, 3.0m, 5.0m. In the 3D view, you could see colored voxels visualizing the pallet and the box (illustrated by bounding boxes in green and blue). The proximity value measured by Measure Tool shows the distance between the front camera and perceived objects. You are expected to obtain similar proximity value with the distance you place objects at.


You are advised to follow Technical Details to understand how scene reconstruction works.
Note
Objects detection range shown in the reconstructed 3D mesh is sensitive to the sensor calibration accuracy. Ensure you follow the mounting guide for correct mounting procedures, and configuration changes.
Ensure Nova Orin Developer Kit is stationary. You are expected to see no drift from the Nova Orin Developer Kit visualization with reference to the odometry frame. You are advised to follow cuVSLAM to understand how visual SLAM works.
After you complete this tutorial, return to Camera-based Perception with Isaac Perceptor on Nova Orin Developer Kit to proceed with other tutorials.