Tutorial for Multi-camera Visual SLAM Using HAWK Cameras
Overview
This tutorial walks you through setting up Multi-camera SLAM based on Isaac ROS Visual SLAM with a Multiple Hawk cameras mounted on Nova Carter or Nova Orin Developer Kit
Tutorial Walkthrough - Multi-camera Visual SLAM Execution
Complete the Nova Carter setup tutorial.
Complete the Robot teleoperation tutorial with the required packages installed from the apt repository or built from source.
[Terminal 1] Clone the Isaac ROS Examples repository:
cd ${ISAAC_ROS_WS}/src
git clone -b release-3.2 https://github.com/NVIDIA-ISAAC-ROS/isaac_ros_examples.git isaac_ros_examples
[Terminal 1] Open a new terminal and run the Docker container:
cd ${ISAAC_ROS_WS}/src/isaac_ros_common
./scripts/run_dev.sh
[Terminal 1] Inside the running container, build and source the workspace:
cd ${ISAAC_ROS_WS}
colcon build --symlink-install \
    --packages-up-to nova_carter_bringup isaac_ros_multicamera_vo \
    --packages-skip isaac_ros_ess_models_install isaac_ros_peoplesemseg_models_install
source install/setup.bash
[Terminal 1] Run the launch file, which launches the multi-camera visual slam and wait for 10 seconds:
ros2 launch isaac_ros_multicamera_vo isaac_ros_visual_slam_multihawk_carter.launch.py use_rosbag:=False
[Terminal 2] Attach another terminal to the running container to execute robot teleoperation:
cd ${ISAAC_ROS_WS}/src/isaac_ros_common
./scripts/run_dev.sh
[Terminal 2] Run the robot teleoperation with all sensors disabled:
source ${ISAAC_ROS_WS}/install/setup.bash
ros2 launch nova_carter_bringup teleop.launch.py \
    enable_wheel_odometry:=False \
    enabled_stereo_cameras:=none \
    enabled_fisheye_cameras:=none \
    enabled_2d_lidars:=none \
    enable_3d_lidar:=False \
    run_foxglove:=False
Complete the Nova Orin Developer Kit setup tutorial and Nova Orin Developer Kit sensor setup tutorial with the required packages installed from the apt repository or built from source.
[Terminal 1] Clone the Isaac ROS Examples repository:
cd ${ISAAC_ROS_WS}/src
git clone -b release-3.2 https://github.com/NVIDIA-ISAAC-ROS/isaac_ros_examples.git isaac_ros_examples
[Terminal 1] Open a new terminal and run the Docker container:
cd ${ISAAC_ROS_WS}/src/isaac_ros_common
./scripts/run_dev.sh
[Terminal 1] Inside the running container, build and source the workspace:
cd ${ISAAC_ROS_WS}
colcon build --symlink-install \
    --packages-up-to nova_developer_kit_bringup isaac_ros_multicamera_vo \
    --packages-skip isaac_ros_ess_models_install isaac_ros_peoplesemseg_models_install
source install/setup.bash
[Terminal 1] Run the launch file, which launches the multi-camera visual slam and wait for 10 seconds:
ros2 launch isaac_ros_multicamera_vo isaac_ros_visual_slam_multihawk_devkit.launch.py use_rosbag:=False
Complete the Quick Start guide for Isaac ROS Visual Slam.
[Terminal 1] Clone the Isaac ROS Examples repository:
cd ${ISAAC_ROS_WS}/src
git clone -b release-3.2 https://github.com/NVIDIA-ISAAC-ROS/isaac_ros_examples.git isaac_ros_examples
[Terminal 1] Open a new terminal and run the Docker container:
cd ${ISAAC_ROS_WS}/src/isaac_ros_common
./scripts/run_dev.sh
Install the prebuilt dependencies:
sudo apt-get update
sudo apt-get install -y \
    ros-humble-image-proc \
    ros-humble-isaac-ros-h264-decoder \
    ros-humble-nova-carter-description
[Terminal 1] Inside the running container, build and source the workspace:
cd ${ISAAC_ROS_WS}
colcon build --symlink-install \
    --packages-up-to isaac_ros_multicamera_vo \
    --packages-skip isaac_ros_ess_models_install isaac_ros_peoplesemseg_models_install \
    --packages-ignore nova_carter_bringup
source install/setup.bash
[Terminal 1] Inside the running container launch the multi-camera visual odometry and wait for 10 seconds:
ros2 launch isaac_ros_multicamera_vo isaac_ros_visual_slam_multihawk_carter.launch.py use_rosbag:=True
[Terminal 2] Attach another terminal to the running container:
cd ${ISAAC_ROS_WS}/src/isaac_ros_common
./scripts/run_dev.sh
[Terminal 2] Download example rosbags from the r2b_2024 dataset.
mkdir -p ${ISAAC_ROS_WS}/isaac_ros_assets/rosbags/
cd ${ISAAC_ROS_WS}/isaac_ros_assets/rosbags/
wget --content-disposition https://api.ngc.nvidia.com/v2/resources/nvidia/isaac/r2bdataset2024/versions/1/zip -O r2bdataset2024_1.zip
unzip r2bdataset2024_1.zip
[Terminal 2] Replay the
r2b_galileoorr2b_whitetunnelrosbag:
ros2 bag play ${ISAAC_ROS_WS}/isaac_ros_assets/rosbags/r2b_galileo
Note
The rosbag contains H.264 compressed images, which means it
is additionally required to decode each of the 8 FHD
video streams. It is known that this may lead to performance
problems on a Jetson-based system. To improve the quality
of the visual odometry tracking on rosbags, it is
recommended to either use a powerful workstation or slow
down the playback speed using the CLI parameter --rate.
Tutorial Walkthrough - Visualizing the Outputs
Note
Images and landmarks visualization may impact the performance of Visual Odometry. Please use visualization
for debugging and demonstration purposes only. To enable landmark visualization, set the following parameters
to True in the launch file: enable_slam_visualization, enable_landmarks_view, enable_observations_view
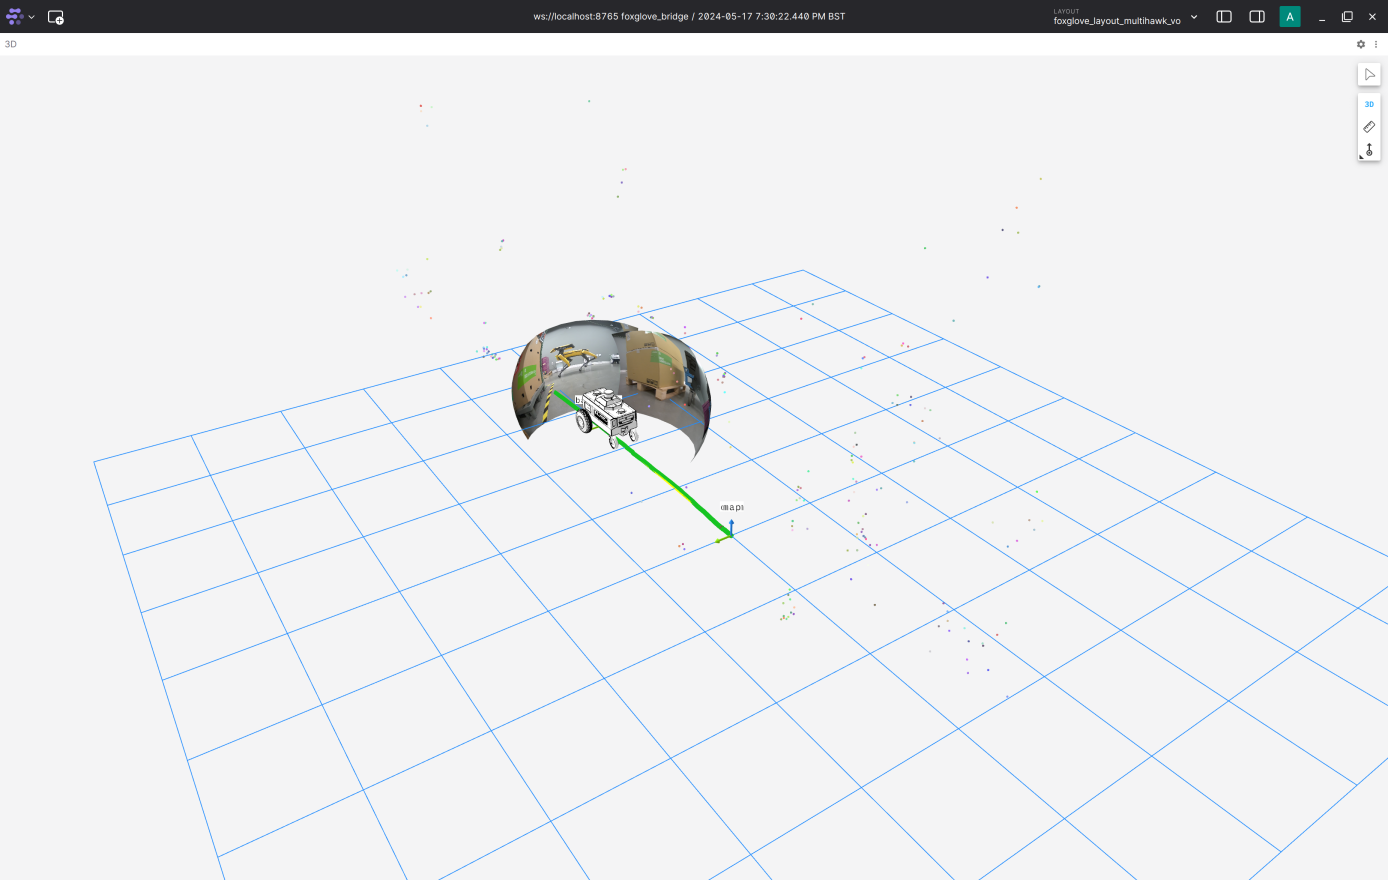
Visualization with Foxglove Studio
Note
These examples will stream the camera images in their full resolution to Foxglove Studio. This requires a substantial amount of bandwidth and is only done here for exemplary purposes. Most likely the image stream will be fairly choppy due to the large bandwidth. For a better visualization experience, we recommend only visualizing resized images or H.264 streams.
Complete the foxglove setup guide.
In Foxglove Studio open the
foxglove_layout_hawk.jsonlayout file, which can be found in the isaac_ros_multicamera_vo repository.Validate that you can see a visualization of the Nova Carter robot, images of the front and right stereo cameras, image landmarks and odometry path. You should expect a visualization similar to the following:
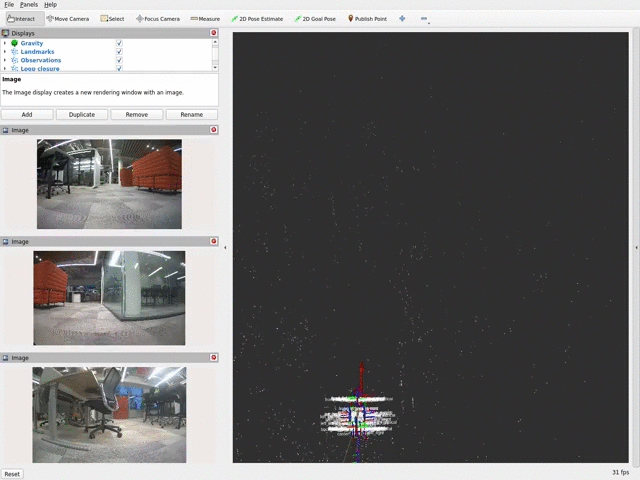
Visualization with RViz2
[Terminal 3] Attach another terminal to the running container to execute RViz2:
cd ${ISAAC_ROS_WS}/src/isaac_ros_common
./scripts/run_dev.sh
[Terminal 3] Open RViz2 from the new terminal attached to the running docker container:
source ${ISAAC_ROS_WS}/install/setup.bash
rviz2 -d ${ISAAC_ROS_WS}/src/isaac_ros_examples/isaac_ros_multicamera_vo/rviz/hawk_multicamera_vo.rviz
Make sure you see the visualization of the Nova Carter robot’s frame tree, images of the front and right stereo camera, image landmarks and odometry path. You should expect a visualization similar to the following:

SLAM Visualization
Note
Isaac ROS Visual can publish various SLAM-related topics. Specifically, during a Loop Closure event,
it publishes sparse visual features to the /visual_slam/vis/loop_closure_cloud topic and the poses
on the internal cuVSLAM map to the /visual_slam/vis/pose_graph_edges2 topic. To enable these features,
set the SLAM mode in the launch file by configuring the enable_localization_n_mapping parameter to true
and activate the visualization by setting the enable_slam_visualization parameter to true.
SLAM-related topics can be clearly visualized when replaying the r2b_whitetunnel rosbag as the robot returns.
The red dots indicate the correspondence between features in the current images and those stored in the internal map:
