Jetson Setup
If you are working on a Jetson developer kit, you’ll need a fast and large storage device to store container images and rosbag files. To add this storage capacity, install an NVMe SSD card in the Jetson developer kit’s carrier board.
Note
Connecting an SSD over USB 3.x is generally not recommended, because it has slower write/read speed than an SSD connected over NVMe (PCIe) interface.
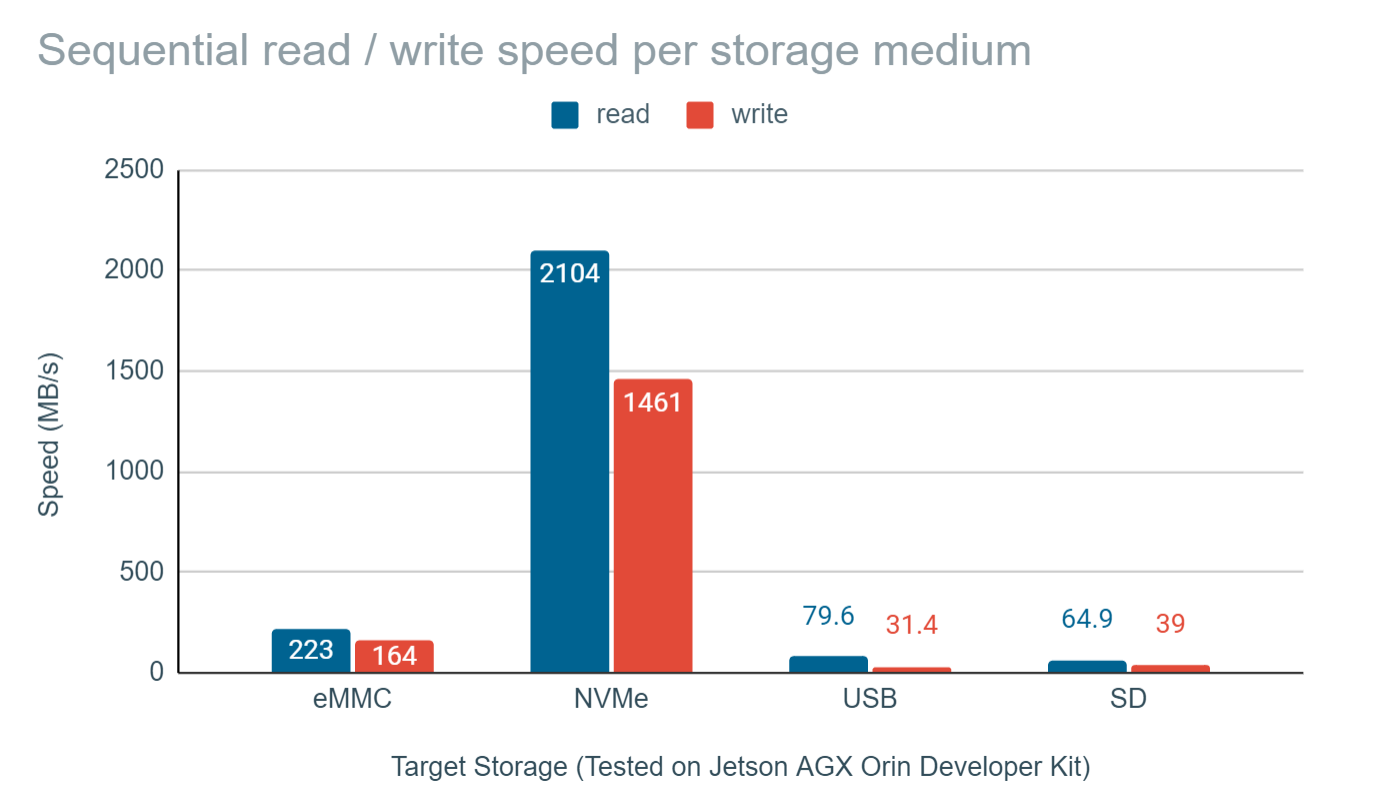
Read/Write Speed Comparison across Different Storage Medium including SSD
To properly configure your Jetson with an NVMe SSD choose one of the following:
Physically install the NVMe SSD on a fresh Jetson developer kit, then use SDK Manager running on an Ubuntu PC to flash the entire L4T (Jetson Linux) on the SSD.
Flash L4T onto the Jetson’s eMMC or on a microSD card, then physically install the NVMe SSD, and configure the SSD as optional storage for the ROS 2 workspace, and/or the Docker overlay files.
The first option is most straightforward, but requires a willingness to reflash the entire Jetson developer kit and thus lose any files already present on the device.
The second option requires more work, but saves the need to reflash the Jetson. The rest of this document explains how to configure an SSD using the second option. If you have a Jetson already set up and running without an NVMe SSD, follow the steps below.
SSD Setup
Physically Install SSD and Auto-Mount
Unplug the power and any peripherals from the Jetson developer kit.
Physically install an NVMe SSD card on the carrier board of your Jetson developer kit. You must properly seat the connector and secure it with the screw.
Reinsert the power cable and any peripherals, and power on the Jetson developer kit.
Verify that the system identifies a new memory controller on PCI bus:
lspci
Typical output looks like the following:
0007:01:00.0 Non-Volatile memory controller: Marvell Technology Group Ltd. Device 1322 (rev 02)
Run
lsblkto find the device name.lsblk
Typical output looks like the following:
NAME         MAJ:MIN RM   SIZE RO TYPE MOUNTPOINT
loop0          7:0    0    16M  1 loop
mmcblk1      179:0    0  59.5G  0 disk
├─mmcblk1p1  179:1    0    58G  0 part /
├─mmcblk1p2  179:2    0   128M  0 part
├─mmcblk1p3  179:3    0   768K  0 part
├─mmcblk1p4  179:4    0  31.6M  0 part
├─mmcblk1p5  179:5    0   128M  0 part
├─mmcblk1p6  179:6    0   768K  0 part
├─mmcblk1p7  179:7    0  31.6M  0 part
├─mmcblk1p8  179:8    0    80M  0 part
├─mmcblk1p9  179:9    0   512K  0 part
├─mmcblk1p10 179:10   0    64M  0 part
├─mmcblk1p11 179:11   0    80M  0 part
├─mmcblk1p12 179:12   0   512K  0 part
├─mmcblk1p13 179:13   0    64M  0 part
└─mmcblk1p14 179:14   0 879.5M  0 part
zram0        251:0    0   1.8G  0 disk [SWAP]
zram1        251:1    0   1.8G  0 disk [SWAP]
zram2        251:2    0   1.8G  0 disk [SWAP]
zram3        251:3    0   1.8G  0 disk [SWAP]
nvme0n1      259:0    0 238.5G  0 disk
Identify the device corresponding to your SSD. In this example, it is
nvme0n1.Format the SSD, create a mount point, and mount it to the filesystem.
sudo mkfs.ext4 /dev/nvme0n1
sudo mkdir -p /mnt/nova_ssd
sudo mount /dev/nvme0n1 /mnt/nova_ssd
To ensure that the mount persists after boot, add an entry to the
fstabfile:Identify the UUID for your SSD:
lsblk -fAdd a new entry to the
fstabfile:sudo vi /etc/fstab
Insert the following line, replacing the UUID with the value found from
lsblk -f:UUID=************-****-****-****-******** /mnt/nova_ssd/ ext4 defaults 0 2
Change the ownership of the
/mnt/nova_ssddirectory.sudo chown ${USER}:${USER} /mnt/nova_ssd
Migrate Docker directory to SSD
After installing the SSD and making it available to your device, you can use the extra storage capacity to hold the space-heavy Docker directory.
Add the
nvidiauser to the docker group to enable using docker without sudo:# Add your user to the docke group sudo usermod -aG docker $USER # Verify that command succeeded id nvidia | grep docker # Log out and log in for the changes to take effect newgrp docker
Stop the Docker service.
sudo systemctl stop docker
Move the existing Docker folder.
sudo du -csh /var/lib/docker/ && \
    sudo mkdir /mnt/nova_ssd/docker && \
    sudo rsync -axPS /var/lib/docker/ /mnt/nova_ssd/docker/ && \
    sudo du -csh  /mnt/nova_ssd/docker/
Use a text editor (e.g. Vi) to edit
/etc/docker/daemon.jsonsudo vi /etc/docker/daemon.json
Insert
"data-root"line similar to the following:{ "runtimes": { "nvidia": { "path": "nvidia-container-runtime", "runtimeArgs": [] } }, "default-runtime": "nvidia", "data-root": "/mnt/nova_ssd/docker" }
Rename the old Docker data directory.
sudo mv /var/lib/docker /var/lib/docker.old
Restart the Docker daemon.
sudo systemctl daemon-reload && \
    sudo systemctl restart docker && \
    sudo journalctl -u docker
Test Docker on SSD
[Terminal 1] Open a terminal to monitor the disk usage while pulling a Docker image.
watch -n1 df
[Terminal 2] Open a new terminal and begin the Docker pull.
docker pull nvcr.io/nvidia/l4t-base:r35.2.1
[Terminal 1] Observe that the disk usage on
/mnt/nova_ssdgoes up as the container image is downloaded and extracted.~$ docker image ls REPOSITORY TAG IMAGE ID CREATED SIZE nvcr.io/nvidia/l4t-base r35.2.1 dc07eb476a1d 7 months ago 713MB
Final Verification
Reboot your Jetson, and verify that you observe the following:
~$ sudo blkid | grep nvme
/dev/nvme0n1: UUID="9fc06de1-7cf3-43e2-928a-53a9c03fc5d8" TYPE="ext4"

~$ df -h
Filesystem      Size  Used Avail Use% Mounted on
/dev/mmcblk1p1  116G   18G   94G  16% /
none            3.5G     0  3.5G   0% /dev
tmpfs           3.6G  108K  3.6G   1% /dev/shm
tmpfs           734M   35M  699M   5% /run
tmpfs           5.0M  4.0K  5.0M   1% /run/lock
tmpfs           3.6G     0  3.6G   0% /sys/fs/cgroup
tmpfs           734M   88K  734M   1% /run/user/1000
/dev/nvme0n1    458G  824M  434G   1% /mnt/nova_ssd

~$ docker info | grep Root
 Docker Root Dir: /mnt/nova_ssd/docker

~$ sudo ls -l /mnt/nova_ssd/docker/
total 44
drwx--x--x  4 root root 4096 Mar 22 11:44 buildkit
drwx--x---  2 root root 4096 Mar 22 11:44 containers
drwx------  3 root root 4096 Mar 22 11:44 image
drwxr-x---  3 root root 4096 Mar 22 11:44 network
drwx--x--- 13 root root 4096 Mar 22 16:20 overlay2
drwx------  4 root root 4096 Mar 22 11:44 plugins
drwx------  2 root root 4096 Mar 22 16:19 runtimes
drwx------  2 root root 4096 Mar 22 11:44 swarm
drwx------  2 root root 4096 Mar 22 16:20 tmp
drwx------  2 root root 4096 Mar 22 11:44 trust
drwx-----x  2 root root 4096 Mar 22 16:19 volumes

~$ sudo du -chs /mnt/nova_ssd/docker/
752M    /mnt/nova_ssd/docker/
752M    total

~$ docker info | grep -e "Runtime" -e "Root"
 Runtimes: io.containerd.runtime.v1.linux nvidia runc io.containerd.runc.v2
 Default Runtime: nvidia
 Docker Root Dir: /mnt/nova_ssd/docker
Your Jetson is now set up with the SSD!
Troubleshooting
Check out our troubleshooting section for issues with setting up your development environment.