isaac_ros_cumotion_moveit#
Source code available on GitHub.
Quickstart#
Set Up Development Environment#
Set up your development environment by following the instructions in getting started.
(Optional) Install dependencies for any sensors you want to use by following the sensor-specific guides.
Note
We strongly recommend installing all sensor dependencies before starting any quickstarts. Some sensor dependencies require restarting the development environment during installation, which will interrupt the quickstart process.
Install isaac_ros_cumotion_moveit and Examples#
Activate the Isaac ROS environment:
isaac-ros activateInstall the prebuilt Debian package:
sudo apt-get update
sudo apt-get install -y ros-jazzy-isaac-ros-cumotion-examples
Clone this repository under
${ISAAC_ROS_WS}/src:cd ${ISAAC_ROS_WS}/src && \ git clone --recurse-submodules -b release-4.5 https://github.com/NVIDIA-ISAAC-ROS/isaac_ros_cumotion.git isaac_ros_cumotion
Activate the Isaac ROS environment:
isaac-ros activateUse
rosdepto install the package’s dependencies:sudo apt-get update
rosdep update && rosdep install --from-paths ${ISAAC_ROS_WS}/src/isaac_ros_cumotion --ignore-src -y
Build the package from source:
cd ${ISAAC_ROS_WS} && \
   colcon build --packages-up-to isaac_ros_cumotion_examples
Source the ROS workspace:
Note
Make sure to repeat this step in every terminal created inside the Isaac ROS environment.
Because this package was built from source, the enclosing workspace must be sourced for ROS to be able to find the package’s contents.
source install/setup.bash
Set Up MoveIt 2 with cuMotion#
Complete the following steps for your selected robot.
Launch the robot driver with the following command, substituting the robot’s IP address for
<ROBOT_IP_ADDRESS>, and replaceur10ewith the correct robot model (both here and in the steps below) if using a UR robot other than UR10e.ros2 launch ur_robot_driver ur_control.launch.py ur_type:=ur10e robot_ip:=<ROBOT_IP_ADDRESS> launch_rviz:=false
Open a new terminal inside the Isaac ROS environment and generate a URDF for the UR10e from the corresponding xacro:
isaac-ros activatemkdir -p ${ISAAC_ROS_WS}/isaac_ros_assets/urdf && \ xacro -o ${ISAAC_ROS_WS}/isaac_ros_assets/urdf/ur10e.urdf /opt/ros/jazzy/share/ur_description/urdf/ur.urdf.xacro ur_type:=ur10e name:=ur10e
Open another terminal inside the Isaac ROS environment and launch MoveIt (including RViz).
isaac-ros activateros2 launch isaac_ros_cumotion_examples ur.launch.py ur_type:=ur10e
Open another terminal inside the Isaac ROS environment and run the cuMotion planner node.
isaac-ros activateros2 launch isaac_ros_cumotion isaac_ros_cumotion.launch.py \ cumotion_action_server.xrdf_file_path:=$(ros2 pkg prefix --share isaac_ros_cumotion_robot_description)/xrdf/ur10e.xrdf \ cumotion_action_server.urdf_file_path:=${ISAAC_ROS_WS}/isaac_ros_assets/urdf/ur10e.urdf \ cumotion_action_server.tool_frame:=tool0
Open another terminal inside the Isaac ROS environment and enable the
allow_nonzero_velocity_at_trajectory_endparameter for thescaled_joint_trajectory_controller.isaac-ros activateros2 param set /scaled_joint_trajectory_controller allow_nonzero_velocity_at_trajectory_end true
On the UR teach pendant: Press play to enable the robot if it is not already enabled.
Follow the instructions in the franka_ros2 repository to set up the Franka ROS2 package and the Franka driver.
Launch MoveIt (including RViz).
ros2 launch isaac_ros_cumotion_examples franka.launch.py
In a separate terminal, run the cuMotion planner node. Remember to first
source install/setup.bashif package was built from source.isaac-ros activateros2 launch isaac_ros_cumotion isaac_ros_cumotion.launch.py \ cumotion_action_server.xrdf_file_path:=$(ros2 pkg prefix --share isaac_ros_cumotion_robot_description)/xrdf/franka.xrdf \ cumotion_action_server.urdf_file_path:=$(ros2 pkg prefix --share moveit_resources_panda_description)/urdf/panda.urdf \ cumotion_action_server.tool_frame:=panda_hand
Create a MoveIt configuration for your robot using the MoveIt setup assistant.
cuMotion requires a URDF as well as an XRDF file for the robot. URDFs are available for most common robot arms, but it may be necessary to create an XRDF file. Follow the Creating an XRDF file for a Custom Manipulator section of the Custom Manipulator tutorial.
Copy cuMotion’s planning configuration file to the MoveIt
configdirectory for your robot:cp ${ISAAC_ROS_WS}/src/isaac_ros_cumotion/isaac_ros_cumotion_moveit/config/isaac_ros_cumotion_planning.yaml \ PATH/TO/ROBOT_moveit_config/config/
In the MoveIt launch file for your robot (for example,
<ROBOT>_moveit_config/launch/<ROBOT>_moveit.launch.py), add the following entry to theparameterslist of theNode()constructor formove_group_node:{ "planning_pipelines": ["ompl", "isaac_ros_cumotion"] }
Install any additional required packages for your robot, and run
source install/setup.bashif building from source.Open another terminal inside the Isaac ROS environment and launch MoveIt (including RViz) using a suitable launch file for your robot, e.g.:
isaac-ros activateros2 launch ROBOT_moveit_config ROBOT_moveit.launch.py
Open another terminal inside the Isaac ROS environment and run the cuMotion planner node. Remember to first run
source install/setup.bashif package was built from source.isaac-ros activateros2 launch isaac_ros_cumotion isaac_ros_cumotion.launch.py \ cumotion_action_server.xrdf_file_path:=/path/to/ROBOT.xrdf \ cumotion_action_server.urdf_file_path:=/path/to/ROBOT.urdf \ cumotion_action_server.tool_frame:=<ROBOT_END_EFFECTOR_LINK>
Using the cuMotion Planner in MoveIt#
Enable cuMotion by ensuring that isaac_ros_cumotion and cuMotion are selected within the “Planning Library” pane within the “Context” tab in
the bottom left corner of the RViz window.
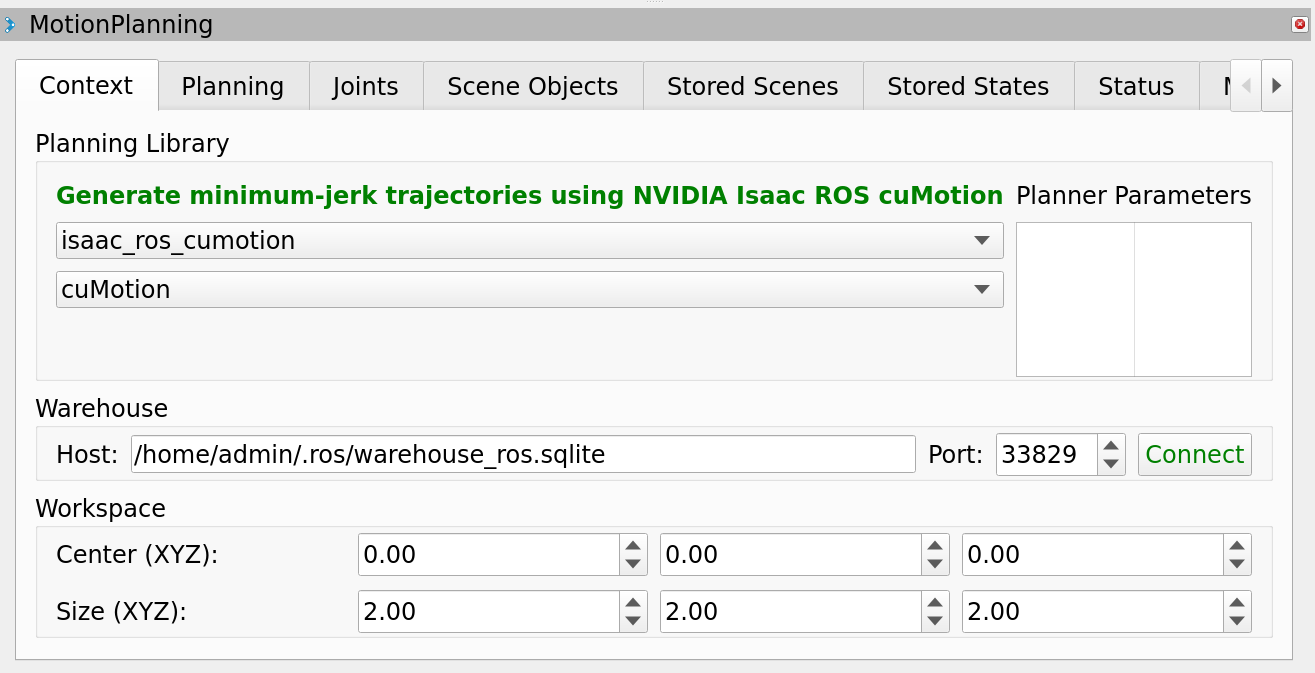
Then select a target pose for the robot end effector, and click the “Plan” button in the “Planning” tab. For a demonstration of collision-aware planning, first add one or more obstacles in the “Scene Objects” tab.
Note
The “Execute” and “Plan & Execute” buttons in RViz will only work if a physical robot is connected or if the robot is emulated in the corresponding robot driver or via an external simulator. The MoveIt configuration for Franka includes such emulation via a “fake hardware” interface, but the same is not true for UR, which would require an external simulator such as URSim.
Warning
In normal operation, only a single MoveIt move_group node should be running at a time. If the node fails to
exit cleanly, however, it may result in two nodes running when the graph is next launched. RViz then connects
to both instances, which results in both requesting a plan from the cuMotion planner node via a MoveGroup action
at nearly the same time. The second to arrive preempts the first without waiting for in-flight CUDA operations to
complete, possibly resulting in “CUDA invalid” errors.
If such errors are observed, ensure that only a single move_group node is running. The cuMotion planner
node will be made more robust in a future release.
Backend interface#
The MoveIt plugin forwards planning requests to the cuMotion backend action server:
Action:
cumotion/move_group(moveit_msgs/MoveGroup)Provider: isaac_ros_cumotion
Try More Examples#
To continue your exploration, check out the following suggested examples:
Troubleshooting#
Isaac ROS Troubleshooting#
For solutions to problems with Isaac ROS, see troubleshooting.