RealSense Camera Examples#
This page contains tutorials for running Isaac ROS Nvblox together with Isaac ROS Visual SLAM on an Intel RealSense camera.
Note
This tutorial requires a compatible RealSense camera from the list of available cameras.
Install#
Complete the Isaac ROS NvBlox RealSense Setup tutorial.
Complete the nvblox quickstart.
If you installed nvblox as a Debian package, you will also need to clone
isaac_ros_nvbloxunder${ISAAC_ROS_WS}/src:cd ${ISAAC_ROS_WS}/src git clone --recursive -b release-4.5 https://github.com/NVIDIA-ISAAC-ROS/isaac_ros_nvblox.git isaac_ros_nvblox
Stop Git tracking the
COLCON_IGNOREfile in therealsense_splitterpackage and remove it.cd ${ISAAC_ROS_WS}/src/isaac_ros_nvblox/nvblox_examples/realsense_splitter && \ git update-index --assume-unchanged COLCON_IGNORE && \ rm COLCON_IGNORE
Note
Note: The
COLCON_IGNOREfile was added to remove the dependency torealsense-rosfor users that don’t want to run the RealSense examples.Activate the Isaac ROS environment (if not already launched):
isaac-ros activateBuild the
realsense_splitterpackage:cd /workspaces/isaac_ros-dev colcon build --symlink-install --packages-up-to realsense_splitter source install/setup.bash
RealSense Example#
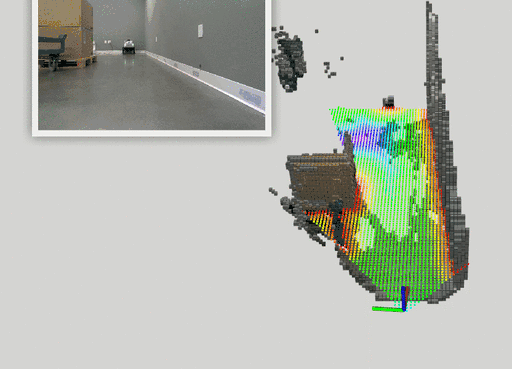
This example runs nvblox-based reconstruction from a single RealSense camera, either from live data coming directly off a RealSense camera, or from recorded data coming from a ROSbag.
Activate the Isaac ROS environment (if not started in the install step)
isaac-ros activateNavigate (inside the Isaac ROS environment) to the workspace folder, and source the workspace
cd /workspaces/isaac_ros-dev
source install/setup.bash
Run the RealSense example, either live from a sensor or from a recorded ROSbag.
ros2 launch nvblox_examples_bringup realsense_example.launch.py
1. Use the rosbag
galileo_static_3_2downloaded in the nvblox quickstart or record your own bag.Launch the rosbag:
ros2 launch nvblox_examples_bringup realsense_example.launch.py \
rosbag:=<YOUR_ROSBAG_PATH>
Note
If you want to restrict odometry to a 2D plane
(for example, to run a robot in a flat environment),
you can use the enable_ground_constraint_in_odometry argument.
Note
Based on how a RealSense camera is mounted to the platform, users are expected to tune ESDF slice height specified in nvblox config file. Details about nvblox mapping parameters could be found at mapper parameters.
Recording Data with RealSense#
To record RealSense data for nvblox:
Connect the camera, activate the Isaac ROS environment and source the workspace as explained in RealSense Camera Examples.
Start recording:
ros2 launch nvblox_examples_bringup record_realsense.launch.py
Stop the recording when done
The resulting ROSbag can be run using the instructions above.
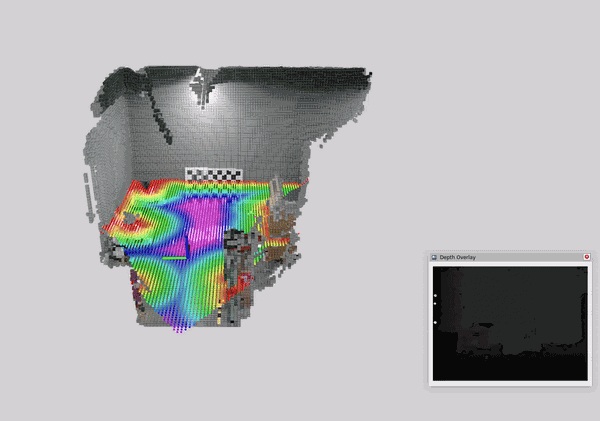
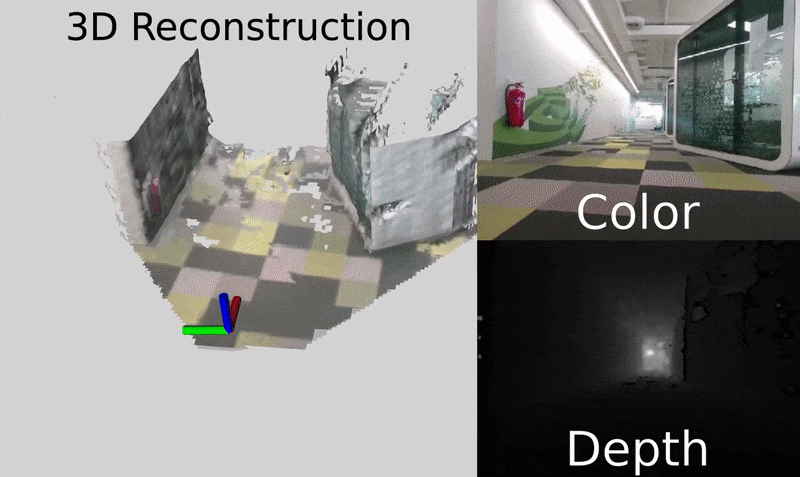
Reconstruction With People Segmentation#
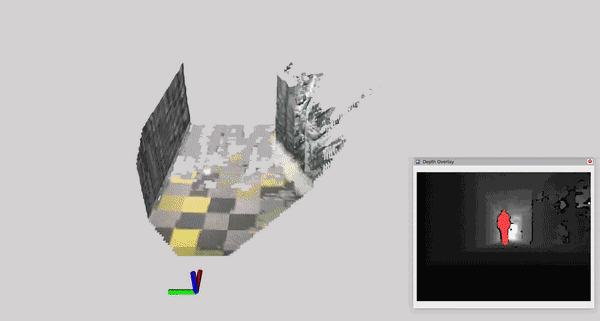
This tutorial demonstrates how to perform dynamic people reconstruction using people segmentation models in nvblox using RealSense data. For more information on how people reconstruction using people segmentation models works, see Technical Details.
Note
If you are on a desktop machine, we recommend using the
PeopleSemSegNet_Vanilla.
On Jetson platforms we recommend the lighter PeopleSemSegNet_ShuffleSeg
model that is provided in Isaac ROS Image Segmentation
for better segmentation performance.
Download and install the PeopleSemSegNet model assets:
sudo apt-get update
sudo apt-get install -y ros-jazzy-isaac-ros-peoplesemseg-models-install &&
ros2 run isaac_ros_peoplesemseg_models_install install_peoplesemsegnet_vanilla.sh --eula &&
ros2 run isaac_ros_peoplesemseg_models_install install_peoplesemsegnet_shuffleseg.sh --eula
Below we provide run instructions for both the full and light segmentation models (
PeopleSemSegNet_VanillaandPeopleSemSegNet_ShuffleSeg) respectively, running from both a ROSbag and live from a RealSense camera.ros2 launch nvblox_examples_bringup realsense_example.launch.py \ mode:=people_segmentation
ros2 launch nvblox_examples_bringup realsense_example.launch.py \ mode:=people_segmentation \ people_segmentation:=peoplesemsegnet_shuffleseg
1. Use the rosbag
galileo_people_3_2downloaded in the nvblox quickstart or record your own bag.ros2 launch nvblox_examples_bringup realsense_example.launch.py \ mode:=people_segmentation \ rosbag:=<YOUR_ROSBAG_PATH>
1. Use the rosbag
galileo_people_3_2downloaded in the nvblox quickstart or record your own bag.ros2 launch nvblox_examples_bringup realsense_example.launch.py \ mode:=people_segmentation \ people_segmentation:=peoplesemsegnet_shuffleseg \ rosbag:=<YOUR_ROSBAG_PATH>
Reconstruction With People Detection#
This tutorial demonstrates how to perform dynamic people reconstruction using people detection model in nvblox using RealSense data. For more information on how people reconstruction using people detection model works, see Technical Details.
Download and install the PeopleNet model assets:
sudo apt-get update
sudo apt-get install -y ros-jazzy-isaac-ros-peoplenet-models-install
ros2 run isaac_ros_peoplenet_models_install install_peoplenet_amr_rs.sh --eula
Below we provide run instructions for people detection model (
PeopleNet) running from both a ROSbag and live from a RealSense camera. Live from RealSense camera assumes camera is started successfully as instructions above.ros2 launch nvblox_examples_bringup realsense_example.launch.py \ mode:=people_detection
1. Use the rosbag
galileo_people_3_2downloaded in the nvblox quickstart or record your own bag.ros2 launch nvblox_examples_bringup realsense_example.launch.py \ mode:=people_detection \ rosbag:=<YOUR_ROSBAG_PATH>
Reconstruction With Dynamic Scene Elements#
This tutorial demonstrates how build a reconstruction with dynamic elements in the scene (people and non-people) using RealSense data. For more information about how dynamic reconstruction works in nvblox see Technical Details.
Below we provide run instructions for running from both a ROSbag and live from a RealSense camera.
ros2 launch nvblox_examples_bringup realsense_example.launch.py \
mode:=dynamic
ros2 launch nvblox_examples_bringup realsense_example.launch.py \
mode:=dynamic \
rosbag:=<YOUR_ROSBAG_PATH>
Visualizing in Foxglove#
The examples in previous sections on this page have used rviz for visualization. RViz is our default visualization tool in the case that nvblox is running on the same computer that is displaying the visualization. In the case that you’d like to visualize a reconstruction streamed from a remote machine, for example a robot, our recommended method is to use Foxglove.
To visualize with Foxglove refer to Foxglove Visualization.
Ensure that you additionally install the nvblox Foxglove extension.
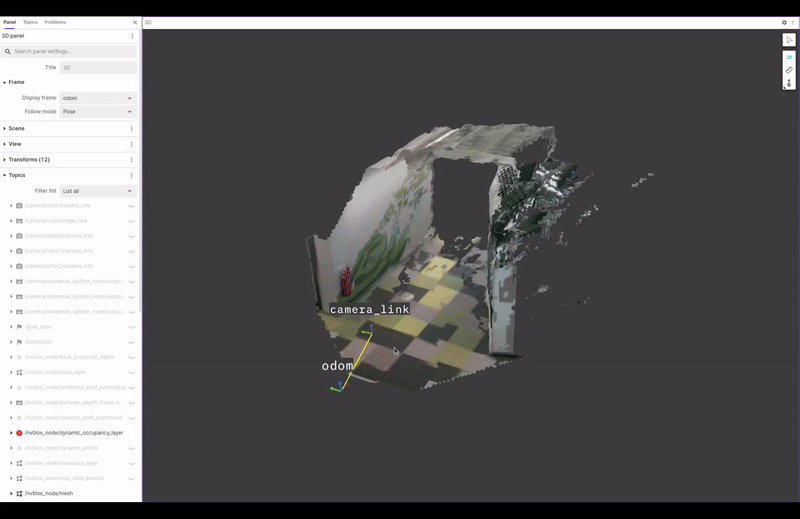
The animation above shows the results of visualizing the /nvblox_node/mesh
and /nvblox/static_esdf_pointcloud topics.
Each of the examples above expose a parameter to enable visualization in foxglove. For example to run the RealSense Example above, on a live sensor, using foxglove instead of RViz run:
ros2 launch nvblox_examples_bringup realsense_example.launch.py \
run_foxglove:=True run_rviz:=False
Note
When visualizing from a remote machine over WiFi, bandwidth is limited
and easily exceeded.
Exceeding this bandwidth can lead to poor visualization results.
For best results we recommend visualizing a limited number of topics,
and to avoiding visualizing high-bandwidth topics for example images.
Furthermore, it is necessary to limit bandwidth of the mesh transmitted
by nvblox. Nvblox exposes a parameter for this purpose layer_streamer_bandwidth_limit_mbps.
When visualizing over WiFi we recommend setting this to 30
here.
Nvblox with Multiple RealSense#
See our Mutli-RealSense Tutorial.
Troubleshooting#
See RealSense Issues.