Tutorial: Running Isaac Perceptor in Isaac Sim
This tutorial enables you to run autonomous navigation in Isaac Sim. The tutorial uses the Isaac Perceptor stack for local camera-based perception, using the simulated sensor outputs.
Hardware Requirements
Simulating the scene and robot sensors requires an RTX-enabled GPU of sufficient capability and memory capacity. In particular, we recommend an “ideal” machine in the Isaac Sim requirements.
Note
This tutorial has been tested with Isaac Sim 4.2.
Prerequisites
To complete this tutorial you need to:
Set up your development environment by following the instructions in getting started.
Clone
isaac_ros_commonunder${ISAAC_ROS_WS}/src:cd ${ISAAC_ROS_WS}/src && \ git clone -b release-3.2 https://github.com/NVIDIA-ISAAC-ROS/isaac_ros_common.git isaac_ros_common
Complete the Isaac Perceptor Prerequisites.
Complete the Isaac Sim Setup.
Install
Build/install the required packages:
1. Make sure you followed the Prerequisites and you are inside the Isaac ROS Docker container.
Install the required Debian packages:
sudo apt update
sudo apt-get install -y ros-humble-nova-carter-bringup
source /opt/ros/humble/setup.bash
Install the required assets:
sudo apt-get install -y ros-humble-isaac-ros-ess-models-install ros-humble-isaac-ros-peoplesemseg-models-install
source /opt/ros/humble/setup.bash

ros2 run isaac_ros_ess_models_install install_ess_models.sh --eula
ros2 run isaac_ros_peoplesemseg_models_install install_peoplesemsegnet_vanilla.sh --eula
ros2 run isaac_ros_peoplesemseg_models_install install_peoplesemsegnet_shuffleseg.sh --eula
4. Declare
ROS_DOMAIN_IDwith the same unique ID (number between 0 and 101) on every bash instance inside the Docker container:export ROS_DOMAIN_ID=<unique ID>1. Make sure you followed the Prerequisites and you are inside the Isaac ROS Docker container.
Use
rosdepto install the package’s dependencies:sudo apt update rosdep update rosdep install -i -r --from-paths ${ISAAC_ROS_WS}/src/nova_carter/nova_carter_bringup/ \ --rosdistro humble -y
Install the required assets:
sudo apt-get install -y ros-humble-isaac-ros-ess-models-install ros-humble-isaac-ros-peoplesemseg-models-install
source /opt/ros/humble/setup.bash

ros2 run isaac_ros_ess_models_install install_ess_models.sh --eula
ros2 run isaac_ros_peoplesemseg_models_install install_peoplesemsegnet_vanilla.sh --eula
ros2 run isaac_ros_peoplesemseg_models_install install_peoplesemsegnet_shuffleseg.sh --eula
Build the ROS package in the Docker container:
colcon build --symlink-install --packages-up-to nova_carter_bringup
source install/setup.bash
5. Declare
ROS_DOMAIN_IDwith the same unique ID (number between 0 and 101) on every bash instance inside the Docker container:export ROS_DOMAIN_ID=<unique ID>
Please set this flag to disable SHM on Isaac Sim. Make sure that file exists in the docker container before running it. Please do this on all terminals. This makes sure that all DDS communication runs over UDP.
export FASTRTPS_DEFAULT_PROFILES_FILE=/usr/local/share/middleware_profiles/rtps_udp_profile.xml
Instructions
Terminal #1:
Open a terminal from the Isaac Sim launcher GUI, as described in Isaac Sim Setup.
Start the simulation by running:
./isaac-sim.sh
Open the scene at the path
omniverse://localhost/NVIDIA/Assets/Isaac/4.2/Isaac/Samples/ROS2/Scenario/perceptor_navigation.usd.Play the scene to start the ROS communication from sim.
Terminal #2:
Inside the Isaac ROS Development container, launch the example:
ros2 launch nova_carter_bringup navigation.launch.py \
   mode:=simulation run_rviz:=True
Note
If you want to run Perceptor with multiple cameras in Isaac Sim, you can refer to the Multi-camera Perceptor In Isaac Sim section below.
In RViz
1. Click on the 2D Goal Pose button. Verify that you see the robot moving towards the goal location, using the costmap produced by the camera-based 3D perception Isaac Perceptor.
Visualizing the Outputs
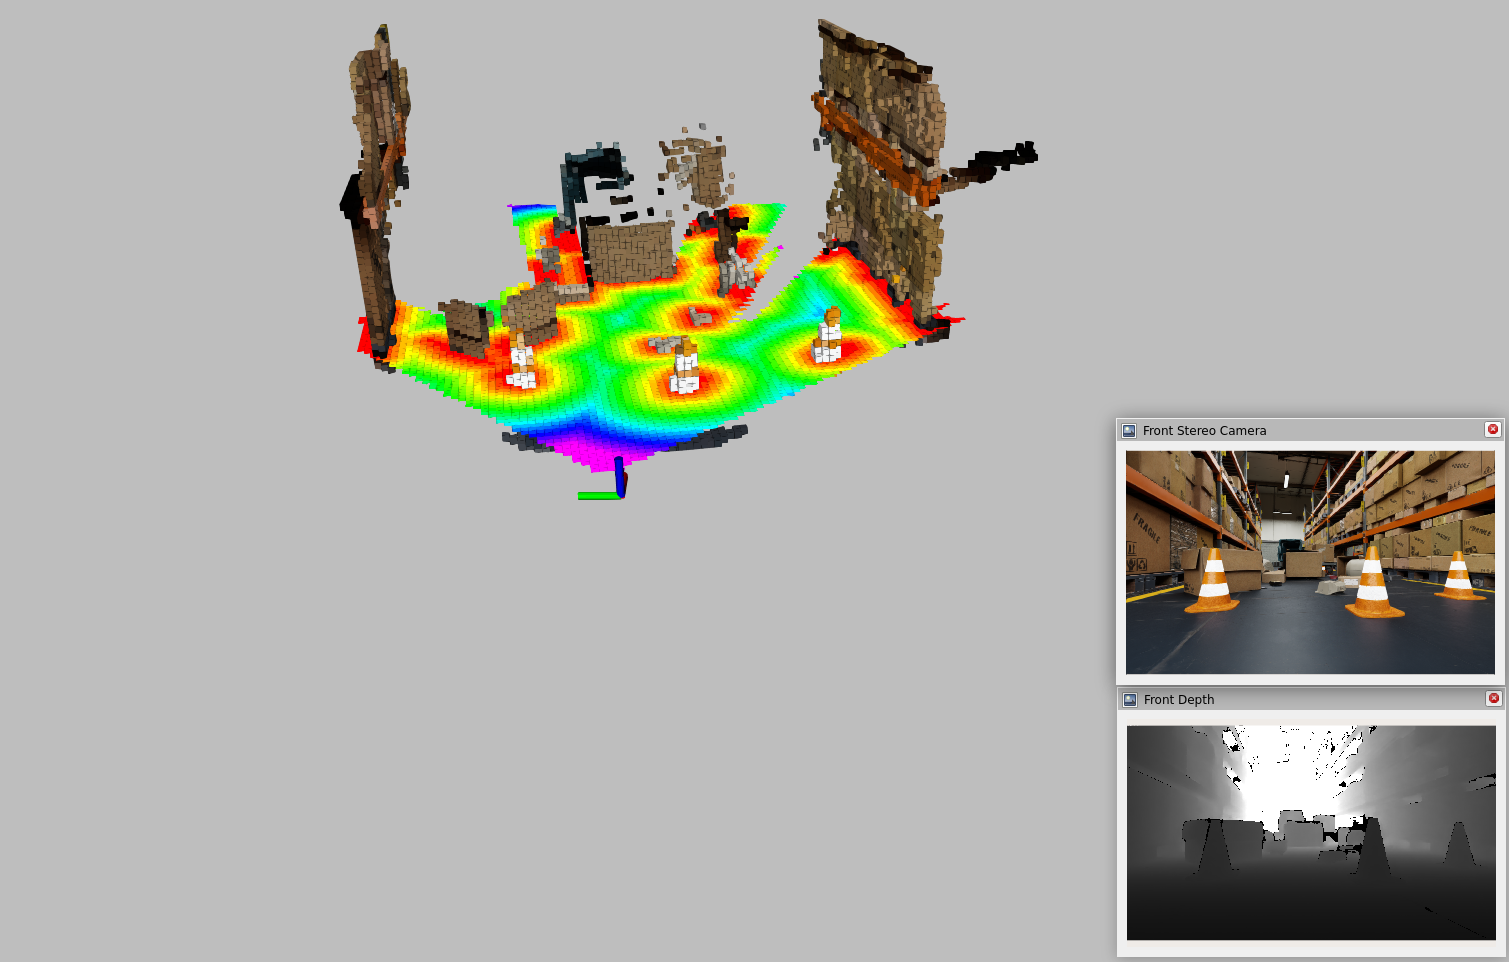
In RViz, it shows camera images streaming from the Nova Carter and Isaac nvblox mesh visualization of surrounding environments. Verify that you see a visualization similar to the image below.
The reconstructed colored voxels are uniformly reconstructed with a resolution of 5cm.
The computed distance map from Isaac nvblox outputs. The rainbow color spectrum reflects the proximity of each region to nearest obstacles. Regions closer to obstacle surfaces are marked in warmer colors (red, orange), while regions further away from obstacle surfaces are marked in cooler colors (blue, violet).
To learn more about topics published by Isaac nvblox, you can refer to nvblox ROS messages.
Enable Global Navigation
To enable global navigation on an occupancy grid map, first enable lidar data publishing from Isaac Sim.
In the Isaac Sim UI:
Stop the scene if it is running.
In the Stage panel, expand
/Nova_Carter_ROS/ros_lidars.Find the following prims and check “Enabled” under Property - Inputs:
front_2d_lidar_render_productback_2d_lidar_render_product
Play the scene again.
Terminal #2:
Launch the application:
ros2 launch nova_carter_bringup navigation.launch.py \
   mode:=simulation run_rviz:=True \
   enable_3d_lidar_localization:=False \
   map_yaml_path:=${ISAAC_ROS_WS}/src/nova_carter/nova_carter_navigation/maps/perceptor_navigation.yaml
Next we’ll send the robot to a pose on the map. In RViz, change the fixed frame to the map frame by setting the value of Display - Global Options - Fixed Frame to
map. If the occupancy map is not displayed, disable and re-enable “Map” in the Display panel. Zoom out to get a better view of the map if needed.Set the initial pose of the robot in RViz or by publishing to the
/initialposetopic.If in RViz, click the 2D Pose Estimate button, then click and drag the robot’s pose on the map.
If by publishing to the
/initialposetopic, in a terminalros2 topic pub -1 /initialpose geometry_msgs/msg/PoseWithCovarianceStamped '{ header: {stamp: {sec: 0, nanosec: 0}, frame_id: "map"}, pose: { pose: {position: {x: -9.7, y: 2.0, z: 0.0}, orientation: {w: 1.0}}, } }'
This command sets the robot to the pose when the scene starts playing. If the robot has moved, update the position and orientation to the desired values.
When the robot is ready, you should be able to see the robot’s frame visualized as an axis within the global map.
Send the robot to a pose by clicking the 2D Goal Pose button, then clicking and dragging the goal pose on the map. You should see the robot’s path displayed on the map, and the robot should start moving.

Multi-camera Perceptor In Isaac Sim
By default, when running Perceptor in Isaac Sim, Perceptor, as well as the simulation scene are configured to produce and consume data from a single Hawk stereo camera. Running with multiple cameras is possible, however requires a powerful machine. If you have a powerful machine (for example an ideal machine) you may follow these steps enable multi-camera Perceptor.
In the Isaac Sim UI:
Stop the scene if it is running.
In the Stage panel, expand
/Nova_Carter_ROS.Find the following prims and check “Enabled” under Property - Inputs:
right_hawk/left_camera_render_productright_hawk/right_camera_render_productleft_hawk/left_camera_render_productleft_hawk/right_camera_render_product
Play the scene again.
Terminal #2:
Launch the example. Note that here we’re launching in local navigation mode, the command can be modified, as above, to run global navigation.
ros2 launch nova_carter_bringup navigation.launch.py \
   mode:=simulation run_rviz:=True \
   stereo_camera_configuration:=front_left_right_configuration