Setup for Simulated Robot in Isaac Sim#
Overview#
This guide walks through the process of setting up the software for a simulated robot with Isaac for Manipulation in Isaac Sim.
Requirements#
Install Isaac Sim following the instructions in Isaac ROS Isaac Sim Setup Guide.
Isaac Sim running on a workstation that has at least 25 GB GPU VRAM and 30 GB CPU RAM. In case of questions, refer to the official Isaac Sim requirement documentation.
Set Up Development Environment#
Set up your development environment by following the instructions in getting started.
Build Robotiq Gripper Dependencies#
Clone the Isaac ROS fork of
ros2_robotiq_gripperandtylerjw/serialunder${ISAAC_ROS_WS}/src:cd ${ISAAC_ROS_WS}/src && \ git clone --recursive https://github.com/NVIDIA-ISAAC-ROS/ros2_robotiq_gripper.git && \ git clone -b ros2 https://github.com/tylerjw/serial.git
Activate the Isaac ROS environment:
isaac-ros activateUse
rosdepto install the package’s dependencies:rosdep update && rosdep install --from-paths ${ISAAC_ROS_WS}/src/ros2_robotiq_gripper ${ISAAC_ROS_WS}/src/serial --ignore-src -y
Build the gripper dependencies:
cd ${ISAAC_ROS_WS}
colcon build --symlink-install --packages-select-regex robotiq* serial --cmake-args "-DBUILD_TESTING=OFF" && \
source install/setup.bash  # Source the workspace after building gripper dependencies
Build Isaac ROS Manipulation Packages#
Activate the Isaac ROS environment:
isaac-ros activateInstall and set the environment variable for Cyclone DDS:
sudo apt-get install -y ros-jazzy-rmw-cyclonedds-cpp
export RMW_IMPLEMENTATION=rmw_cyclonedds_cpp
Install system dependencies:
sudo apt update && sudo apt install -y python3-pip python3-git && pip install --break-system-packages pyvers==0.2.2
Install the prebuilt Debian package:
sudo apt-get update
sudo apt-get install -y ros-jazzy-isaac-ros-manipulation-bringup
Clone this repository under
${ISAAC_ROS_WS}/src:cd ${ISAAC_ROS_WS}/src && git clone --recursive -b release-4.5 https://github.com/NVIDIA-ISAAC-ROS/isaac_ros_manipulation.git isaac_ros_manipulation
Activate the Isaac ROS environment:
isaac-ros activateInstall and set the environment variable for Cyclone DDS:
sudo apt-get install -y ros-jazzy-rmw-cyclonedds-cpp
export RMW_IMPLEMENTATION=rmw_cyclonedds_cpp
Install system dependencies:
sudo apt update && sudo apt install -y python3-pip python3-git && pip install --break-system-packages pyvers==0.2.2
Use
rosdepto install the package’s dependencies:sudo apt-get update
rosdep update && rosdep install --from-paths ${ISAAC_ROS_WS}/src/isaac_ros_manipulation/isaac_ros_manipulation_bringup --ignore-src -y
Install the
segment_anythingpackage viapip.pip install --no-deps --break-system-packages git+https://github.com/facebookresearch/segment-anything.git
Accept NVIDIA model EULAs before building:
The build process will download perception models (ESS, FoundationStereo, FoundationPose, SyntheticaDETR, Grounding DINO) that require accepting NVIDIA’s End-User License Agreements (EULAs). Set the following environment variable to accept the terms:
export ISAAC_ROS_ACCEPT_EULA=1
Note
By setting this variable, you accept the terms and conditions of the EULAs for the perception models listed above. These models are distributed on the NVIDIA NGC Catalog under NVIDIA’s standard model licenses.
Build the package from source:
cd ${ISAAC_ROS_WS}
export MANIPULATOR_INSTALL_ASSETS=1
export FOUNDATIONSTEREO_MODEL_RES=low_res
colcon build --symlink-install --packages-up-to isaac_ros_manipulation_bringup
Note
Setting
FOUNDATIONSTEREO_MODEL_RES=low_resis recommended because the build process installs FoundationStereo models. The defaulthigh_resmodel requires 16 GB of GPU memory during TensorRT conversion, whilelow_resrequires 8 GB.Source the ROS workspace:
Note
Make sure to repeat this step in every terminal created inside the Isaac ROS environment.
Because this package was built from source, the enclosing workspace must be sourced for ROS to be able to find the package’s contents.
source install/setup.bash
Note
In all terminals, set the following flag for proper communication.
export RMW_IMPLEMENTATION=rmw_cyclonedds_cpp
If you are running any other workflow apart from
GEAR_ASSEMBLY, then change thePhysicsSceneprim by going to its properties and changing theTime Step Per Secondto30or60. This will make the scene run significantly faster. Gear Assembly needs a time step of120because of the higher quality of physics simulation required.
Setup Perception Models#
Set up the perception models by following the instructions in Set Up Perception Deep Learning Models section.
Build Topic Based Control#
We maintain a fork of the original repository with the necessary changes to support the impedance controller required for the sim to real workflows.
Clone this repository under
${ISAAC_ROS_WS}/src:cd ${ISAAC_ROS_WS}/src && git clone https://github.com/karanchahal-nv/topic_based_ros2_control
Install dependencies:
rosdep update && rosdep install --from-paths ${ISAAC_ROS_WS}/src/topic_based_ros2_control --ignore-src -y
Build the package:
cd ${ISAAC_ROS_WS} && colcon build --symlink-install --packages-up-to topic_based_ros2_control && source install/setup.bash
Note
If you still face issues in spawning the driver nodes, then please refer to checking the package versions for ros2 control here.
The issue stems from the fact that ros2 control can update with ABI breakages so it is important to make sure all ros2 control packages in this package are at the same version.
Prepare Configuration Files and Environment Variables#
Before editing any configuration files, copy them to the appropriate location and set up environment variables based on your installation method.
Binary installations have read-only configuration files in system directories. Copy all necessary files to a writable location:
# Create a directory for your custom configuration
mkdir -p ${ISAAC_ROS_WS}/isaac_ros_manipulation_config
Copy the workflow configuration file for your robot:
cp $(ros2 pkg prefix --share isaac_ros_manipulation_bringup)/params/sim_launch_params.yaml \
      ${ISAAC_ROS_WS}/isaac_ros_manipulation_config/my_robot_config.yaml
Set up environment variables:
# Point to the directory containing your configuration files
export ISAAC_ROS_MANIPULATION_WORKFLOW_CONFIG_DIR="${ISAAC_ROS_WS}/isaac_ros_manipulation_config"
When building from source with
--symlink-install, you can edit configuration files directly in the source directories.Set up environment variables:
# Point to the source directories containing the configuration files
export ISAAC_ROS_MANIPULATION_WORKFLOW_CONFIG_DIR="${ISAAC_ROS_WS}/src/isaac_ros_manipulation/isaac_ros_manipulation_bringup/params"
Launch Isaac Sim#
Open Isaac Sim and load the scene:
https://omniverse-content-production.s3-us-west-2.amazonaws.com/Assets/Isaac/5.1/Isaac/Samples/ROS2/Scenario/isaac_manipulator_scene.usd
Tip
We recommend setting a
ROS_DOMAIN_IDviaexport ROS_DOMAIN_ID=<ID_NUMBER>for every new terminal where you run ROS commands, to avoid interference with other computers in the same network (ROS Guide).Hit Play in Isaac Sim to start the simulation.
Run Pre-Flight Tests (Optional but highly recommended)#
To verify that you have setup Isaac for Manipulation correctly, run the following command:
export ENABLE_MANIPULATOR_TESTING=isaac_sim
# Point to the directory containing your configuration files
export ISAAC_ROS_MANIPULATION_TEST_CONFIG=<your-workflow-config-file-path-for-isaac-sim>
python3 -m pytest ${ISAAC_ROS_WS}/src/isaac_ros_manipulation/isaac_ros_manipulation_bringup/test
Note
One can also use colcon test --packages-select isaac_ros_manipulation_bringup to run the tests.
However, pytest has a better output and makes it easier to view status and progress of the tests.
If these tests fail, please look at Isaac for Manipulation Testing Guide for more information.
It is recommended to run the tests manually using launch_test and then manually inspecting the results.
This will run a series of tests to verify that Isaac for Manipulation is working correctly.
Optimization for Physics Scene (Optional)#
If you are running the gear assembly workflow, skip this section.
Gear Assembly needs a time step of
120andGPU physicsbecause of the higher quality of physics simulation required.
Stop the scene.
Disable the
Enable GPU dynamicsoption in thePhysicsSceneprim. This will make the scene run significantly faster. When we have a scene like the one in this tutorial which has a single robot, CPU physics generally runs much faster.Change the
PhysicsSceneprim (/World/PhysicsScene) by going to its properties and changing theTime Step Per Secondto30or60. This will make the scene run significantly faster. Gear Assembly needs a time step of120because of the higher quality of physics simulation required.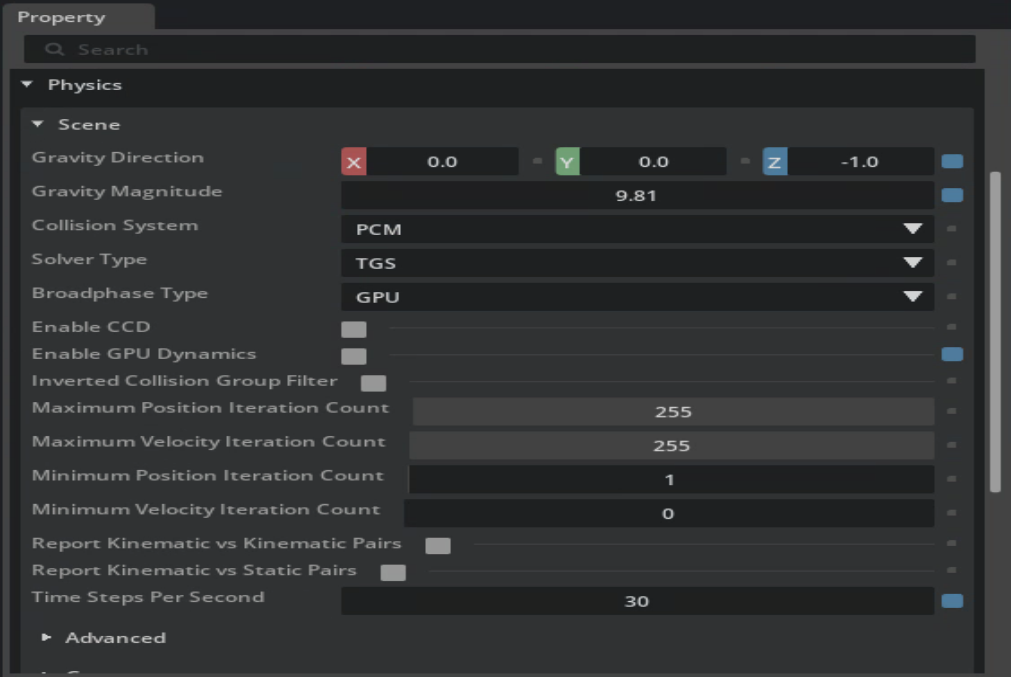
Start the scene.