Nova Carter
Nova Carter was jointly developed with Segway Robotics, for autonomous robotics development including accelerated computing for ROS 2 with full 360° sensing from camera and LIDAR and validated by Open Navigation for use with Nav2.
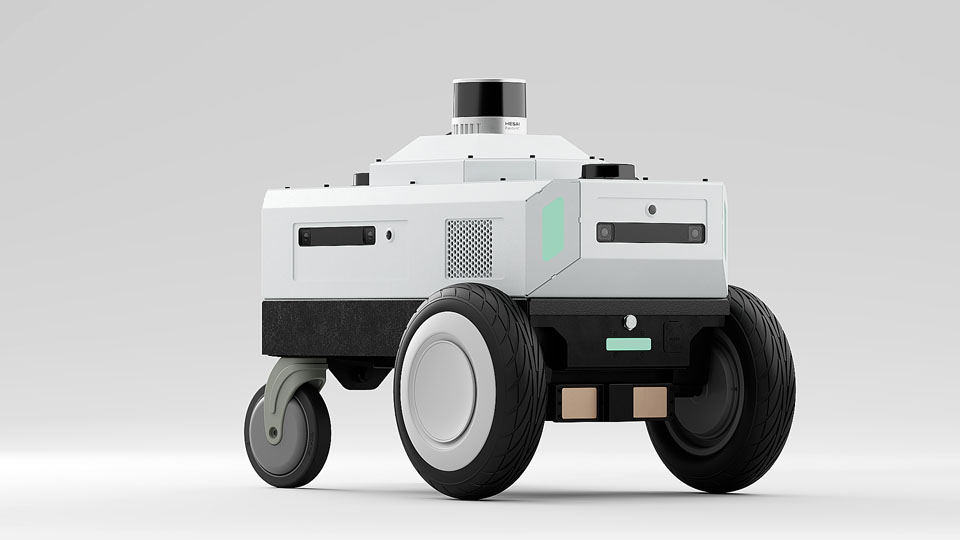
Nova Carter is powered by a Jetson AGX Orin with additional interface I|O boards developed for robotics; it includes a 32 beam 360° LIDAR, 2x planar LIDAR, 4x HAWK, 4x OWL, IMU, Magnetometer, and Barometer with high precision time synchronization between sensors using hardware time stamping, and PTP over Ethernet with less than 10us for sensor acquisition time. The robot provides simultaneous camera capture across all cameras within 100us from a single hardware trigger, and can write to disk at 4 GB per second for sensor capture to ROSbags.
Nova Carter robots running Isaac ROS can be teleoperated, map an environment, and navigate within that environment using visual cameras and LiDARs.
Important Nova Carter Robot Information
Before operating the Nova Carter robot, read all of the following safety guidelines carefully. You must follow all of these guidelines during operation of the robot.
Isaac Robot Operator Safety
The Nova Carter robot is small and lightweight, weighing less than 100 kg even with its full payload. The main hazard is impact from the robot itself, where moderate harm could result from a worst-case direct collision. Robot operators must take the following precautions:
◦ Familiarize yourself with the Nova Carter controls and dynamics in an open area away from bystanders.
◦ Be aware of the speed at which Nova Carter can accelerate, decelerate, and turn.
◦ Be aware that stopping Nova Carter quickly while it’s moving forward can cause it to overshoot and move backwards.
In the event of a safety incident, inspect the Nova Carter for the following:
◦ Damage to the robot chassis (including dents and punctures to the housing or drivetrain).
◦ Damage to the sensors that emit IR (including scratches and pits on the optical window).
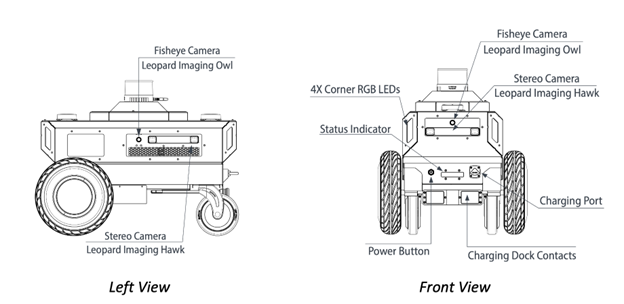
If there is damage, do not power on Nova Carter. Use the tow handle to move the robot and contact your Segway representative immediately. Nova Carter has a tow handle for manual transport located above the caster wheels.
A red emergency stop (ESTOP) button is located above the caster wheels, below the tow handle. Pushing the ESTOP button disconnects power to the motors, but the Carter robot can continue to coast in the direction it was previously moving. It can also roll if placed on a sloped surface while the ESTOP is pressed.
Do not open or remove any panels from the robot, and do not loosen or remove any sensors.
Unboxing Nova Carter
After receiving your Nova Carter robot from Segway, follow the guide below to unpack and power on the robot.
Make sure you are familiar with or have completed the following:
Remove Nova Carter from its packaging.
Remove the protective Lidar cover (colored red) using a 2.5 mm hex driver, and re-install any bolts which were removed.
Familiarize yourself with the following parts of Nova Carter:
- Wall charger and its connection to the robot. You can connect Nova Carter to its charger when it is powered on or off.
Note
The robot does not respond to movement commands while plugged into the wall charger.
EStop button at the rear of the robot and its operation. Press to engage, twist clockwise to disengage.
IO panel at rear of robot with USB-C, DisplayPort, and Ethernet connections. These connect directly to the Jetson, and can be used for development, rapid data transfer, or to re-flash the Jetson AGX Orin.
Status indicator LED bar at the front. This shows yellow on boot, green when Jetson is actively communicating with the wheelbase, and red if there is an error or EStop button is pressed.
Power on the robot using the button at its front. The LED panels at each corner of the robot flash white. After Jetson has finished booting, they transition to green. If the status indicator light flashes red, disengage the EStop.
Network Connectivity
Connecting the Robot to your WiFi Network
Follow these steps to connect the Nova Carter to the local WiFi network:
Connect the robot to a display using the DisplayPort on the rear rear IO panel.
Note
A recommended best practice is to engage the EStop button any time you connect external cables to the robot, to prevent it from responding to any movement commands.
Connect the robot to the wired Ethernet Port (using an RJ45 connector) on the rear IO panel.
Connect the keyboard with touchpad to the rear IO panel.
Log in to the robot (contact the NVIDIA Solutions team for the robot password).
Follow the WiFi instructions for Ubuntu.
Connecting the PC to the Robot
To control, deploy, launch, and debug applications, you have to connect your PC to the robot.
First, you must get the IP address of the robot. Assuming you have the robot connected to a display and a keyboard with touchpad from the previous section, follow these instructions:
Use
CTRL+ALT+tto open a terminal.Find the IP address of the WiFi by running
ifconfig wlan0. You should see an output similar to the screenshot below. The IP address is highlighted with a red rectangle.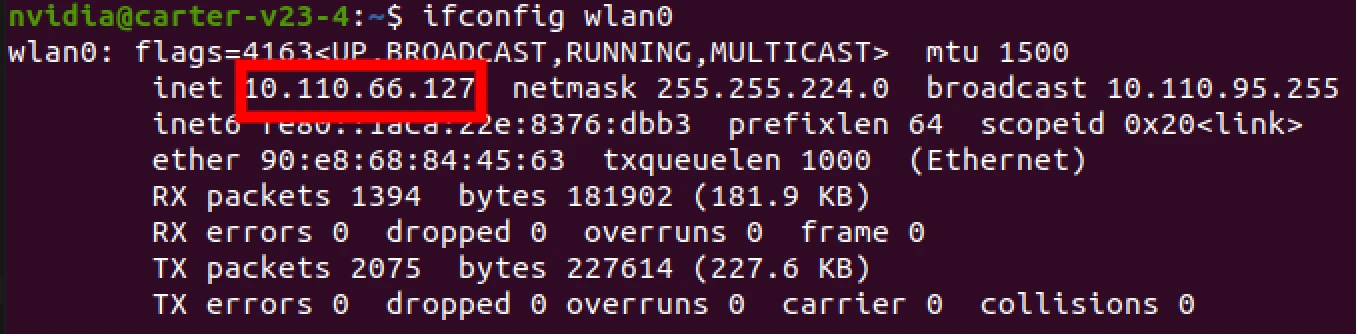
Record the IP address (in above case it is
10.110.66.127). This IP address will be used for connecting in all further tutorials and may need to be retrieved again if it changes.SSH into the robot:
bob@jetson:~/isaac$ ssh ROBOTUSER@ROBOT_IP
Use a computer that is connected to the same WiFi network as your robot
Assuming you are on a Linux computer, open a terminal with
CTRL+ALT+tand runssh <USER>@<ROBOT_IP>. In the above case, it would bessh nvidia@10.110.66.127.Enter the password to log in to the robot (contact the NVIDIA Solutions team for the robot password). The tutorials/tools in the following sections will be run from this SSH connection.
Note
The login will timeout for security reasons. Also, the DisplayPort will turn off after a while due to inactivity, so retry if the screen goes black.
Initializing Nova Carter with Nova Carter Init
Nova Carter Init is a Debian package that sets up the sensors and Jetson device on the Nova Carter robot. Follow the instructions to install Nova Carter Init(version 1.1.1) here.
Pairing the Joystick Controller
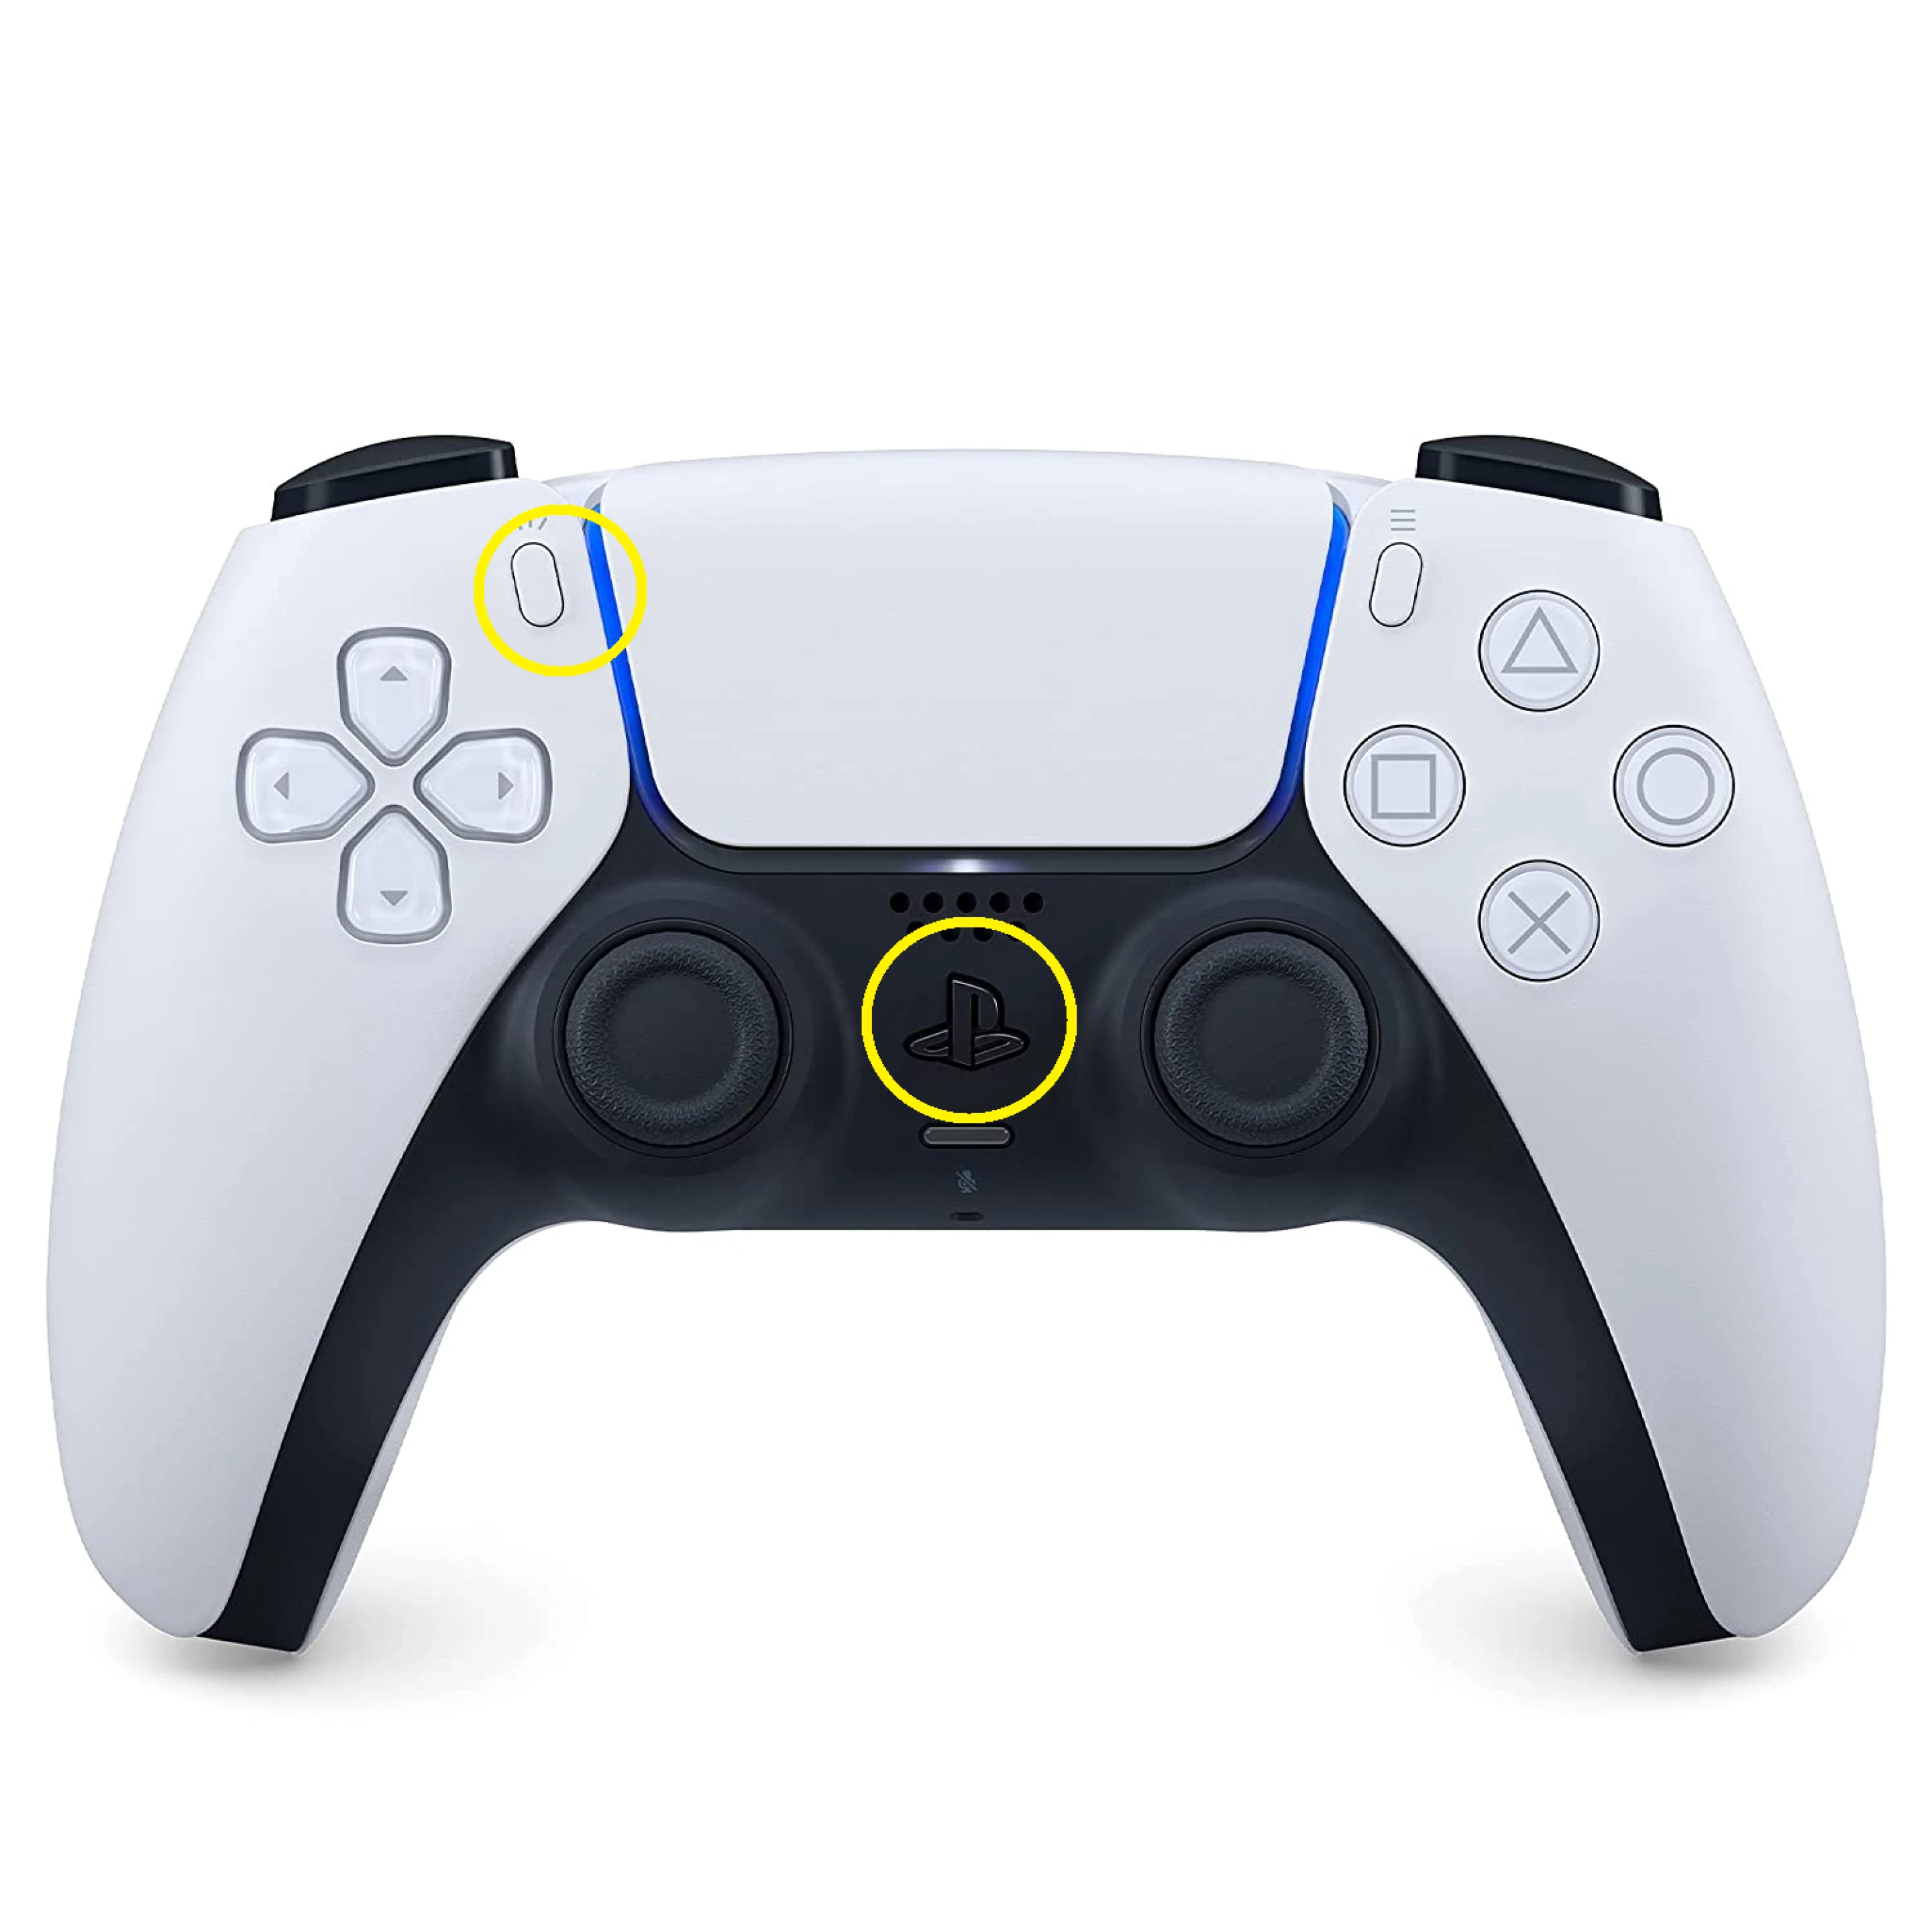
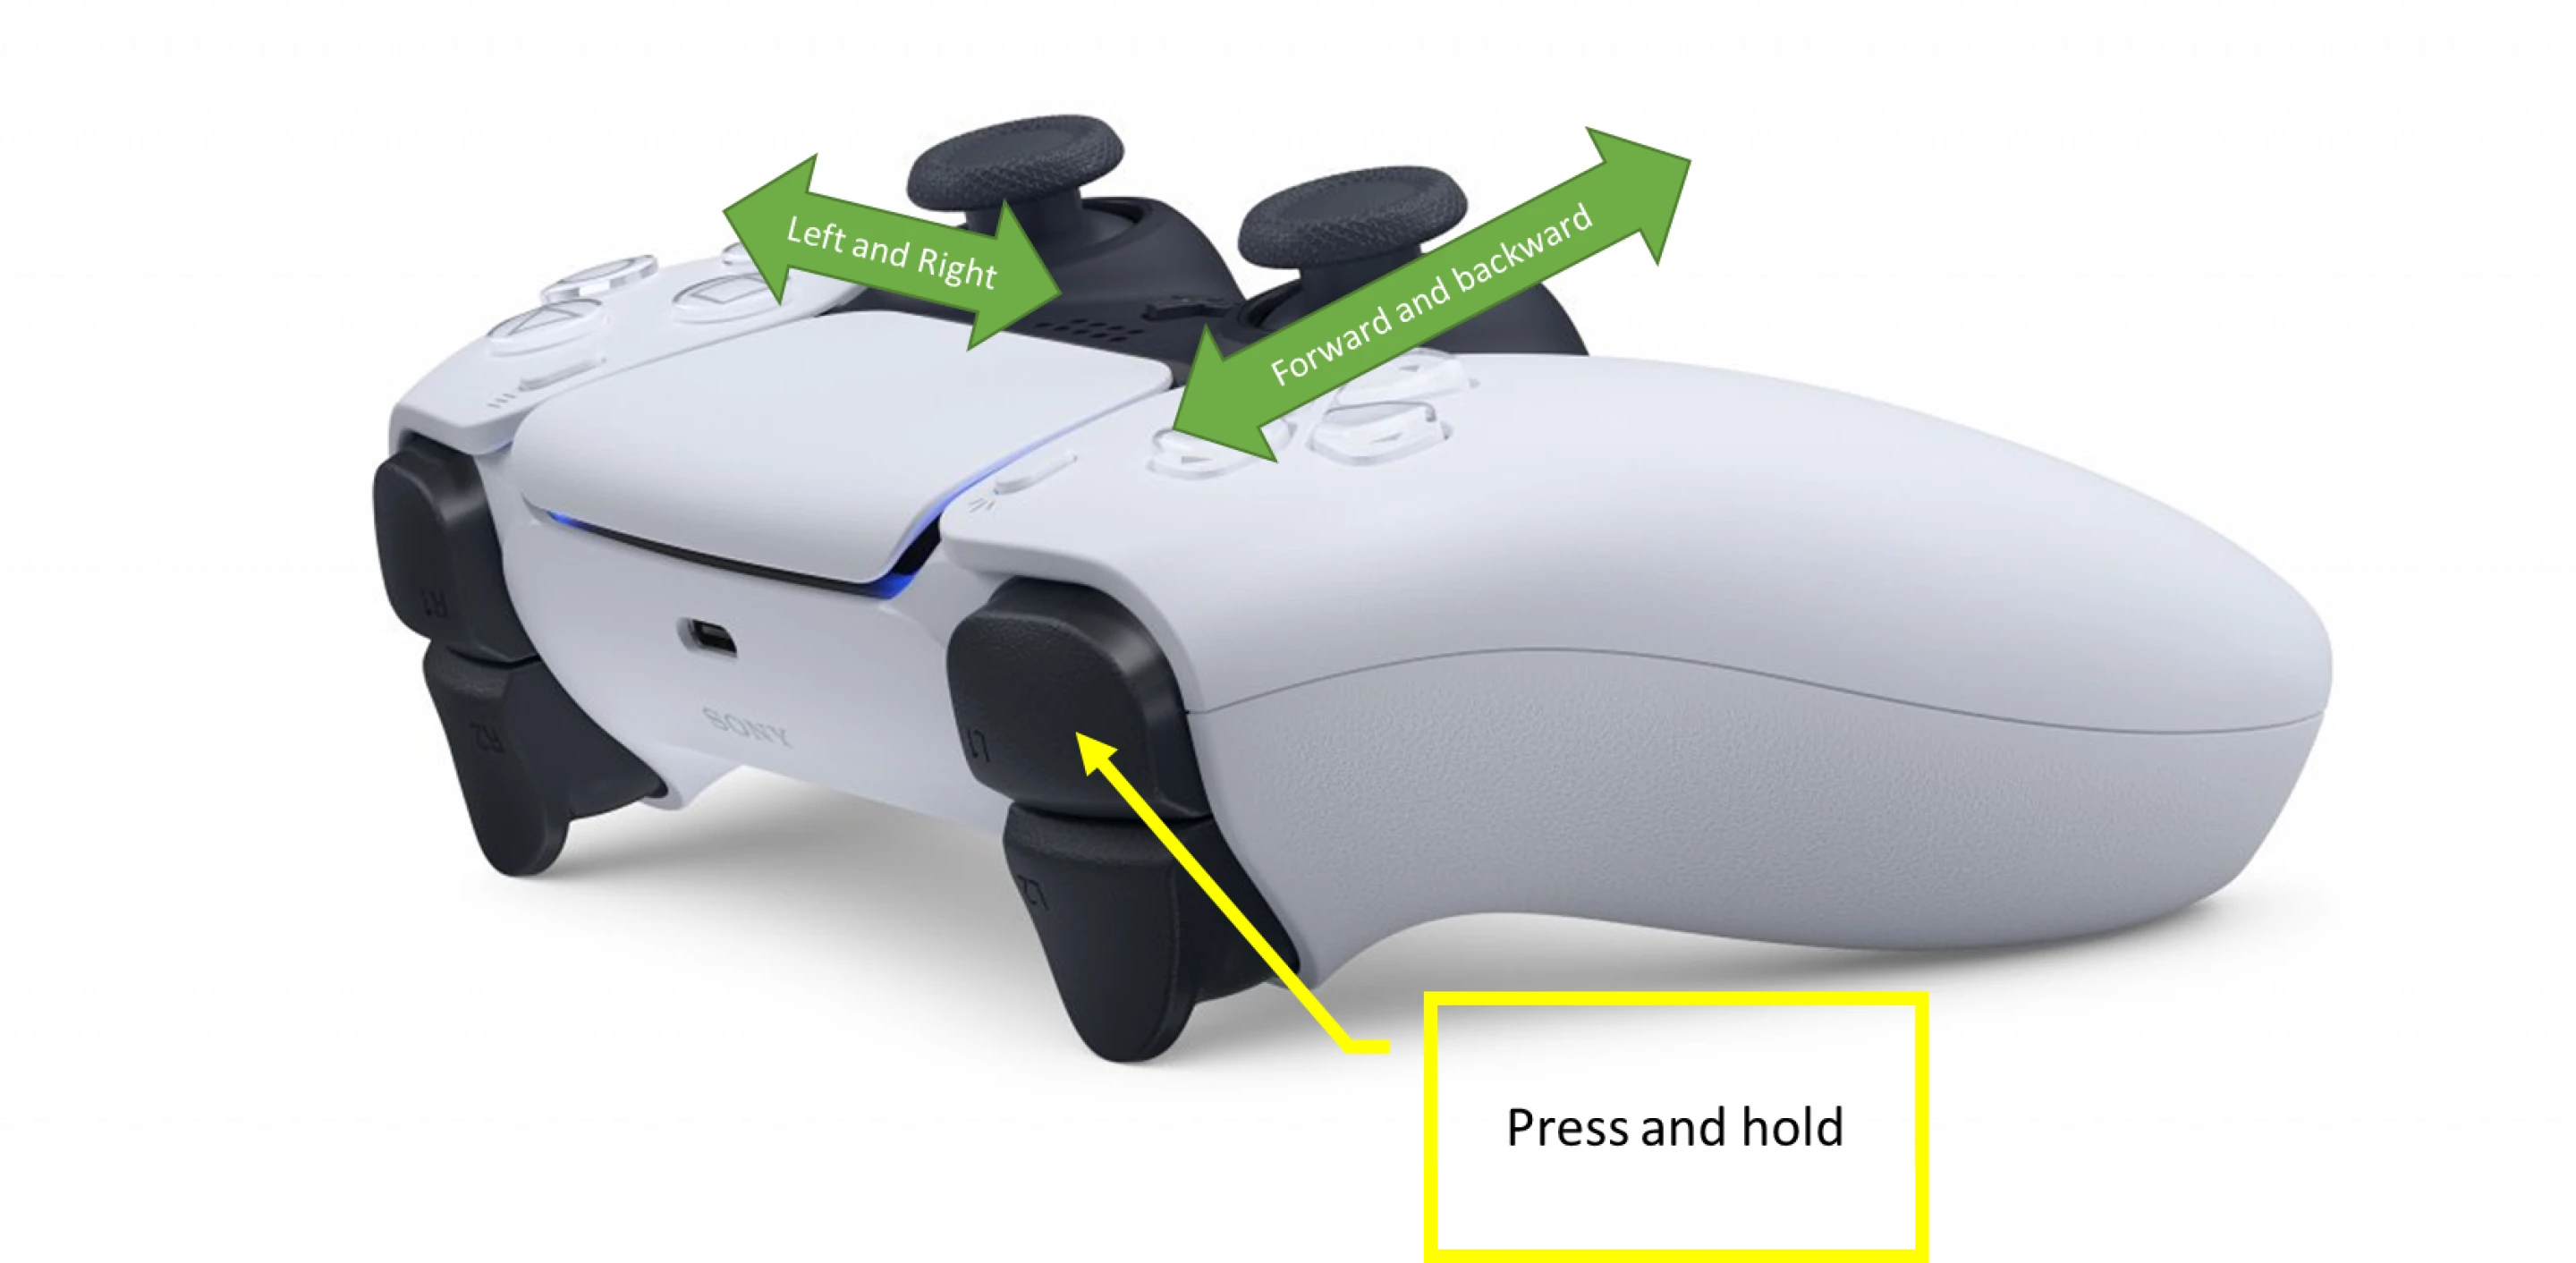
A PS5 joystick controller is shipped with the robot. To connect the joystick with the robot, put the controller in pairing mode, by pressing and holding down the two buttons shown in the image below until the controller lights start blinking:
Connect to the robot and pair the controller to the robot.
ssh nvidia@<ROBOT IP>

$ sudo bluetoothctl

**[bluetooth]#** scan on

// This should list the available devices

Discovery started

[CHG] Controller 90:E8:68:84:35:24 Discovering: yes

[NEW] Device D4:20:B0:42:66:4F D4-20-B0-42-66-4F

[NEW] Device D4:20: B0:42:5C:CC D4-20-B0-42-5C-CC

[NEW] Device D4:20:B0:42:64:1A D4-20-B0-42-64-1A

[NEW] Device 7C:66:EF:5D:36:B1 Wireless Controller

[NEW] Device D4:20:B0:42:C6:80 D4-20-B0-42-C6-80

[NEW] Device D4:20:B0:42:5B:37 D4-20-B0-42-5B-37

**[bluetooth]#** scan off

//The mac address used should match the one named Wireless Controller, in this case it is
7C:66:EF:5D:36:B1

**[bluetooth]#** pair 7C:66:EF:5D:36:B1

//Upon successful pairing, it should ask you to type yes/no to trust the
device. Type "yes". If not prompted

**[bluetooth]#** trust 7C:66:EF:5D:36:B1

**[bluetooth]#** exit
Note
Once the controller is connected, the LEDs on the controller should stay solid blue; flashing blue LEDs indicate the controller is trying to connect.
Note
In the terminal run
ls /dev/input/js0. If the connection was successful it prints out/dev/input/js0. If the connection was not successful the command prints out\ ls: cannot access '/dev/input/js0': No such file or directory\.
The controller should now be connected. You should not need to pair again. If you want to connect again after the controller turns off press the PS button as shown below.

Docker Configuration
Add the
nvidiauser to the docker group:sudo usermod -aG docker $USER # verify that command succeeded id nvidia | grep docker #log out and log in for the changes to take effect
Setup docker cache by making a data folder
mkdir /mnt/nova_ssd/docker. Then, follow this link and set thedata-rootfield to/mnt/nova_ssd/docker:https://www.guguweb.com/2019/02/07/how-to-move-docker-data-directory-to-another-location-on-ubuntu/
Configure the docker daemon to use
nvidiaby default. Add"default-runtime": "nvidia"to the/etc/docker/daemon.jsonon your robot. Your file should have at least these fields whencat /etc/docker/daemon.jsonis run.{ "default-runtime": "nvidia", "runtimes": { "nvidia": { "path": "nvidia-container-runtime", "runtimeArgs": [] } }, }
Checking the Battery Status
Before using the robot check the battery level. Run:
nova_battery_status
Verify that you see output similar to the following with a battery percentage printed at the end:
nvidia@ubuntu:~$ nova_battery_status
host version build date:[23-09-19]
host version build time:[14:21:54]
Communication interface adding CAN_INTERFACE
Please guarantee the 'canbus_pre.sh' file has been taken into the '/home/sdcard/firmware' directory, if can register has not been configed
HAL CANBUS init success!
Scheduler Num 0 Start. Task Num = 1. Period = 100000
Scheduler Num 1 Start. Task Num = 1. Period = 50000
Scheduler Num 2 Start. Task Num = 1. Period = 20000

battery: 54%
Calibrating Extrinsics with the Nova Calibration Tool
The Nova Carter Calibration Tool is a containerized application that guides you through the process of calibrating the poses of the sensors on a Nova Carter robot. Follow the instructions to set up calibration.
If the calibration is successful, you should see a URDF file generated at /etc/nova/calibration/isaac_calibration.urdf. This is
also the default URDF path used by Nova Carter demo applications.
Note
You also have access to a URDF file with nominal values located at /etc/nova/calibration/isaac_nominals.urdf.
This file could be useful as a backup in case calibration fails, but in general, always use isaac_calibration.urdf because it better reflects the true extrinsics of your physical robot.
Development Environment Setup
Follow the development environment setup steps.
Note
Ensure you setup the SSD and migrate Docker directory to SSD. Instructions can be found in the first step of the Quickstart section in the above link.
Repository Setup
Clone the
nova_carterandisaac_ros_commonrepository:cd /mnt/nova_ssd/workspaces/isaac_ros-dev/src && \ git clone --recurse-submodules https://github.com/NVIDIA-ISAAC-ROS/nova_carter.git && \ git clone --recurse-submodules https://github.com/NVIDIA-ISAAC-ROS/isaac_ros_common.git
Setup the Nova Carter environment variable:
echo "export ISAAC_ROS_WS=/mnt/nova_ssd/workspaces/isaac_ros-dev" >> ~/.bashrc && \
   source ~/.bashrc
Create the
run_devscript configuration files in the$ISAAC_ROS_WS/src/isaac_ros_common/scriptsdir:Create a file called
.isaac_ros_common-configwith the following context:
cd ${ISAAC_ROS_WS}/src/isaac_ros_common/scripts && \
   echo -e "CONFIG_IMAGE_KEY=ros2_humble.nova_carter\nCONFIG_DOCKER_SEARCH_DIRS=(../../nova_carter/docker ../docker)" > .isaac_ros_common-config
Create a file called
.isaac_ros_dev-dockerargswith the following context:
cd ${ISAAC_ROS_WS}/src/isaac_ros_common/scripts && \
   echo -e "-v /etc/nova/calibration:/etc/nova/calibration/" > .isaac_ros_dev-dockerargs
Launch the Docker container using the
run_dev.shscript:cd $ISAAC_ROS_WS/src/isaac_ros_common && \ ./scripts/run_dev.sh $ISAAC_ROS_WS
Download the ESS 3D Depth Estimation Neural Network model for isaac_ros_ess:
mkdir -p /workspaces/isaac_ros-dev/src/nova_carter/carter_navigation/models && \ cd /workspaces/isaac_ros-dev/src/nova_carter/carter_navigation/models && \ wget 'https://api.ngc.nvidia.com/v2/models/nvidia/isaac/dnn_stereo_disparity/versions/3.0.0/files/ess.etlt'
Convert the
.etltmodel file to an.enginefile:/opt/nvidia/tao/tao-converter -k ess -t fp16 -e /workspaces/isaac_ros-dev/src/nova_carter/carter_navigation/models/ess.engine -o output_left,output_conf /workspaces/isaac_ros-dev/src/nova_carter/carter_navigation/models/ess.etlt
Clone the dependency repositories using the
vcstoolfile in thenova_carterrepository:cd /workspaces/isaac_ros-dev && \ vcs import --recursive src < src/nova_carter/nova_carter.repos
Demo Applications
Joystick Driving with 4 Owl Fisheye Cameras
Connect the PS5 joystick to the robot using step 3 of these instructions.
Run the following command:
ls /dev/input/js0If the output below is as shown, the joystick has been connected successfully.
/dev/input/js0
Open a new terminal and connect it to the robot.
Launch the Docker container using the
run_dev.shscript:cd $ISAAC_ROS_WS/src/isaac_ros_common && \ ./scripts/run_dev.sh $ISAAC_ROS_WS
Build the ROS packages in the Docker container:
cd /workspaces/isaac_ros-dev && \ colcon build --symlink-install --packages-up-to carter_navigation isaac_ros_vda5050_nav2_client_bringup isaac_ros_hesai isaac_ros_occupancy_grid_localizer isaac_ros_pointcloud_utils isaac_ros_segway_rmp isaac_ros_hawk isaac_ros_owl isaac_ros_correlated_timestamp_driver isaac_ros_image_proc isaac_ros_ess isaac_ros_visual_slam isaac_ros_nvblox nvblox_nav2 isaac_ros_depth_image_proc sllidar_ros2 nvblox_examples_bringup
Run the launch file:
cd /workspaces/isaac_ros-dev && \ source install/setup.bash && \ ros2 launch carter_navigation teleop.launch.py
Complete the foxglove setup guide.
The
joystick_owl.jsonfoxglove layout file can be found in the nova_carter repository. You should now be able to see the 4 Owl fisheye camera streams.
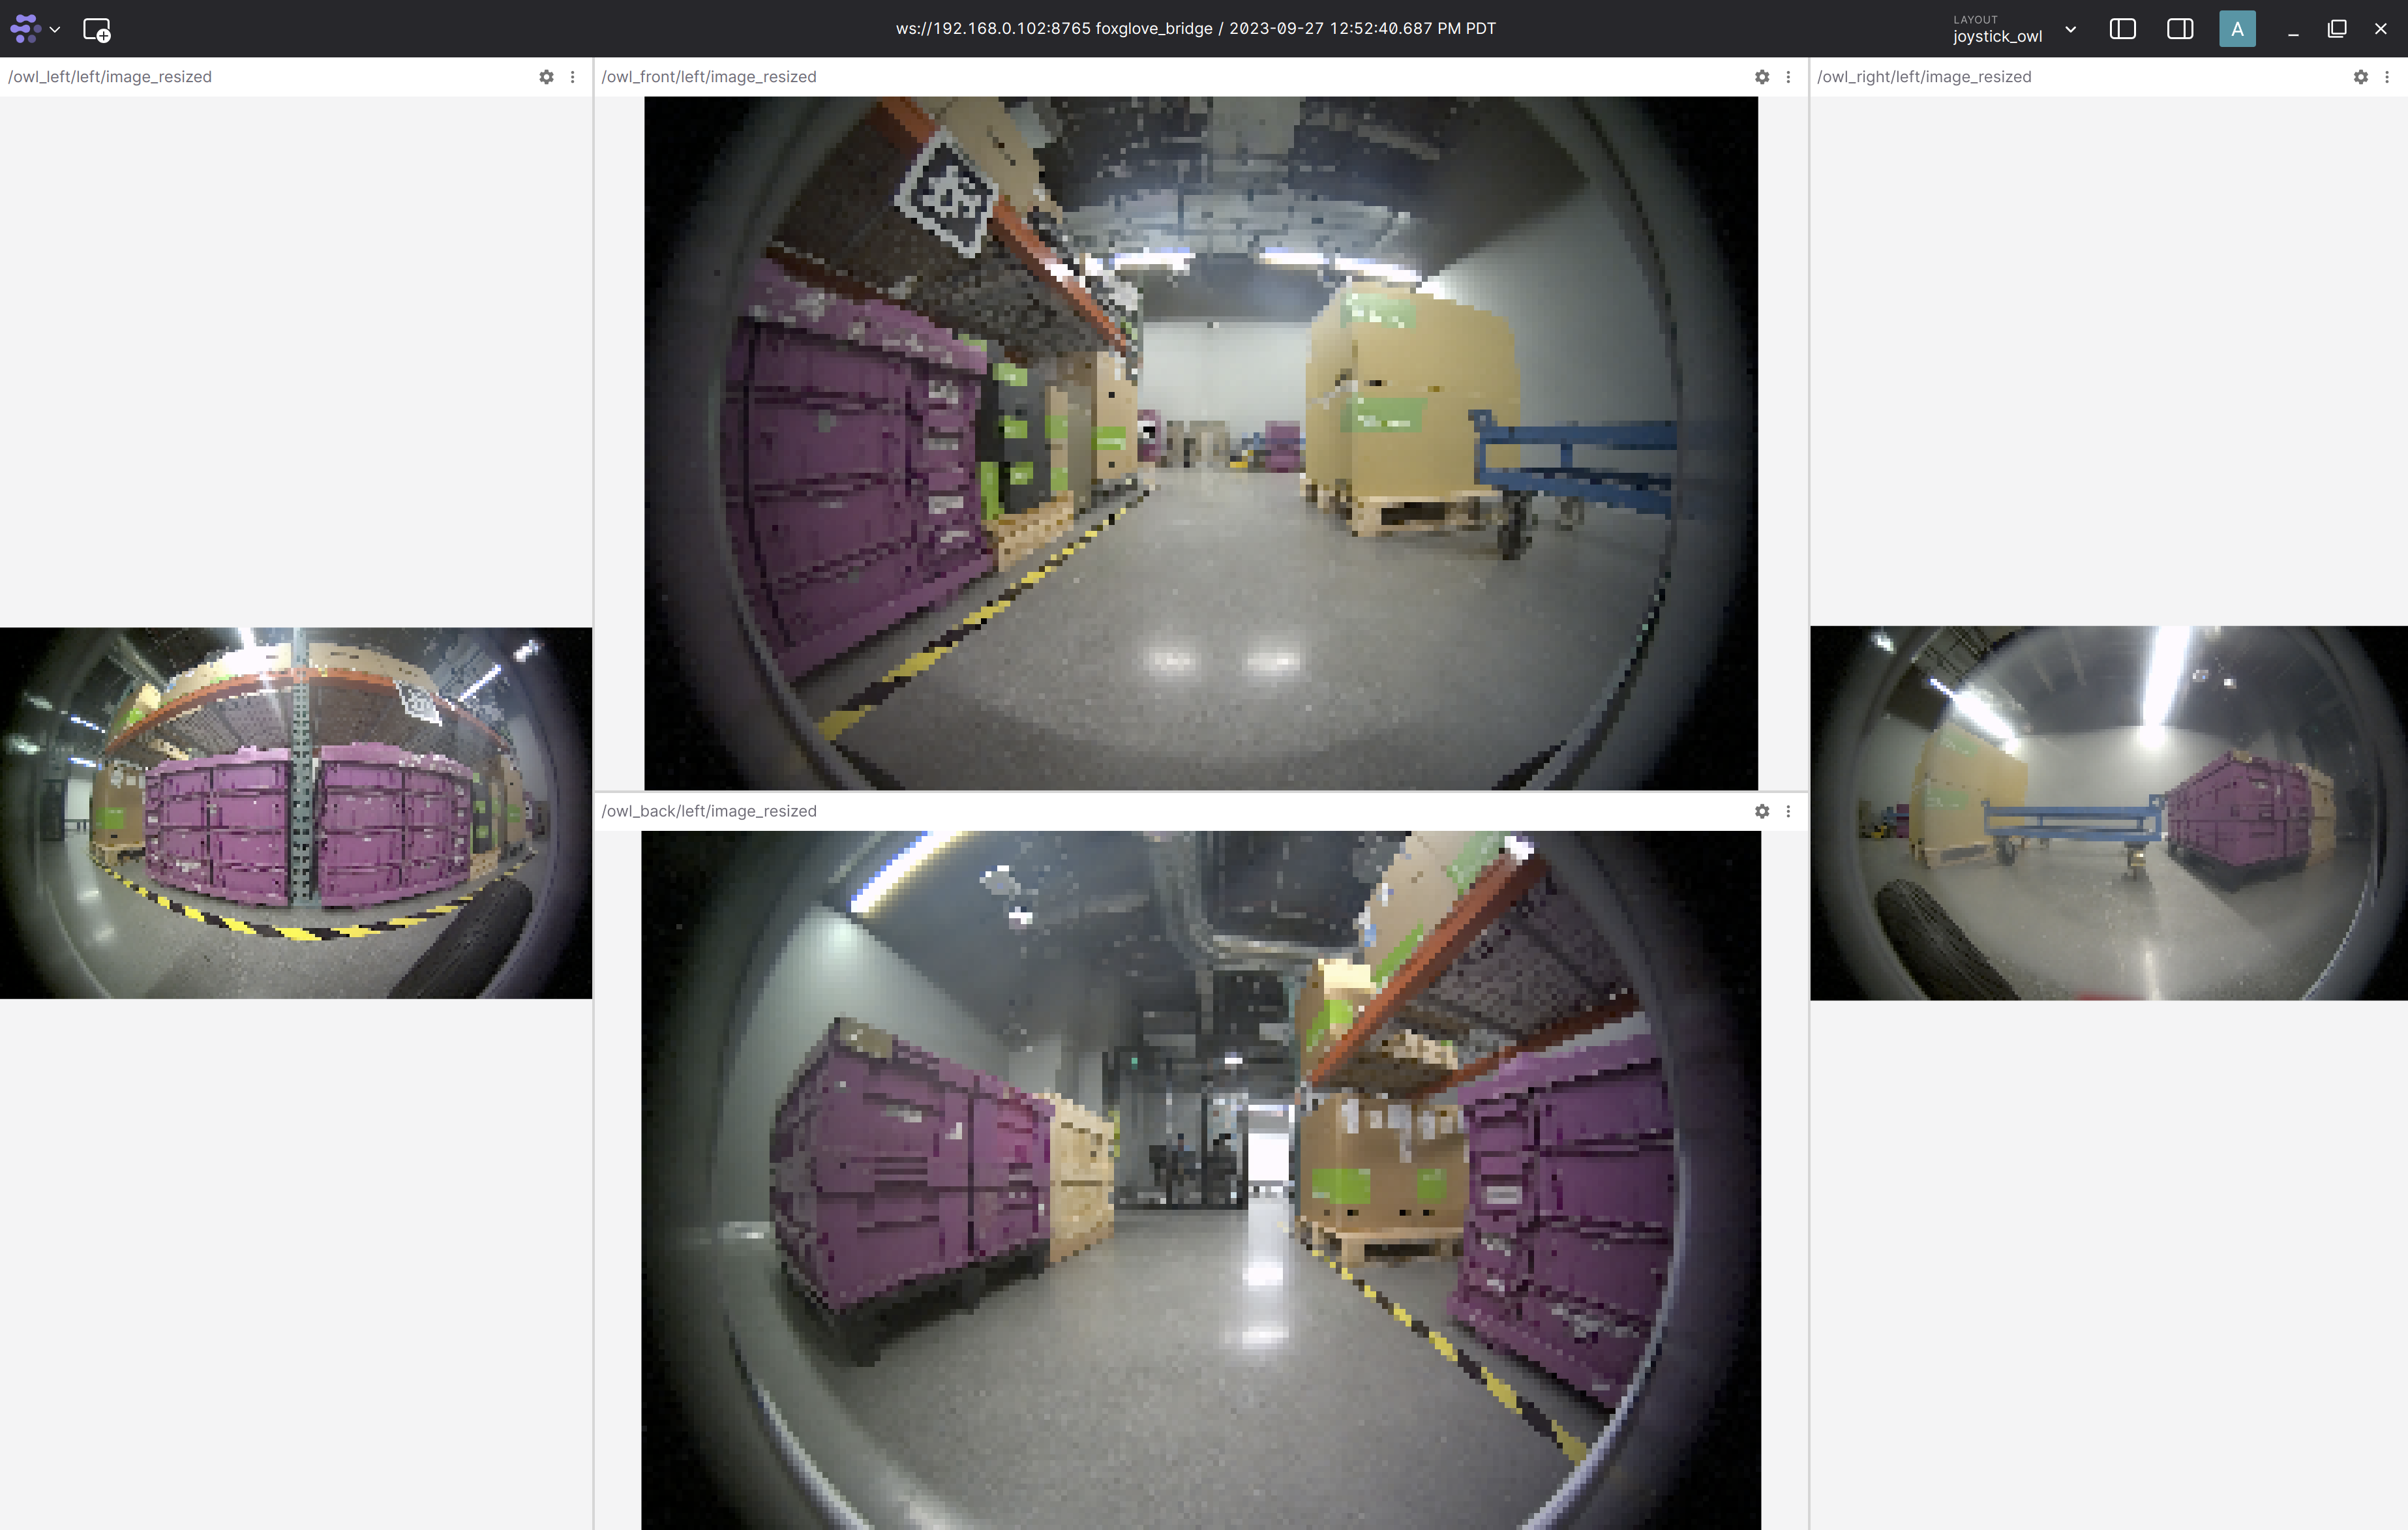
Move the robot using the joystick. Controls can be found below:
Visualizing All Sensors on Foxglove
The teleop.launch.py file can be used to launch all the sensors on the Nova Carter robot.
Note
Streaming higher bandwidth data to Foxglove causes higher latency. You can choose an appropriate value for the send_buffer_limit parameter in Foxglove bridge to control latency vs. high bandwidth data visualization.
Open a new terminal and connect it to the robot.
Launch the Docker container using the
run_dev.shscript:cd $ISAAC_ROS_WS/src/isaac_ros_common && \ ./scripts/run_dev.sh $ISAAC_ROS_WS
Print all the arguments for the
teleop.launch.py:cd /workspaces/isaac_ros-dev && \ source install/setup.bash && \ ros2 launch carter_navigation teleop.launch.py --show-args
You should see:
admin@carter-v24-3:/workspaces/isaac_ros-dev$ ros2 launch carter_navigation teleop.launch.py -show-args Arguments (pass arguments as ':='): 'launch_owls': Launch Owl Cameras (default: LaunchConfig('launch_owls')) 'launch_hawks': Launch Hawk Cameras (default: LaunchConfig('launch_hawks')) 'launch_hesai': Launch Hesai 3D Lidar (default: LaunchConfig('launch_hesai')) 'launch_rplidars': Launch rplidars (default: LaunchConfig('launch_rplidars')) 'send_buffer_limit': no description given (default: '10000000') 'joy_config': no description given (default: 'ps5') 'joy_dev': no description given (default: '/dev/input/js0') 'joy_vel': no description given (default: 'cmd_vel') 'config_filepath': no description given (default: '/workspaces/isaac_ros-dev/install/carter_navigation/share/carter_navigation/config/' + LaunchConfig('joy_config') + '.config.yaml') 'launch_delay': no description given (default: '15') 'publish_odom': no description given (default: 'True')
Enable the required sensors using the corresponding launch file argument. For example, to enable the Hesai 3D Lidar and the 2 RPLIDARs, run the following command:
cd /workspaces/isaac_ros-dev && \ source install/setup.bash && \ ros2 launch carter_navigation teleop.launch.py launch_hesai:=True launch_rplidars:=True
Note
The Owl cameras are enabled by default. Use
launch_owls:=Falseto disable streaming the Owl cameras.Complete the foxglove setup. The
foxglove_layout_all_sensors.jsonfoxglove layout file to visualize all sensors can be found in the nova_carter repository. You should see the sensor data in Foxglove as shown below:Note
If both the RPLIDARs visualizations do not show up, press
Ctrl+Rwhen in the Foxglove window to get the latest update.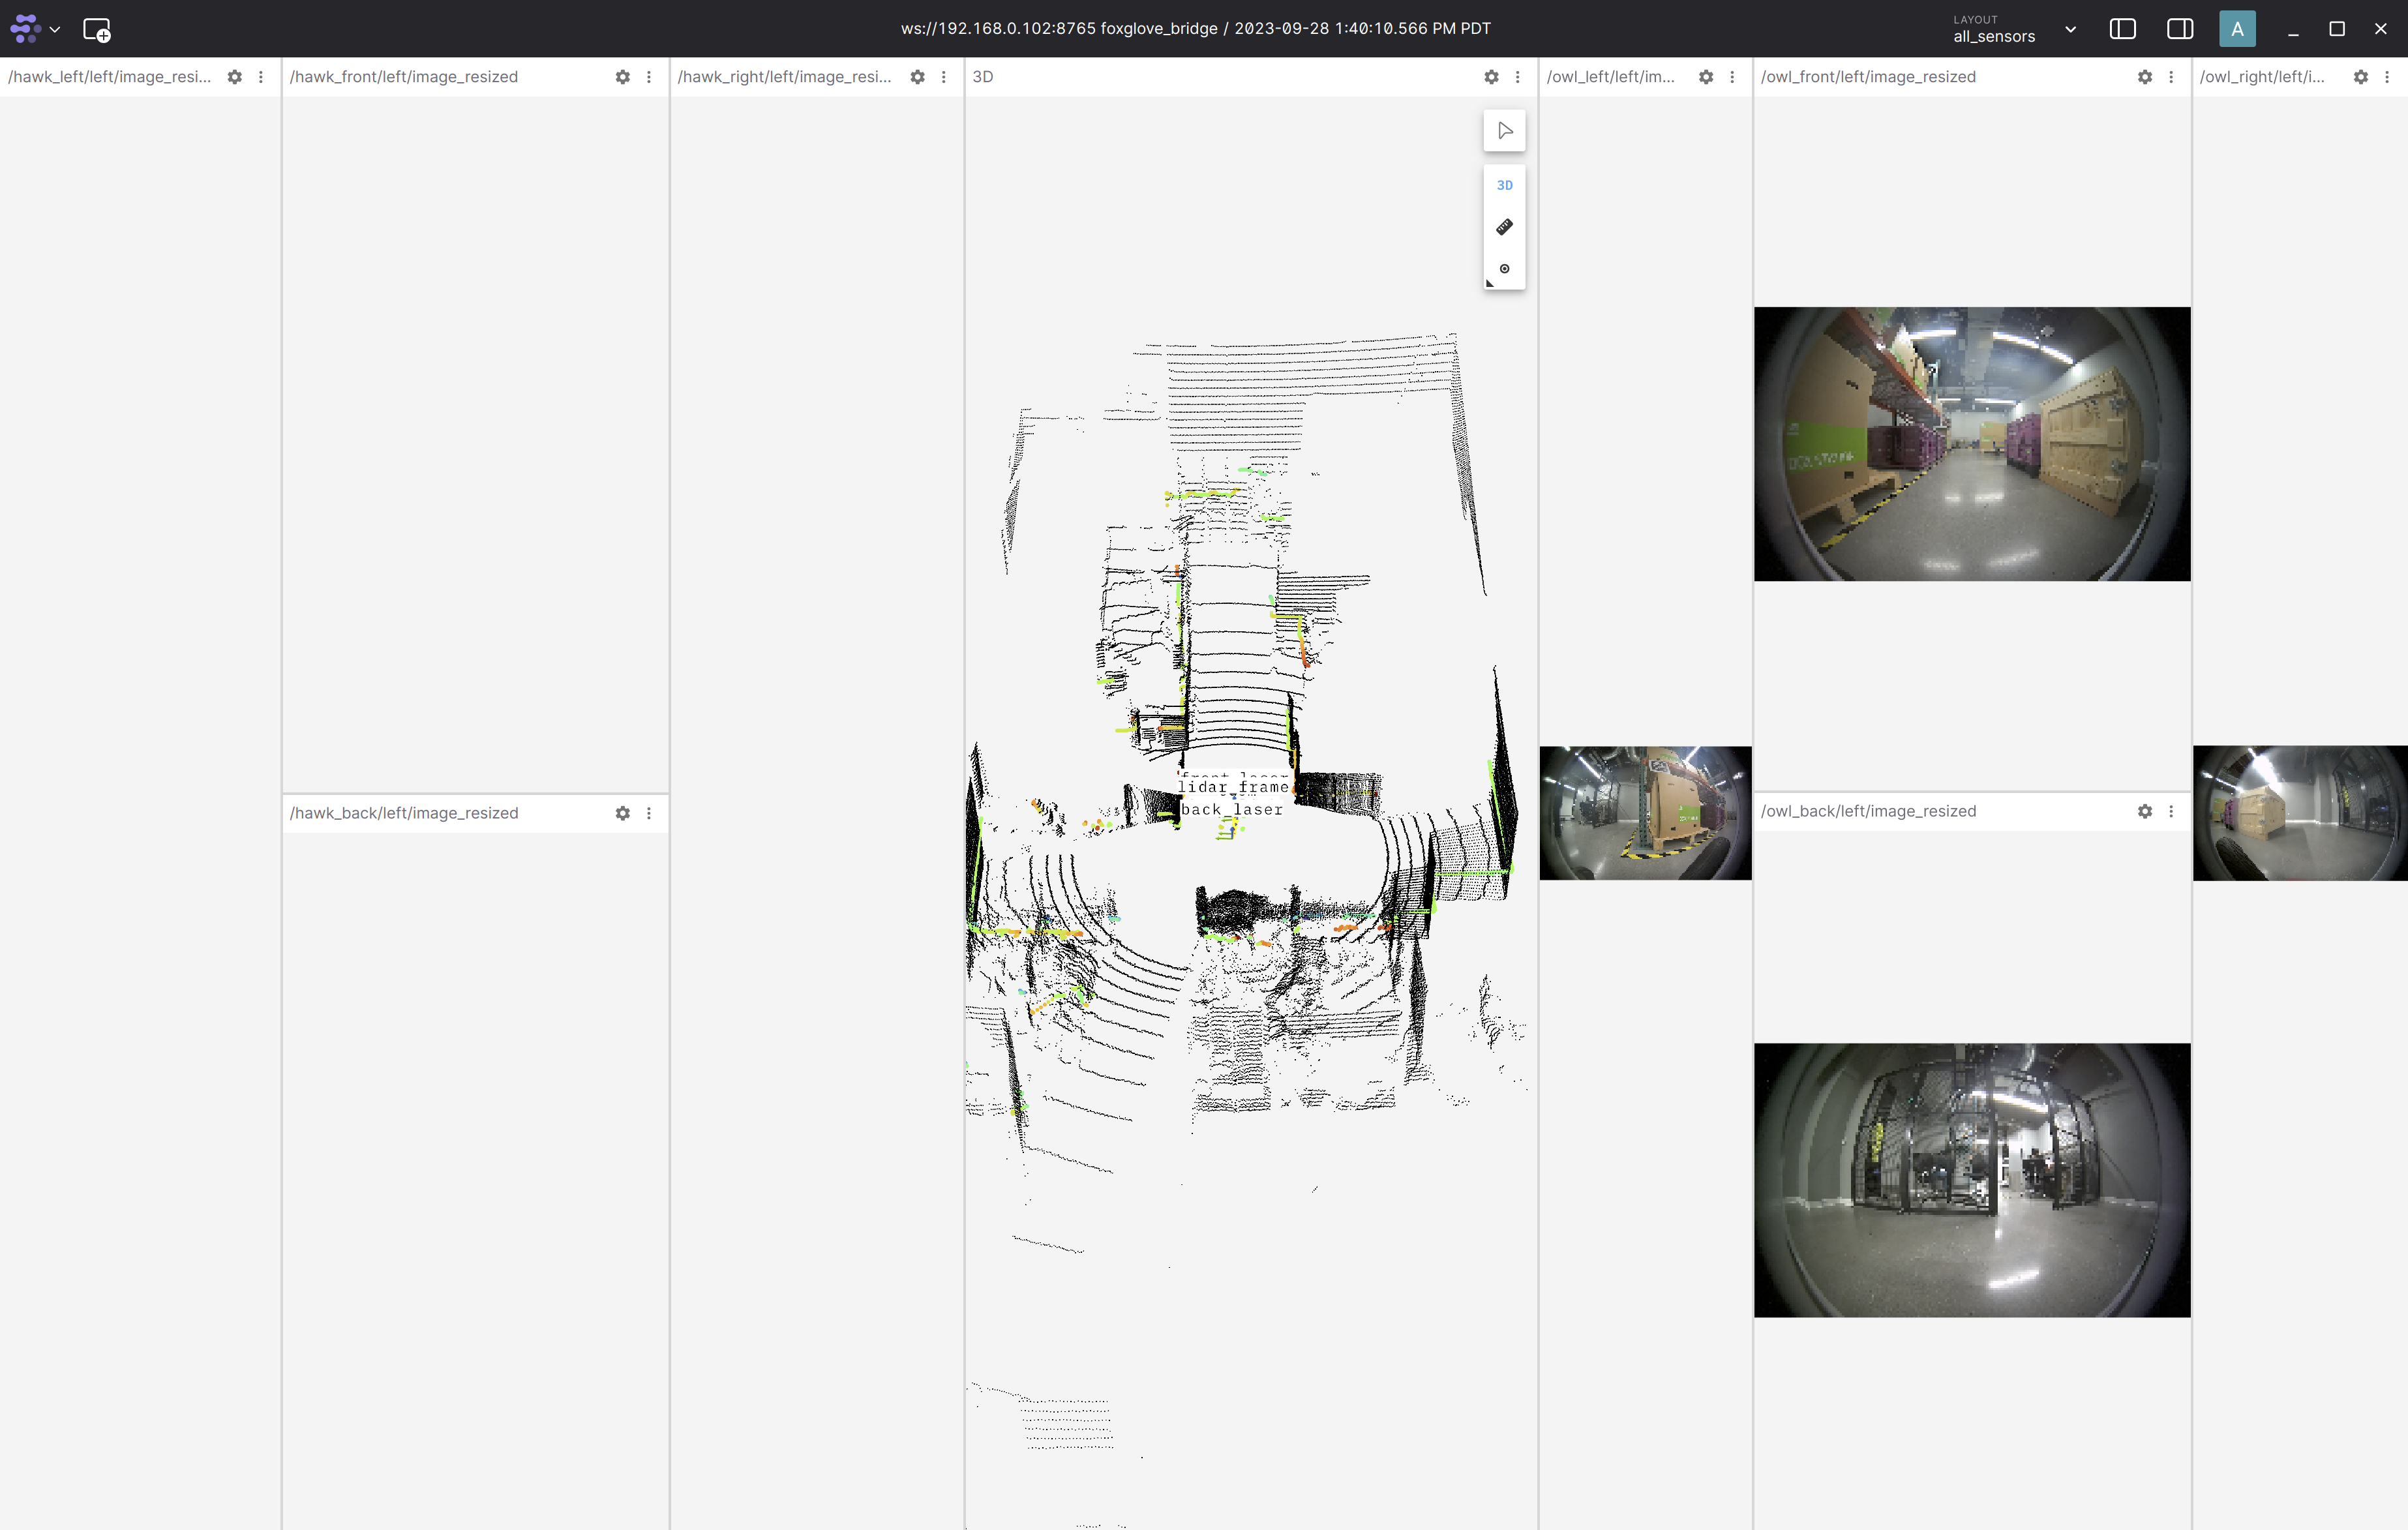
Mapping with slam_toolbox, Nav2, Hesai 3D Lidar and Segway Wheel Odometry
Connect the joystick by following steps using steps 1-2 from Joystick Driving with 4 Owl Fisheye Cameras.
Open a new terminal and connect it to the robot.
Launch the Docker container using the
run_dev.shscript:
cd $ISAAC_ROS_WS/src/isaac_ros_common && \
  ./scripts/run_dev.sh $ISAAC_ROS_WS
Run the launch file:
cd /workspaces/isaac_ros-dev && \ source install/setup.bash && \ ros2 launch carter_navigation mapping.launch.py
Complete the foxglove setup. The
foxglove_layout_nav2.jsonFoxglove layout file can be found in the nova_carter repository. You should see the map, local costmap data, and footprint of the robot in foxglove as shown below: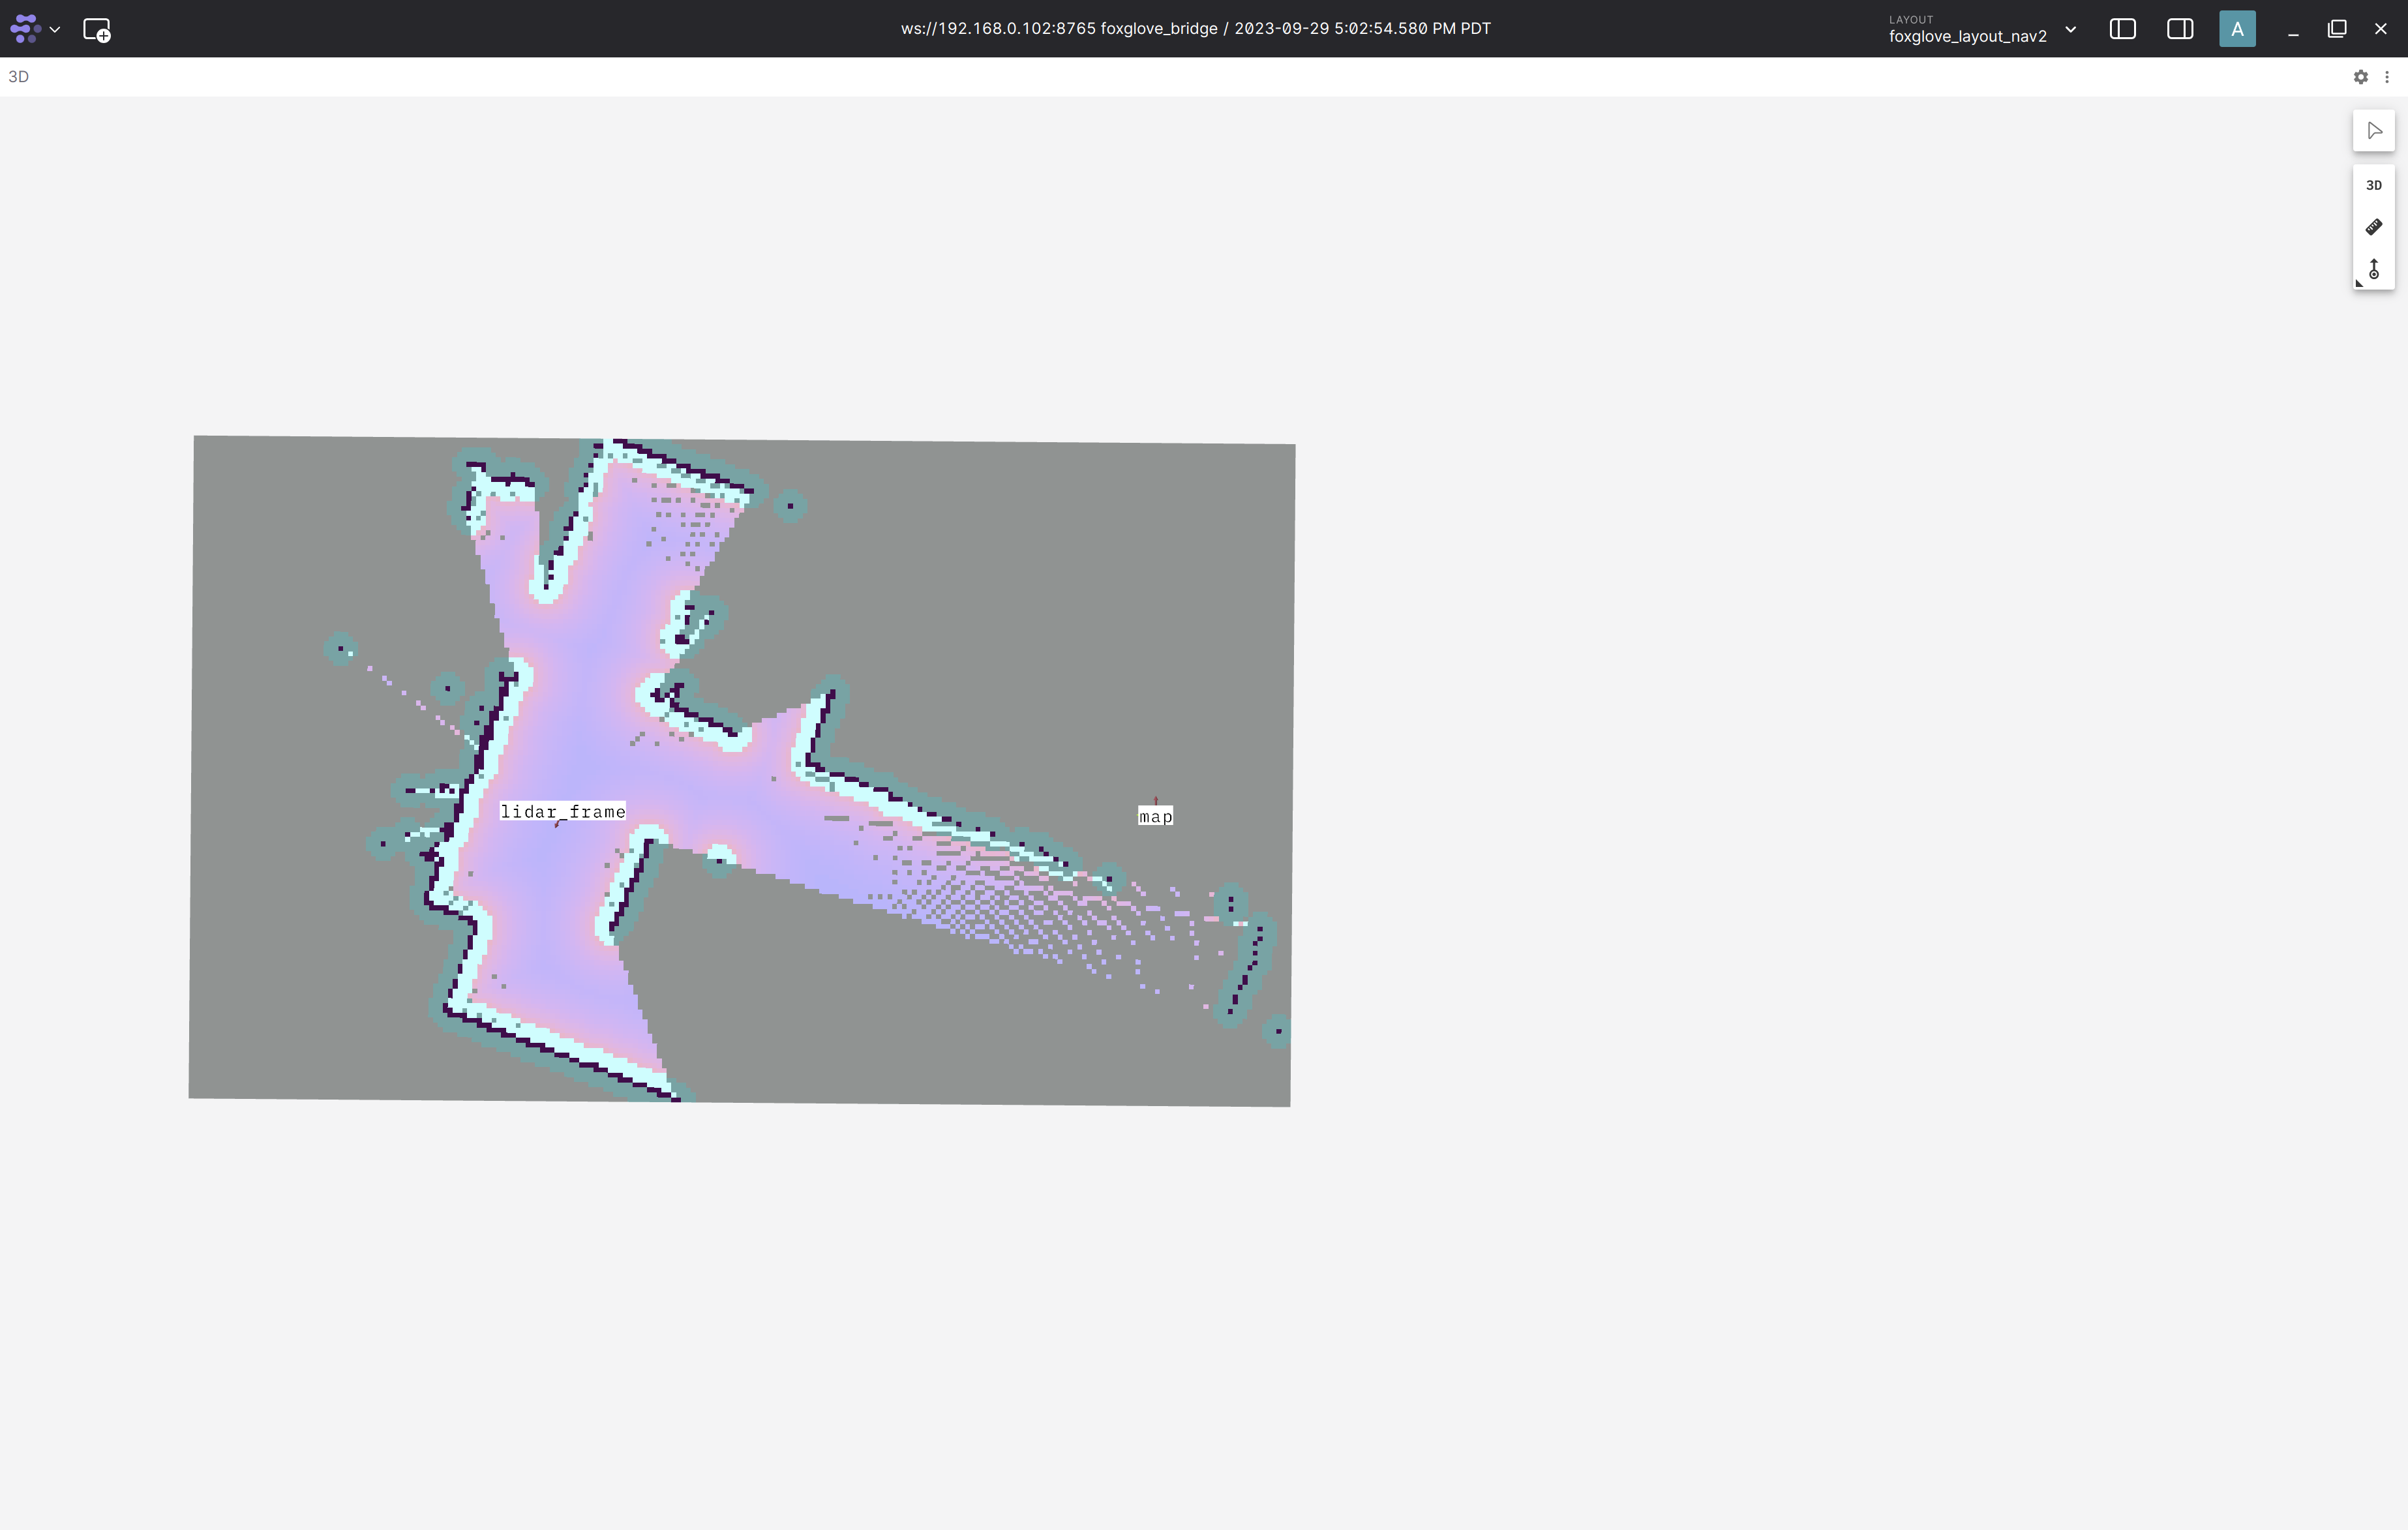
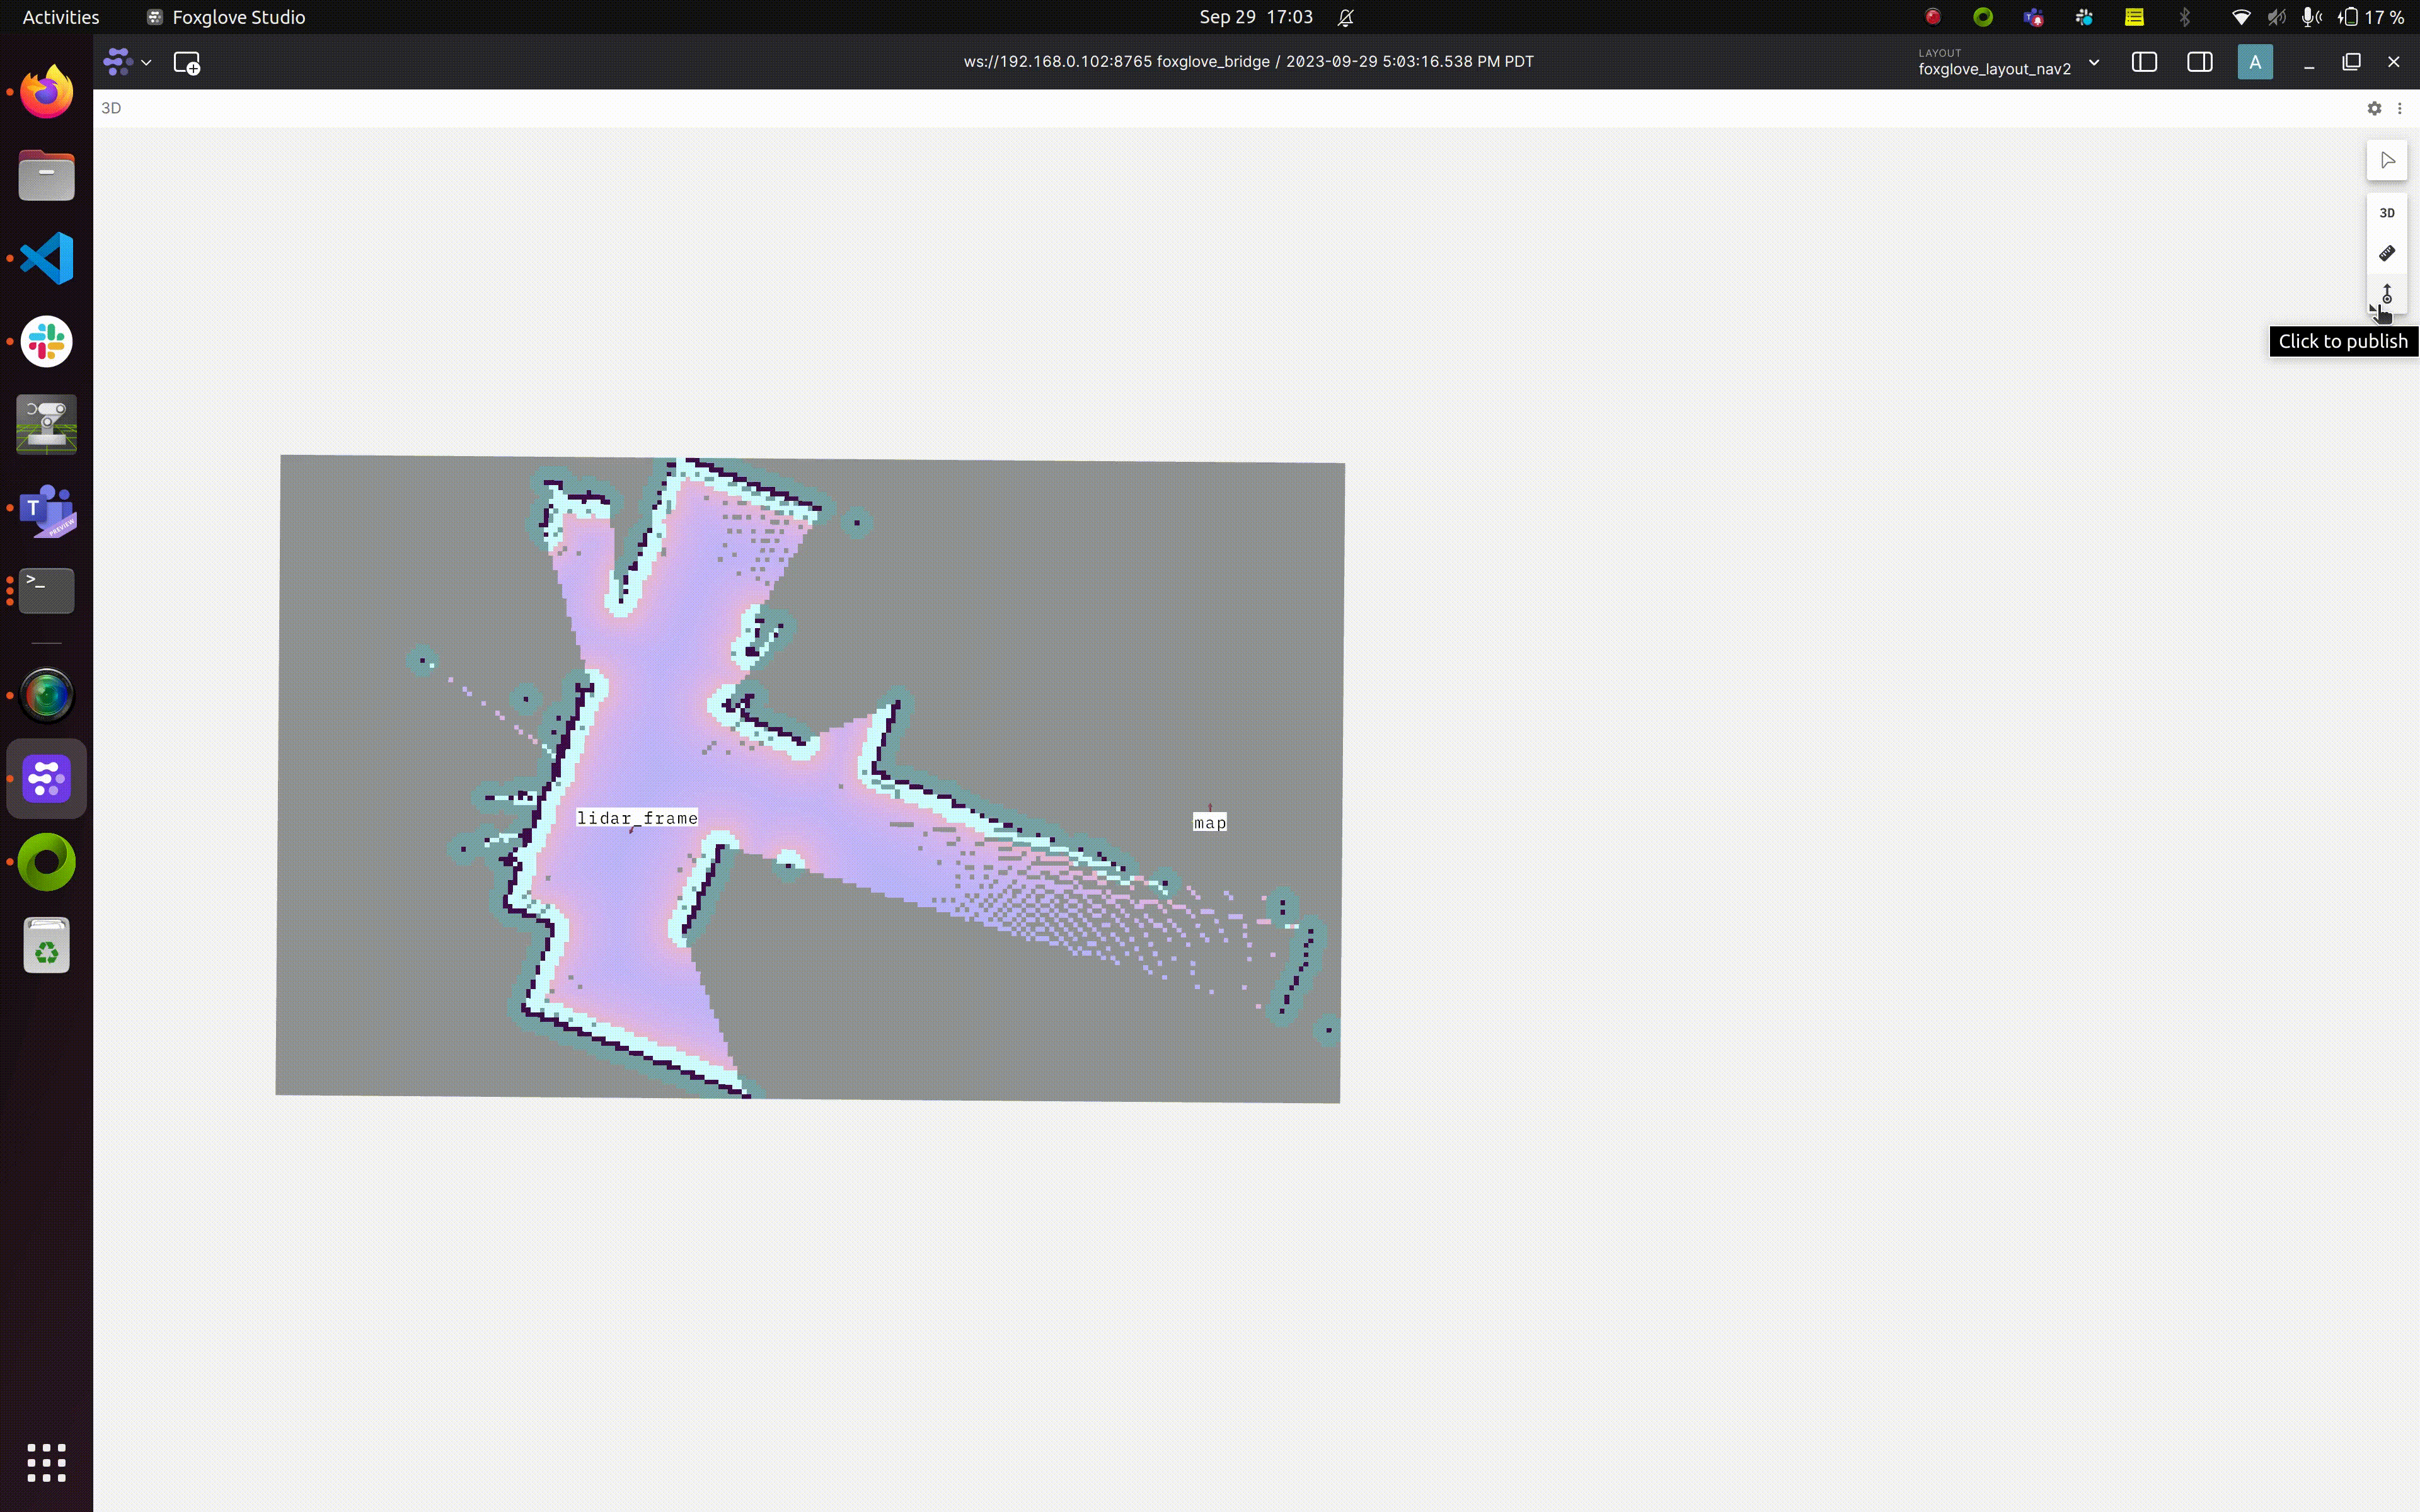
You can move the robot around using the joystick. You can also move the robot around using Nav2 (autonomous navigation) as shown in the next step.
You can send a goal pose setpoint to Nav2 using the Pose publish button in Foxglove as shown below:
Note
You can use the joystick to override Nav2 autonomous control at any point.
Attach a new terminal to the Docker container using the
run_dev.shscript:
cd $ISAAC_ROS_WS/src/isaac_ros_common && \
  ./scripts/run_dev.sh $ISAAC_ROS_WS
Run the below command to save the map
.pngand.yamlfile:
cd /workspaces/isaac_ros-dev && \
   ros2 run nav2_map_server map_saver_cli --fmt png -f map_filename
This
.yamlfile can be used as the input map launch file argument (map_yaml_file) in the next Nav2+AMCL tutorial.
Note
Use the
launch_nvblox_pipelinelaunch argument to enable the front hawk + Isaac ROS ESS + Isaac ROS Nvblox 3D reconstruction pipeline
Nav2 with Hesai 3D lidar and Segway Wheel Odometry
The teleop.launch.py file can be used to launch all the sensors on the Nova Carter robot.
Note
Streaming higher bandwidth data to Foxglove causes higher latency. You can choose an appropriate value for the send_buffer_limit parameter in Foxglove bridge to control latency versus high bandwidth data visualization.
Open a new terminal and connect it to the robot.
Launch the Docker container using the
run_dev.shscript:cd $ISAAC_ROS_WS/src/isaac_ros_common && \ ./scripts/run_dev.sh $ISAAC_ROS_WS
Run the launch file:
cd /workspaces/isaac_ros-dev && \
   source install/setup.bash && \
   ros2 launch carter_navigation nav2.launch.py
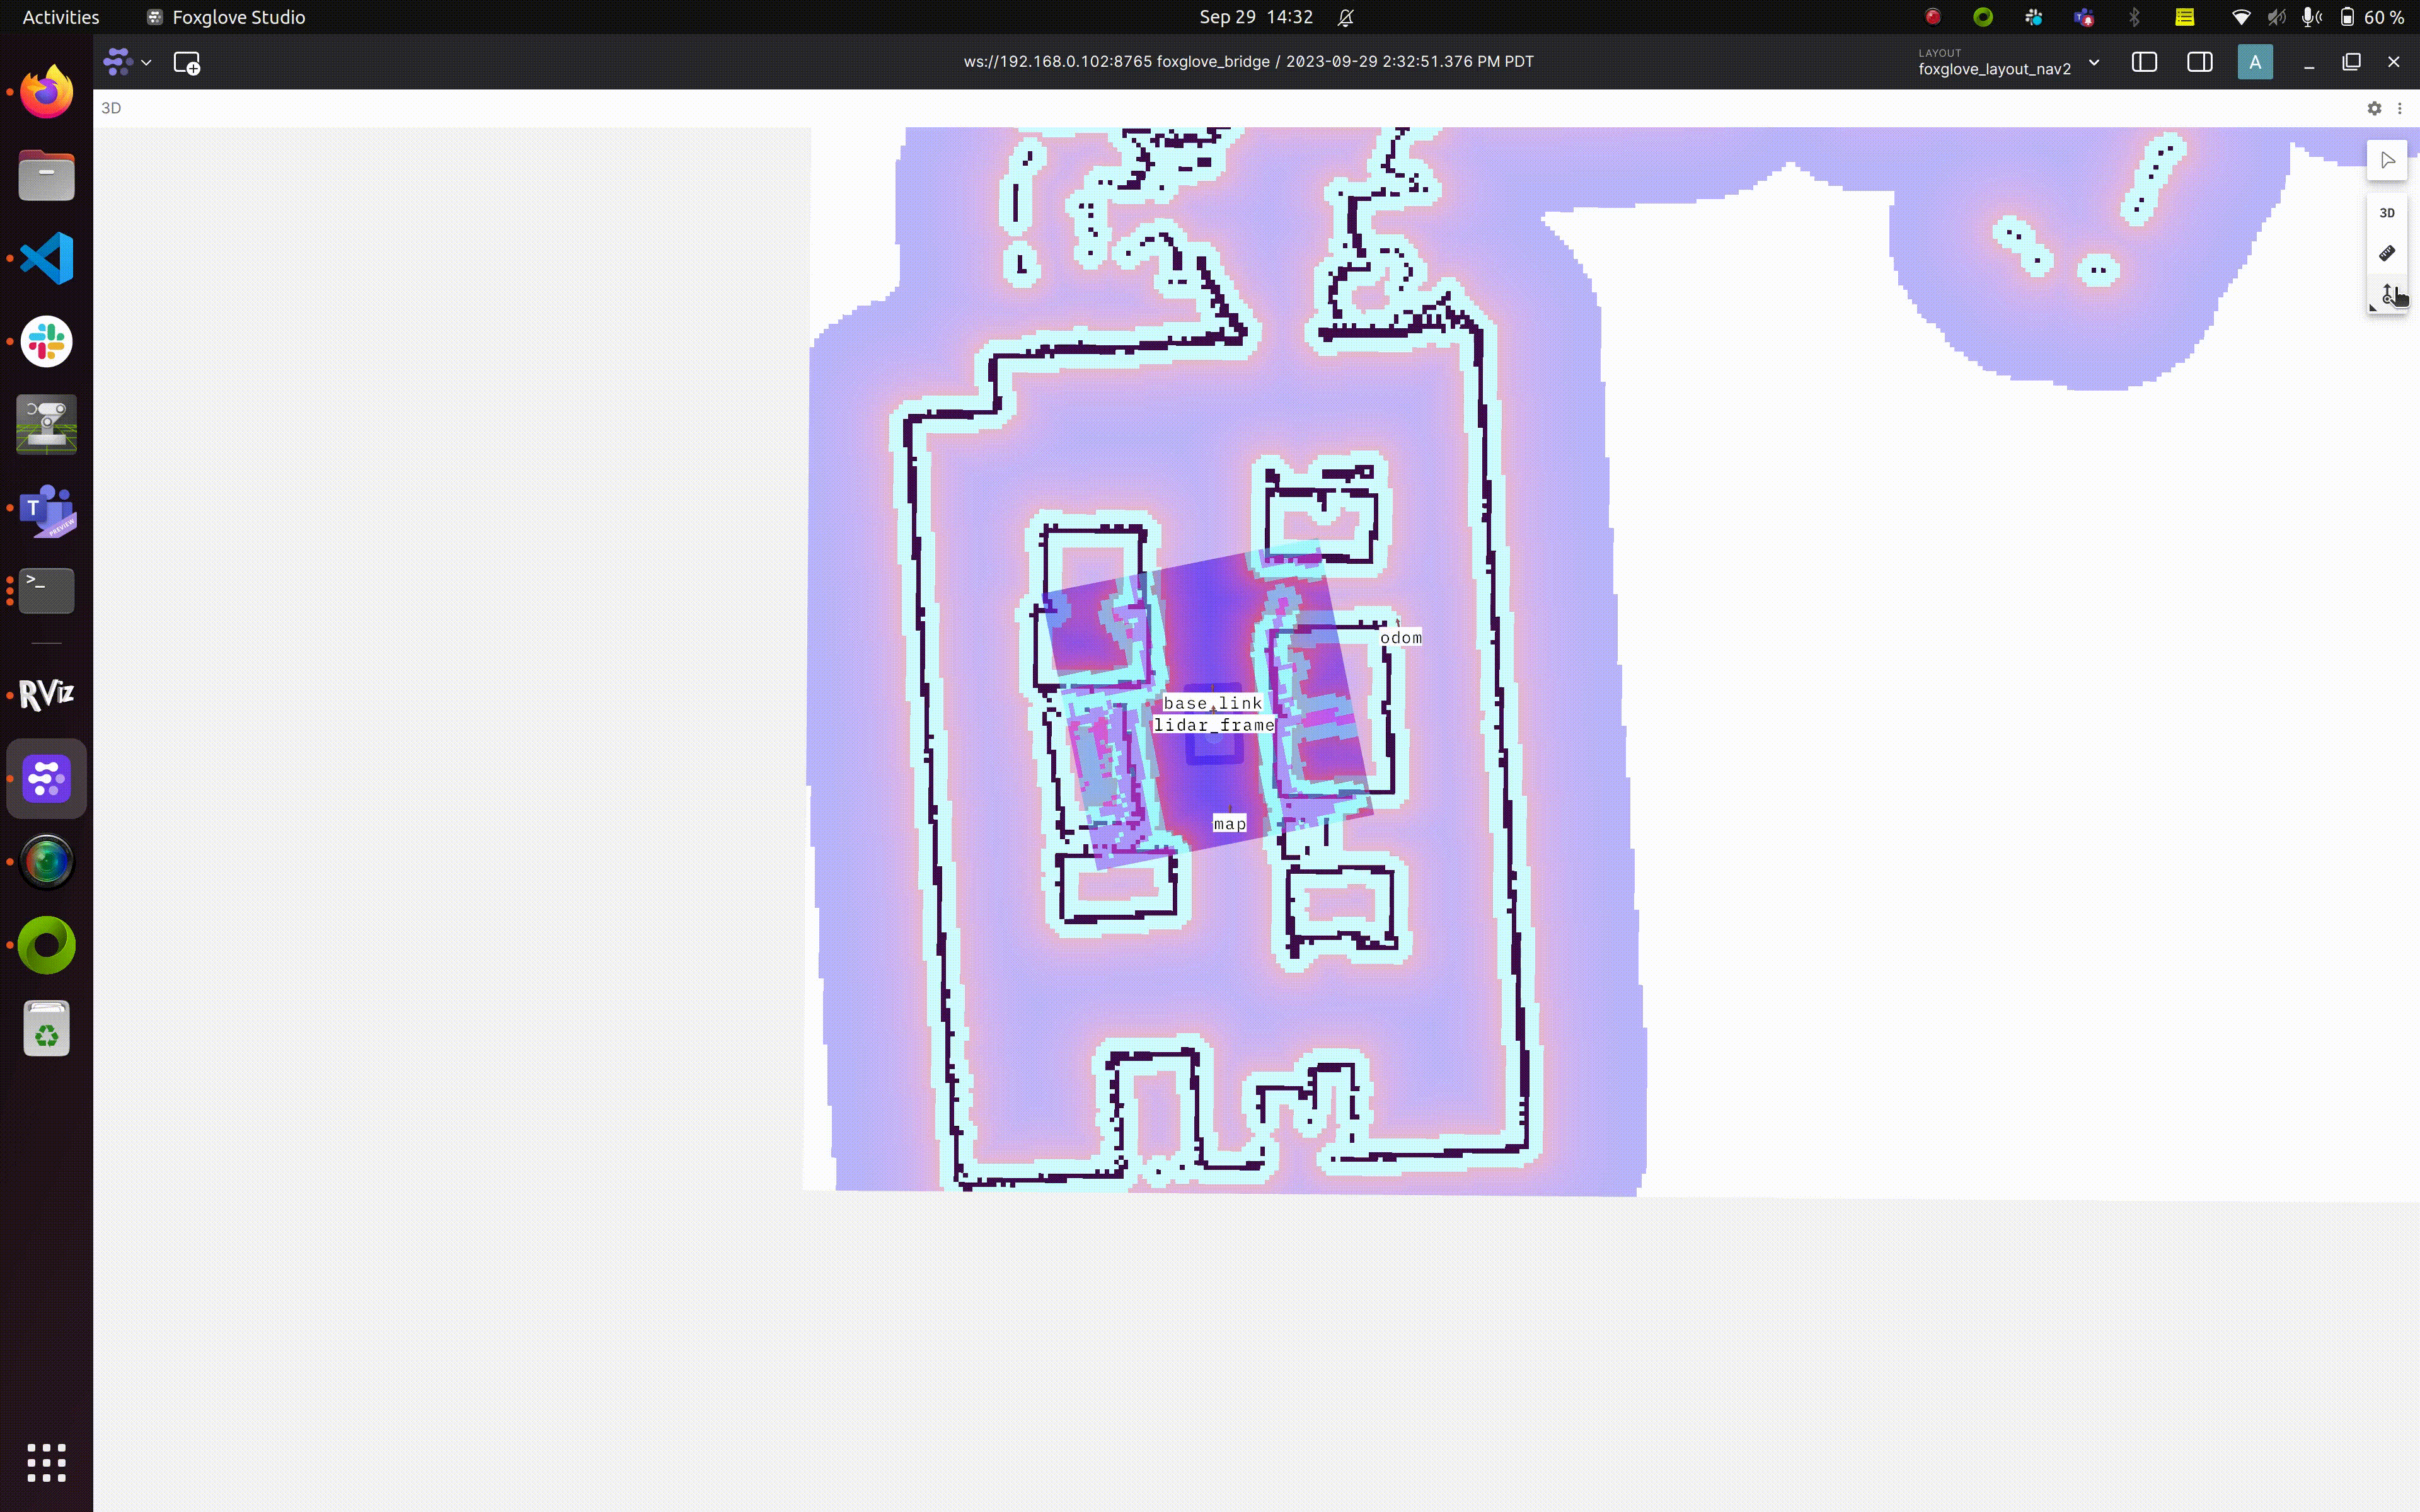
Complete the foxglove setup. The
foxglove_layout_nav2.jsonFoxglove layout file can be found in thenova_carterrepository here. You should see the map, local costmap data, and footprint of the robot in Foxglove as shown below: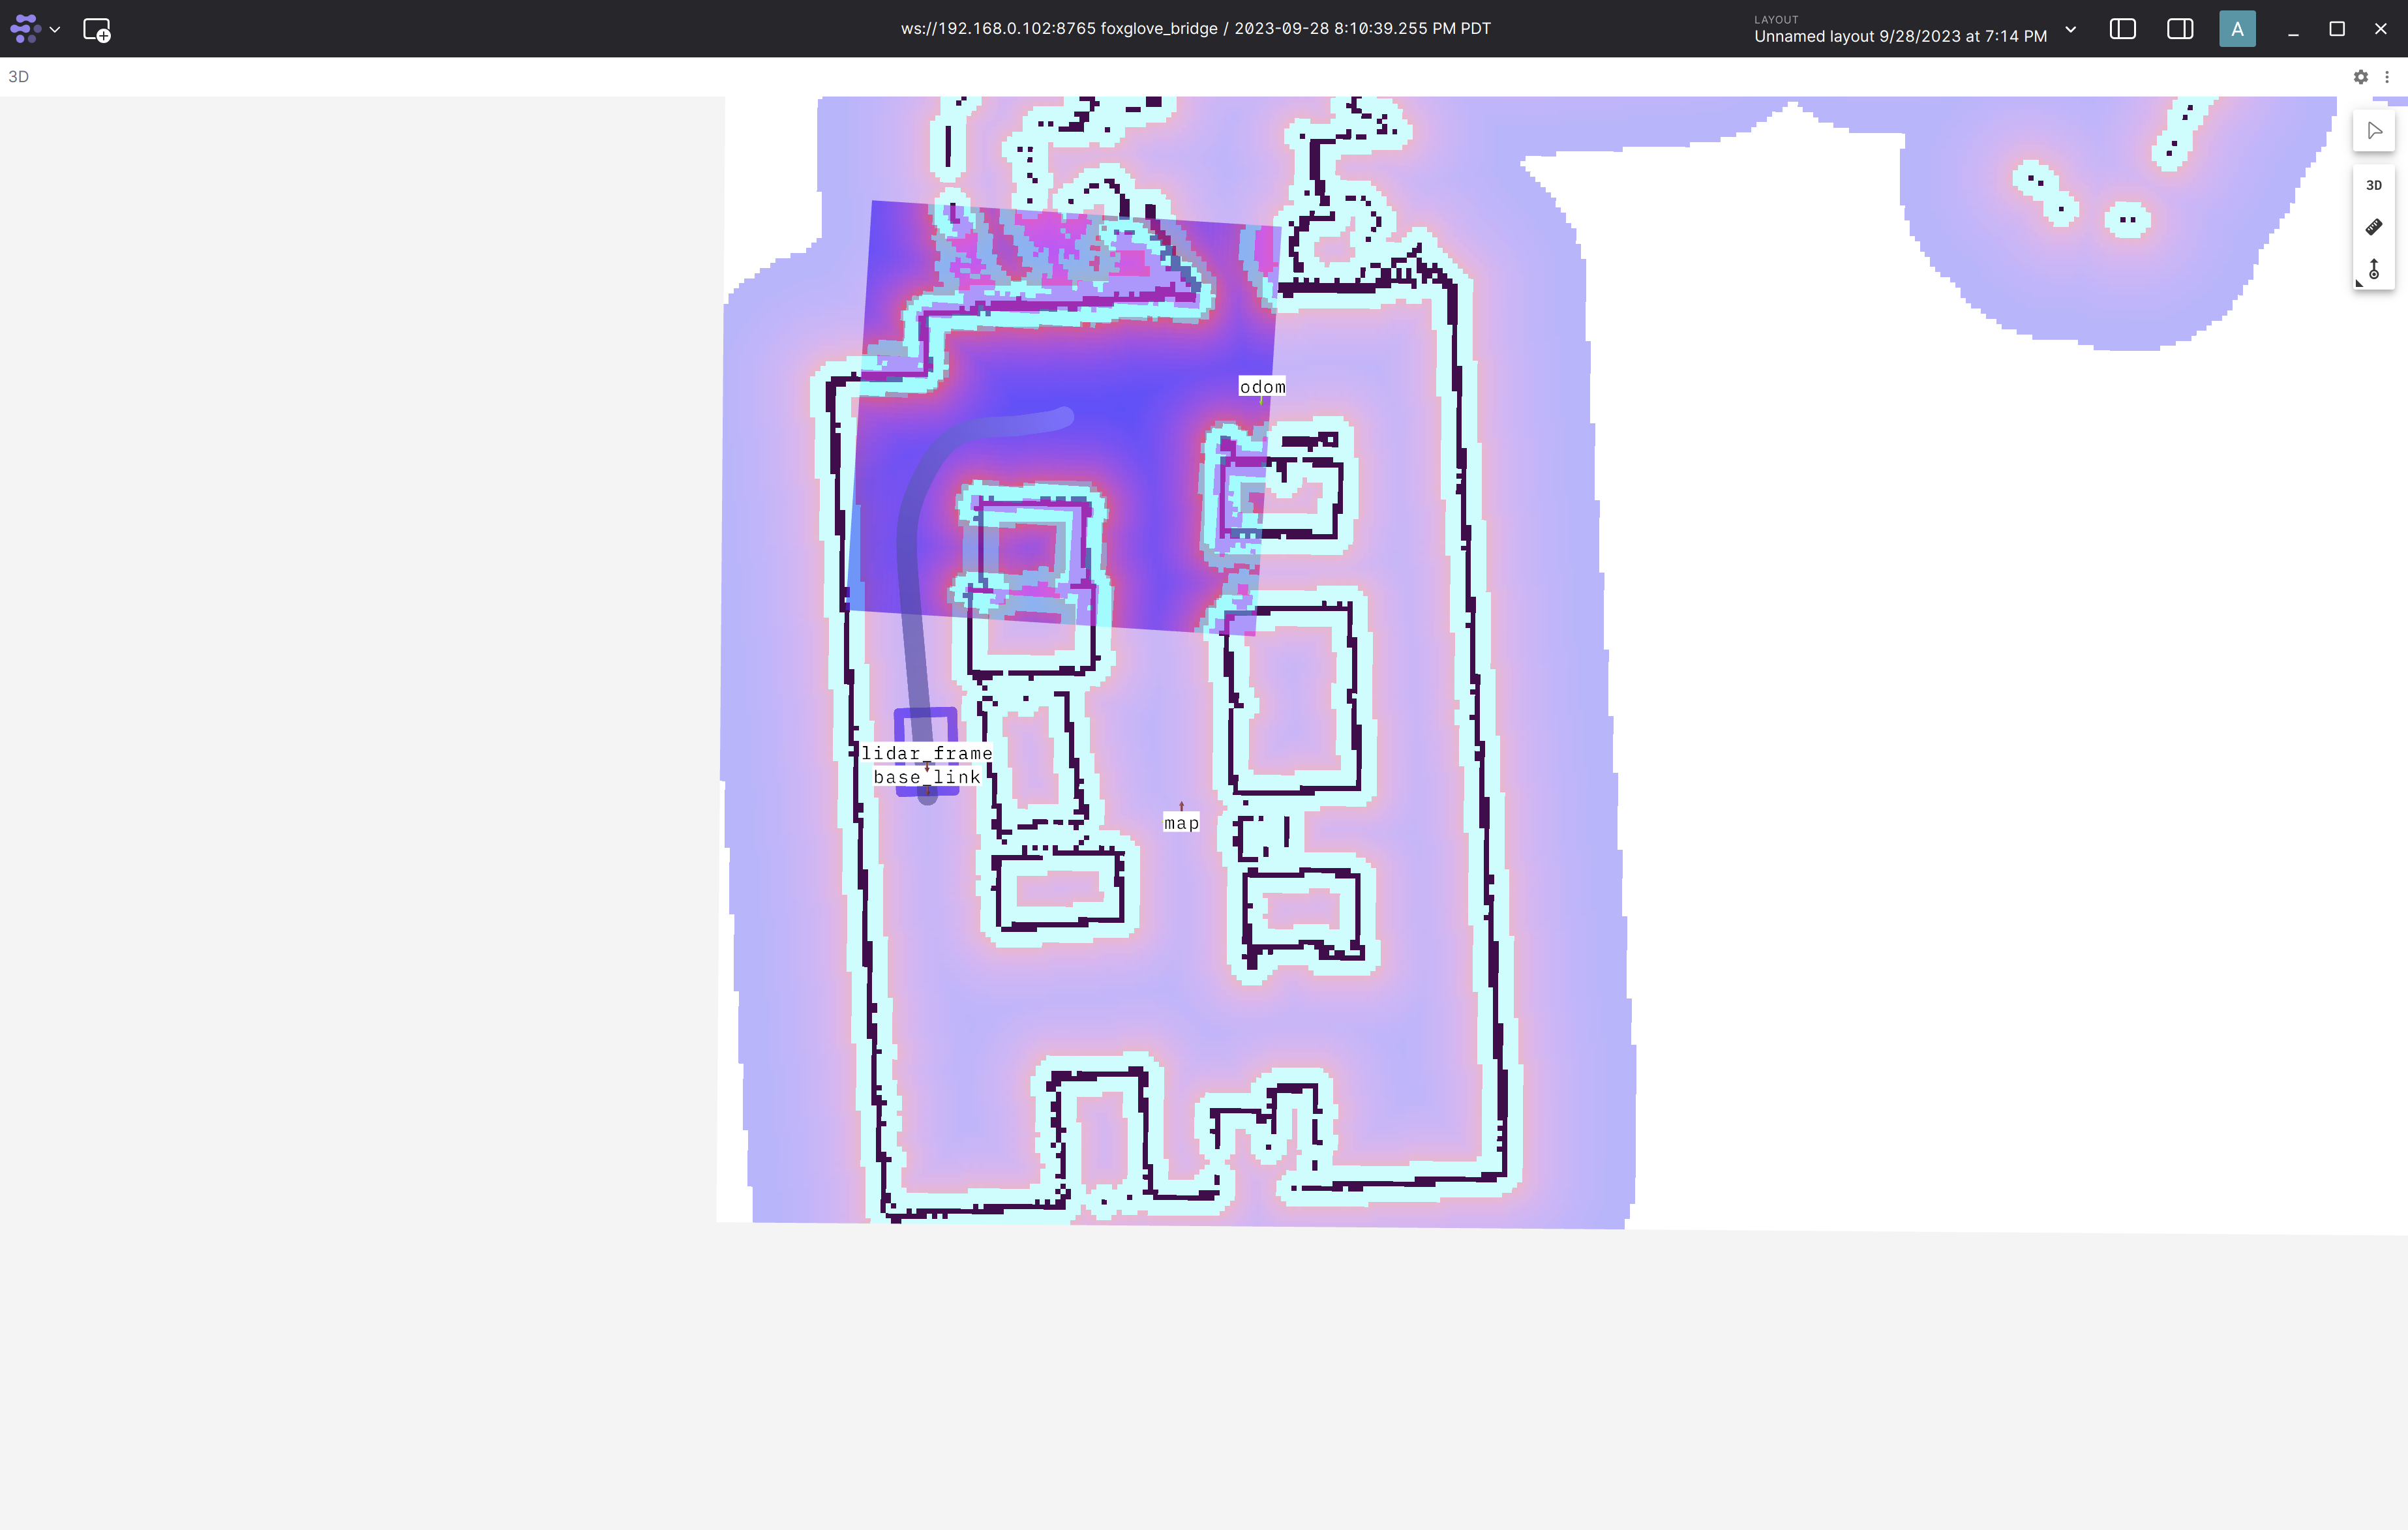
You can send a goal pose setpoint to Nav2 using the Pose publish button in Foxglove as shown below:
Note
You can use the joystick to override Nav2 autonomous control at any point.
Note
To pass a custom map YAML file path use the map_yaml_file launch argument.
Note
Use the launch_nvblox_pipeline launch argument to enable the front hawk + Isaac ROS ESS + Isaac ROS Nvblox 3D reconstruction pipeline
Foxglove Setup
On your visualization computer (laptop), setup the Isaac ROS development environment by following these steps
Clone the
nova_carterrepository:cd ${HOME}/workspaces && \ git clone --recurse-submodules https://github.com/NVIDIA-ISAAC-ROS/nova_carter.git
Install Foxglove Studio, launch Foxglove Studio:
Click on the “Open connection” button. Connect to the Foxglove bridge running on the robot by replacing
localhostwith the ip of the robot: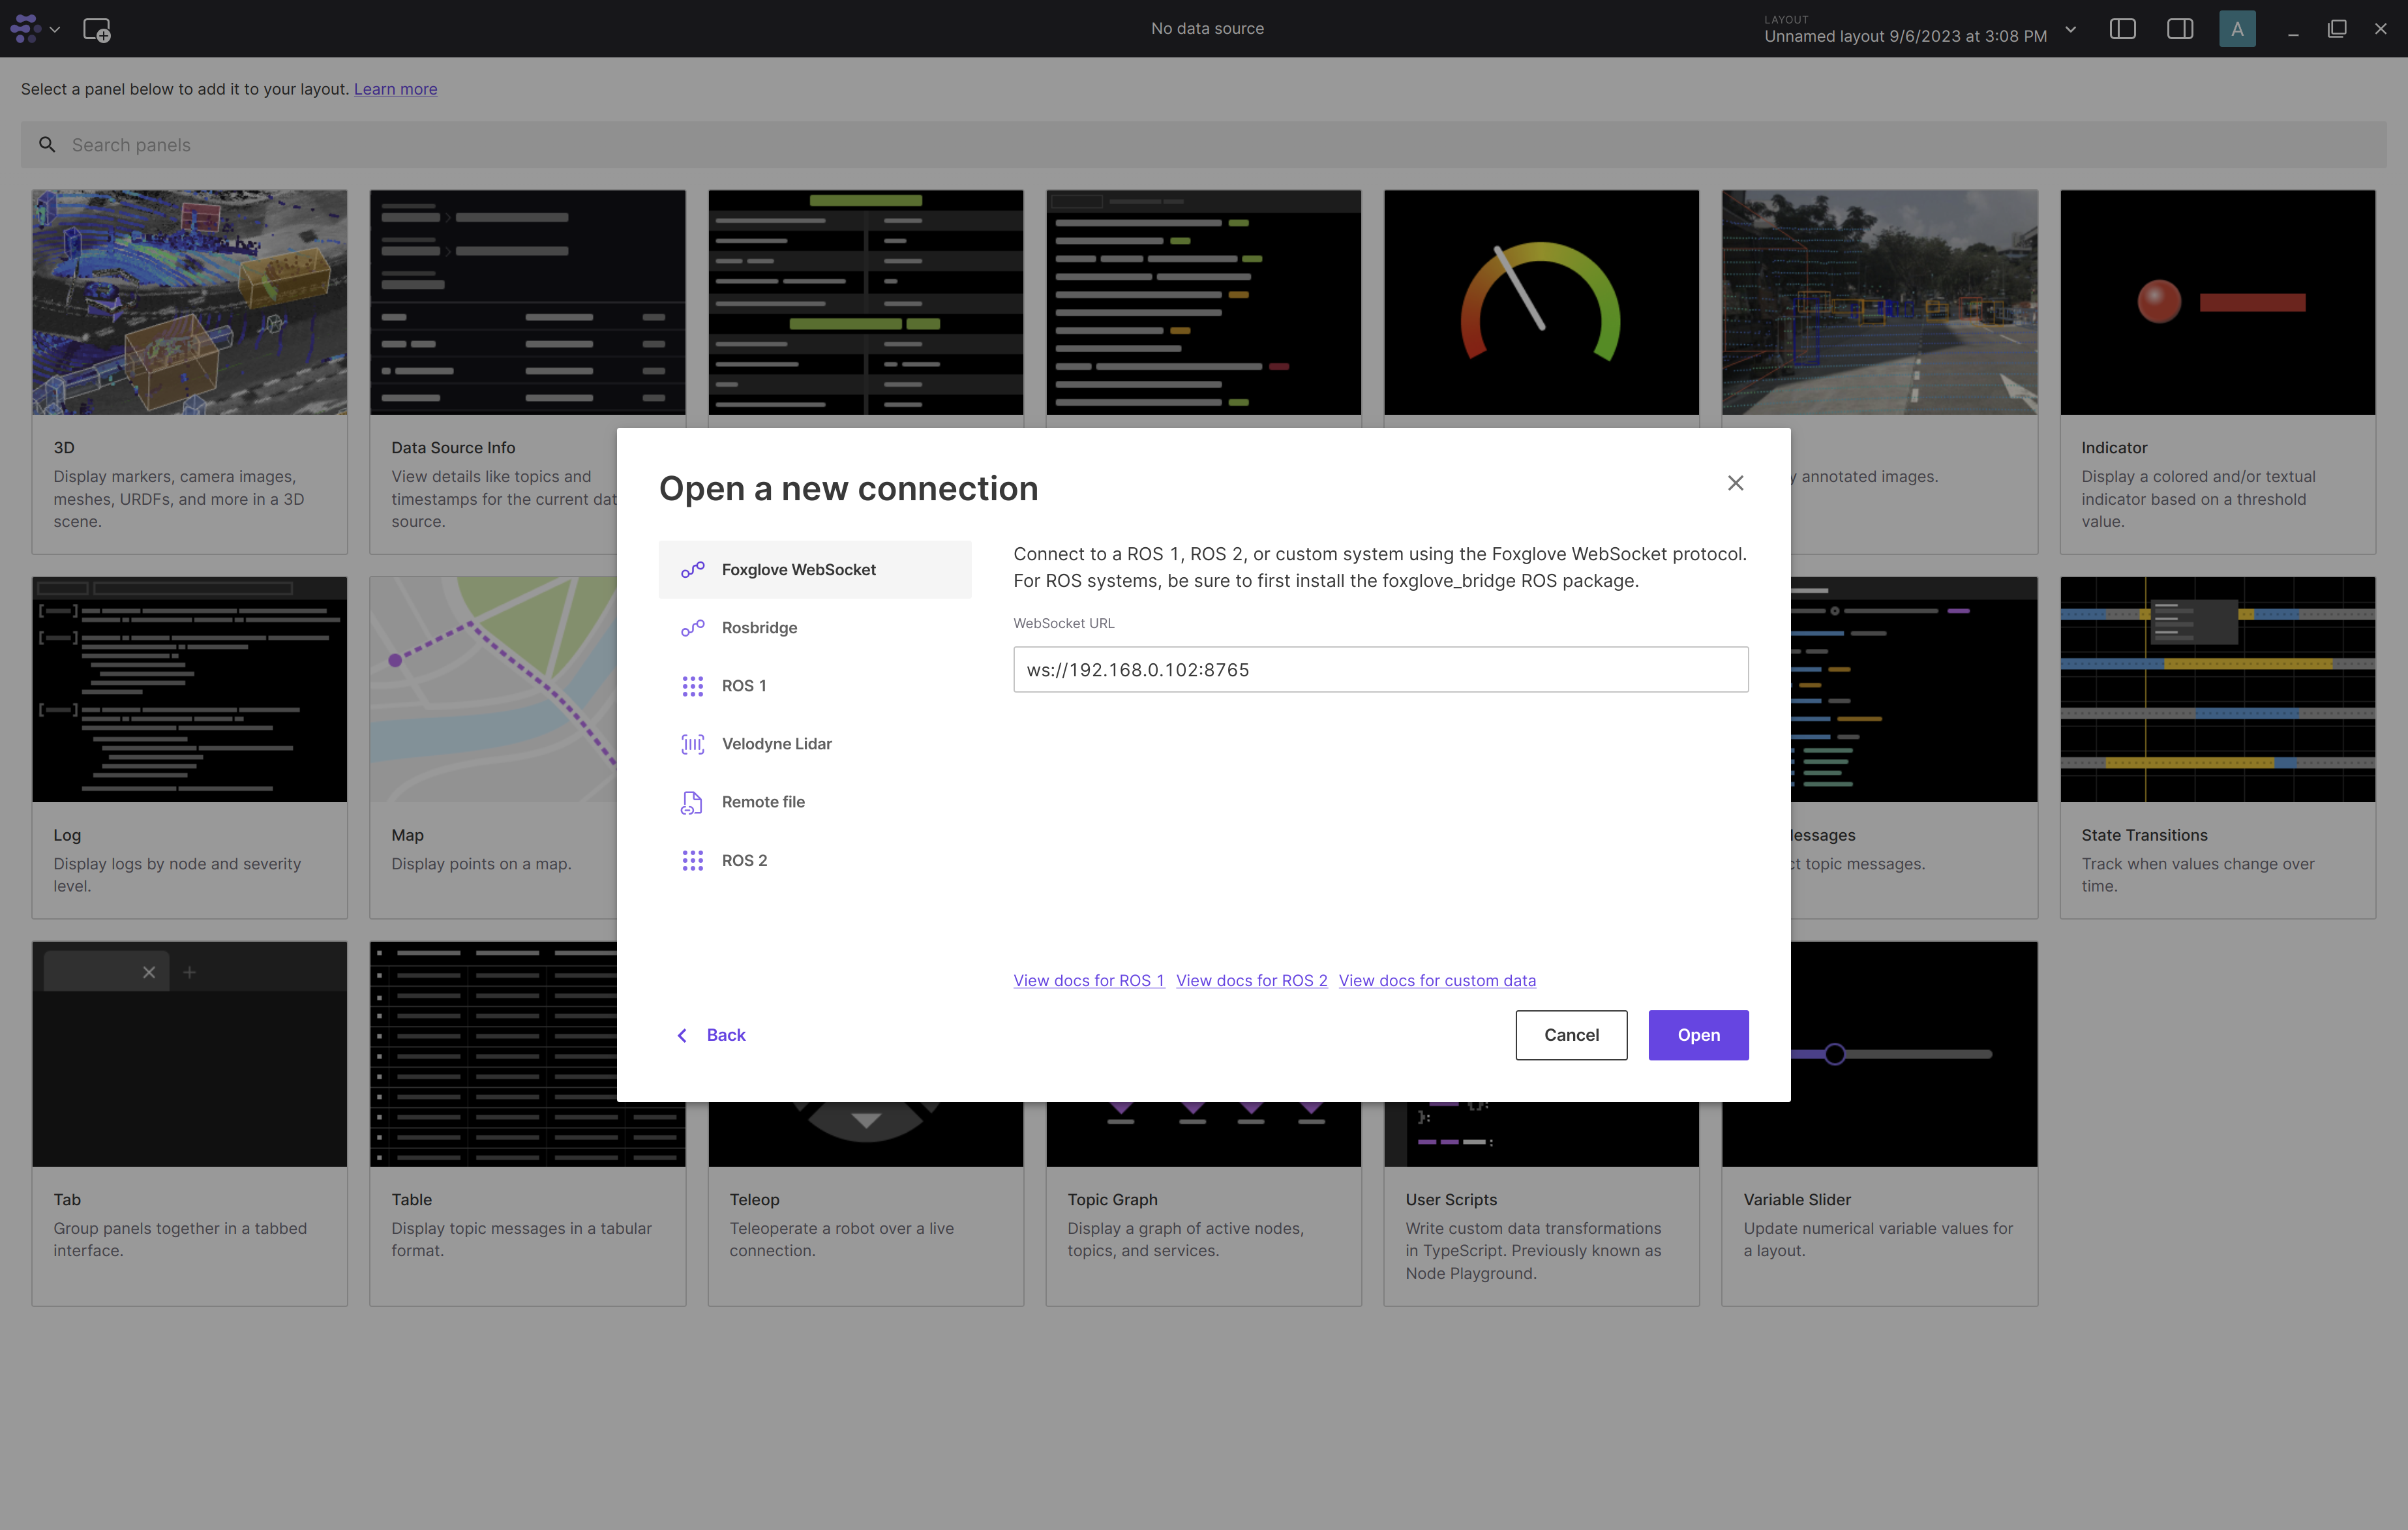
A layout file is provided for each tutorial in the nova_carter repository.
Import this layout file by clicking on the
Import from file...in thelayoutdrop down menu and choosing the layout file from the${HOME}/workspaces/nova_carter/carter_navigation/foxglove_layouts.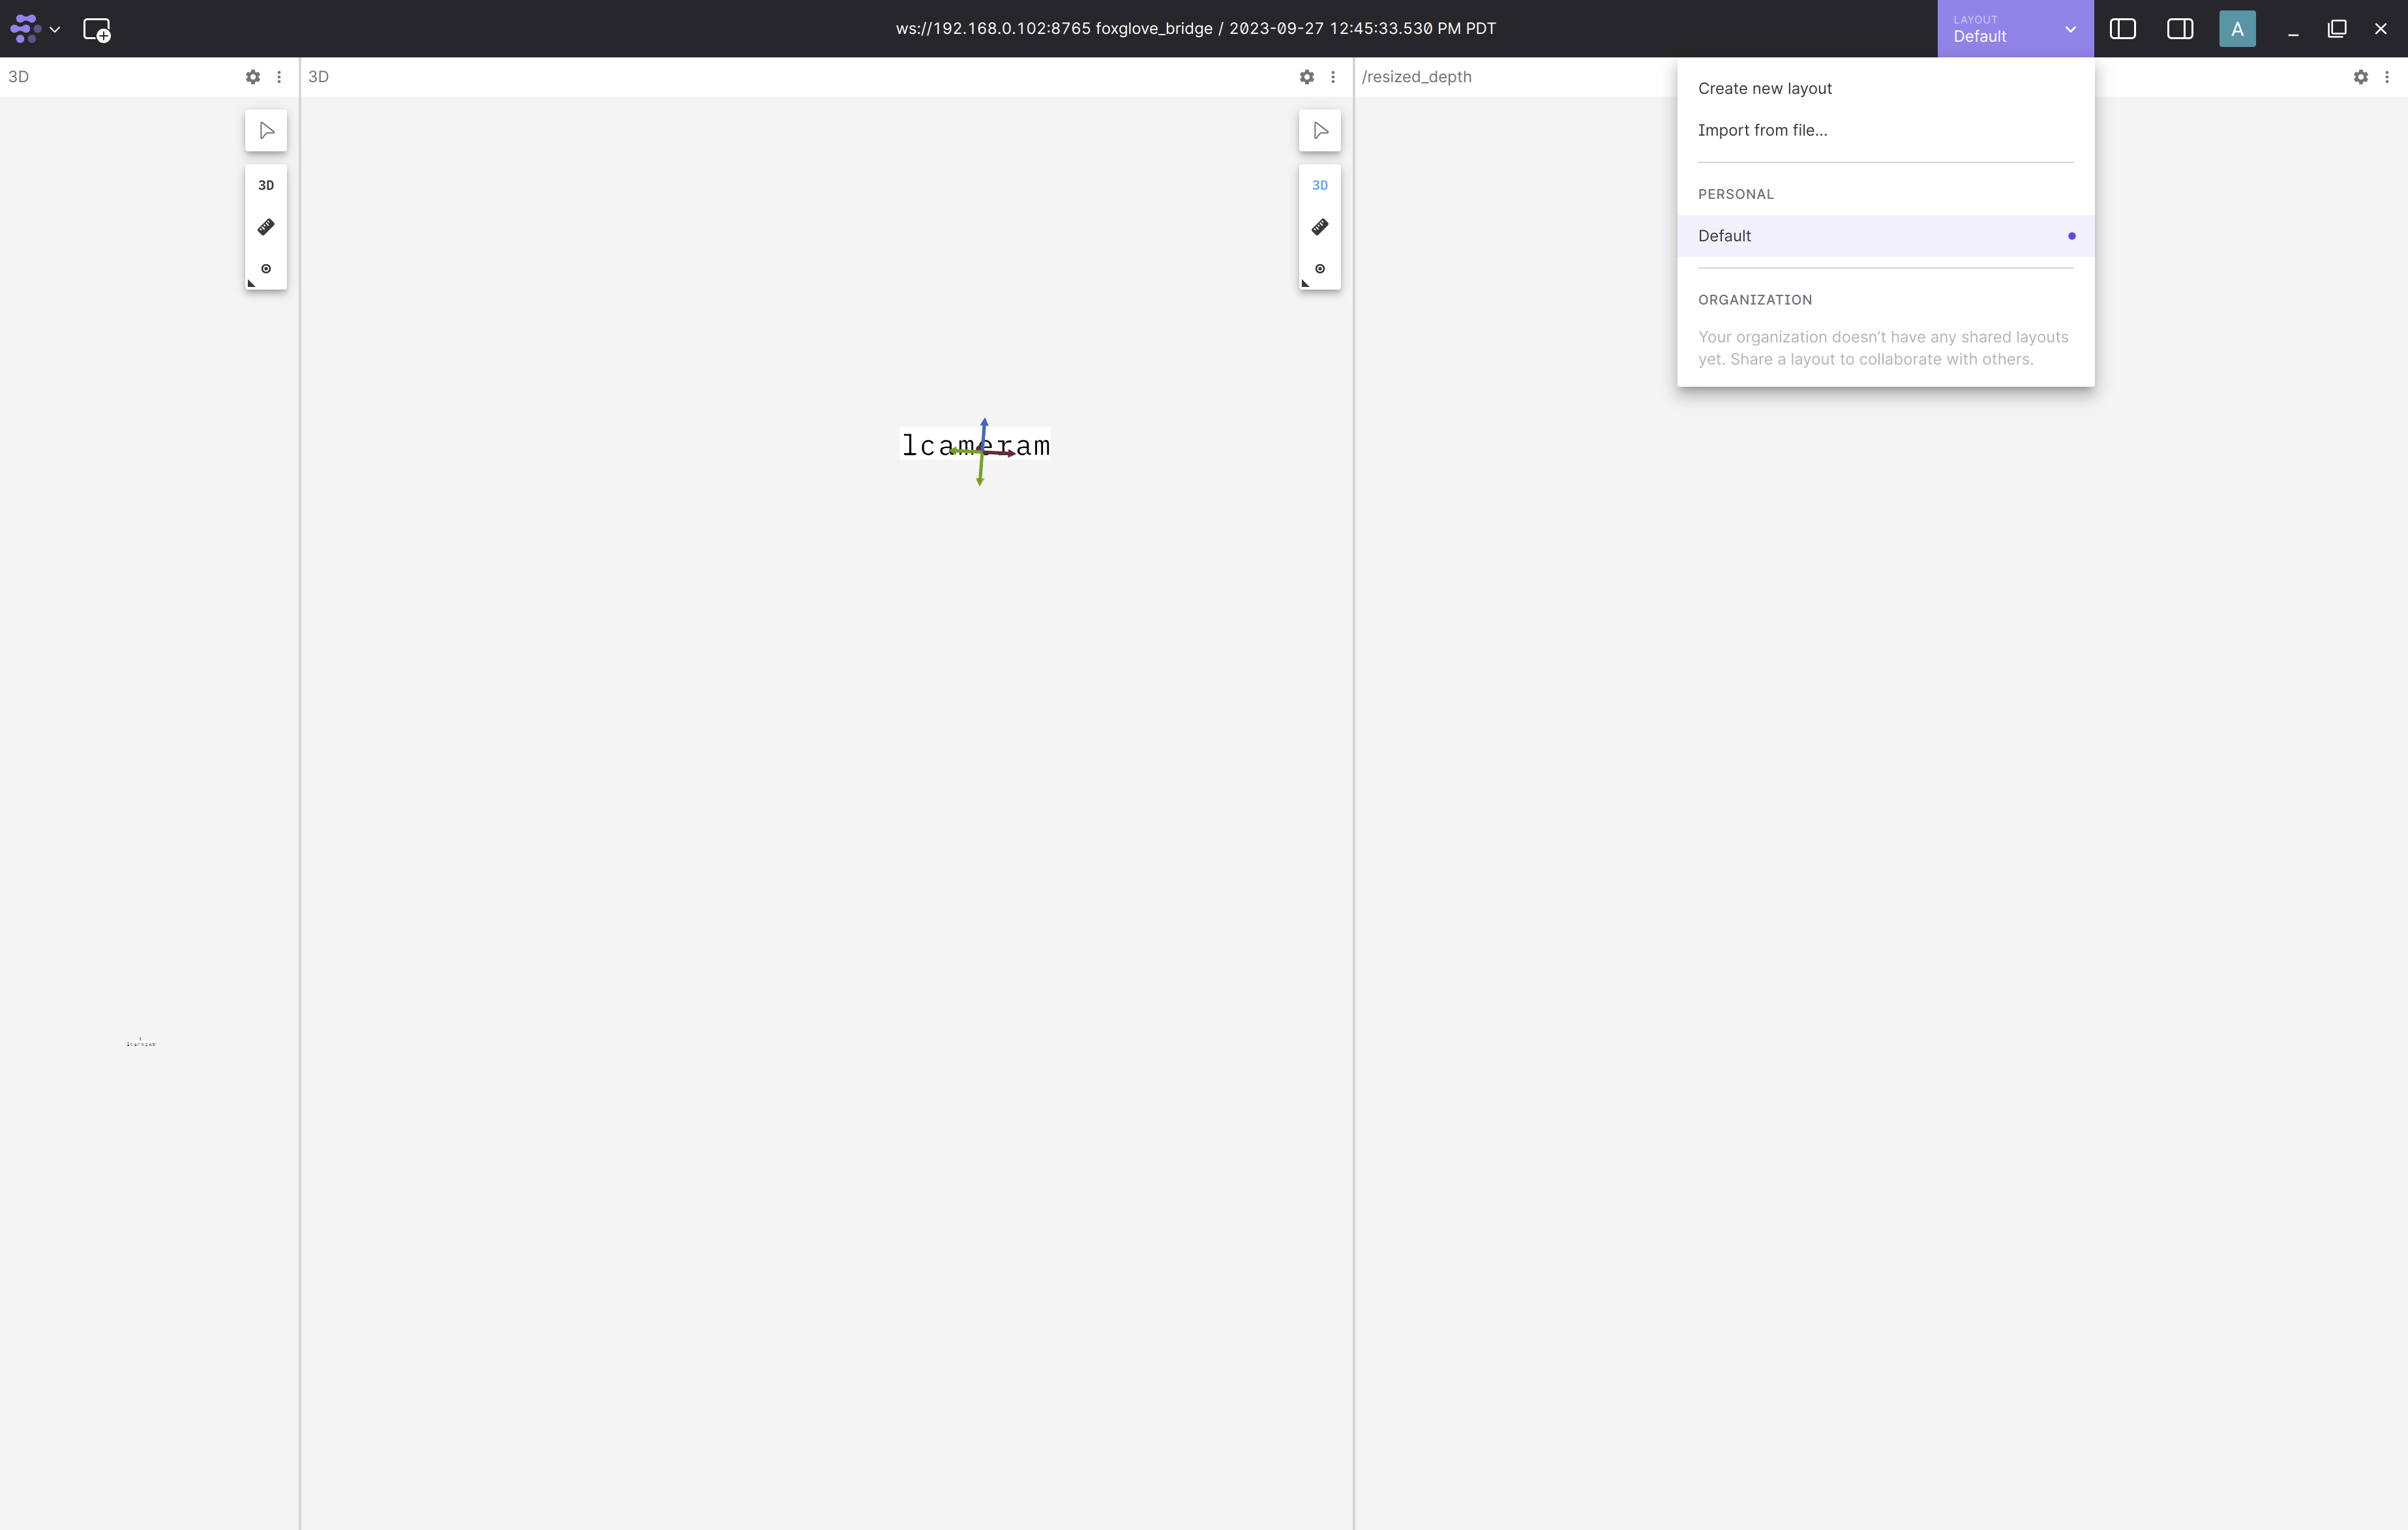
AMCL Tuning
We made the following changes to the AMCL default parameters:
1. Used the beam laser_model_type instead of the default “likelihood_field” laser_model_type
2. Reduced the z_hit Gaussian model sigma(sigma_hit) to 0.1
3. Set the beam laser_model_type weights to z_hit: 0.5, z_max: 0.05, z_rand: 0.4 and z_short: 0.05
4. Increased the max_beams parameter from 60 to 360 to allow for more detailed features to be used by AMCL
5. Decreased all odometry process noise from 0.2 to 0.1 to allow higher confidence in the robots wheel odometry
Troubleshooting
How do I Pair the Bluetooth Joystick with the Nova Carter Robot?
Refer to the pairing the controller section.
Jetson Won’t Connect to the Monitor Unless Ethernet Is Connected
This is a known bug. We’d recommend that you have the Nova Carter robot connected to Ethernet during the initial SW setup procedure in the documentation.
Robot Does Not Move:
In a terminal inside the Docker container, run
ros topic echo /cmd_vel.Ensure that when you press the buttons or move the joysticks, the values on the topic change. If it does not show any data move to the next step.
If you can see the expected values in the above command when pressing the joystick, check if the horizontal indicator light next to the power button on the robot is green. If it is not green, then the Segway ROS driver has gone into “locked state”.
You can fix this by running ros2 service call /reset_chassis std_srvs/srv/Empty {} in a new terminal that is attached to the Isaac ROS Docker container. The Segway driver has to be running to reset the chassis. Restarting the teleop, Nav2, or mapping launch files also resets the Segway driver.
ros2 topic hz Shows a Lower than Expected Value
Note
ros2 topic hzis known to cause 100% CPU load for the first ~6 seconds after running the command. And the frame rate measured during this period is inaccurate compared to when the command is not running. Use the--windowflag as shown below and wait for ~6 secs to get a more accurate measurement.Note
ros2 topic hzalso triggers the type adaptation NITROS nodes.
Run the following command to get a list of all the topics:
ros2 topic list
Run the
ros2 topic hzcommand of the required topic:ros2 topic hz <topic_name> --window 30
ros2 topic list on a remote system does not show all topics on robot
Note
We use Cyclone DDS as our ROS 2 middleware interface
Note
When using the below Cyclone DDS configuration file, replace
your_network_interface,robot_ipandremote_system_ipwith appropriate values.
Check if your system allows multicast communication by following the steps in this medium post
If it does not, disable multicast and set the peer IPs manually as shown in this medium post. An example of the cyclone DDS config file is also given below:
<CycloneDDS xmlns="https://cdds.io/config" xmlns:xsi="http://www.w3.org/2001/XMLSchema-instance" xsi:schemaLocation="https://cdds.io/config https://raw.githubusercontent.com/eclipse-cyclonedds/cyclonedds/master/etc/cyclonedds.xsd">
<Domain id="any">
<General>
<Interfaces>
   <NetworkInterface name="your_network_interface"  multicast="false" />
</Interfaces>
<AllowMulticast>false</AllowMulticast>
<EnableMulticastLoopback>false</EnableMulticastLoopback>
</General>

<Discovery>
<!-- Replace with robot and visualization machine ip -->
<Peers>
   <Peer address="robot_ip"/>
   <Peer address="remote_system_ip"/>
</Peers>
<ParticipantIndex>auto</ParticipantIndex>
<MaxAutoParticipantIndex>200</MaxAutoParticipantIndex>
</Discovery>
</Domain>
</CycloneDDS>