Getting Started#
Isaac ROS is a collection of NVIDIA® CUDA®-accelerated computing packages and AI models designed to streamline and expedite the development of advanced AI robotics applications.
NVIDIA Isaac ROS is built on open-source ROS 2. Through Isaac ROS, developers in the ROS community can take advantage of NVIDIA-accelerated libraries and AI models to fast track their AI robot development and deployment workflows.
System Requirements#
Supported Platforms#
Platform |
Hardware |
Software |
Storage |
Notes |
|---|---|---|---|---|
Jetson |
128+ GB NVMe SSD |
For best performance, ensure that power settings are configured appropriately. |
||
x86_64 |
|
32+ GB disk space available |
ROS Support#
All Isaac ROS packages are designed and tested to be compatible with ROS 2 Jazzy.
Initialize Compute#
Install the latest NVIDIA GPU Driver using the official instructions.
Verify the NVIDIA GPU Driver is installed correctly:
nvidia-smi
Confirm that all relevant fields satisfy the requirements.
Driver Version
CUDA Version
GPU Memory
Complete the Jetson AGX Thor Quick Start Guide.
Install the complete JetPack SDK.
After boot, confirm that you have installed the correct version of
Jetpackby running the following command. Confirm that the output has the termsR38 (release), REVISION: 2.1.cat /etc/nv_tegra_releaseSet the power mode to
MAXNusing this guide.Set the GPU and CPU clock speeds to max using this guide.
Add your user to the
dockergroup.sudo usermod -aG docker $USER newgrp docker
Setup Docker.
From the official Docker install instructions (here), install the
docker-buildx-plugin.# Add Docker's official GPG key: sudo apt-get update sudo apt-get install ca-certificates curl gnupg sudo install -m 0755 -d /etc/apt/keyrings curl -fsSL https://download.docker.com/linux/ubuntu/gpg | sudo gpg --dearmor -o /etc/apt/keyrings/docker.gpg sudo chmod a+r /etc/apt/keyrings/docker.gpg # Add the repository to Apt sources: echo \ "deb [arch="$(dpkg --print-architecture)" signed-by=/etc/apt/keyrings/docker.gpg] https://download.docker.com/linux/ubuntu \ "$(. /etc/os-release && echo "$VERSION_CODENAME")" stable" | \ sudo tee /etc/apt/sources.list.d/docker.list > /dev/null sudo apt-get update sudo apt install docker-buildx-plugin
Consider the following recommendations for a better experience:
Create a Workspace#
Create a ROS 2 workspace for experimenting with Isaac ROS:
mkdir -p  ~/workspaces/isaac_ros-dev/src
echo 'export ISAAC_ROS_WS="${ISAAC_ROS_WS:-${HOME}/workspaces/isaac_ros-dev/}"' >> ~/.bashrc
source ~/.bashrc
Install the SSD using the instructions in Jetson Storage Setup.
Create a ROS 2 workspace for experimenting with Isaac ROS:
mkdir -p  /mnt/nova_ssd/workspaces/isaac_ros-dev/src
echo 'export ISAAC_ROS_WS="${ISAAC_ROS_WS:-/mnt/nova_ssd/workspaces/isaac_ros-dev/}"' >> ~/.bashrc
source ~/.bashrc
Configure Isaac ROS Apt Repository#
The NVIDIA Isaac ROS Apt Repository hosts the following categories of packages for all users:
Isaac ROS CLI package for managing Isaac ROS development environments
Pre-built Isaac ROS packages for currently-supported platforms
Auxiliary packages to improve developer experience or to support a legacy OS
To configure the Isaac ROS Apt Repository, follow the steps below:
Set the locale on your host system to UTF-8:
locale  # check for UTF-8

sudo apt update && sudo apt install locales
sudo locale-gen en_US en_US.UTF-8
sudo update-locale LC_ALL=en_US.UTF-8 LANG=en_US.UTF-8
export LANG=en_US.UTF-8

locale  # verify settings
Install the dependencies:
sudo apt update && sudo apt install curl gnupg
sudo apt install software-properties-common
sudo add-apt-repository universe
Source the Isaac ROS Apt Repository:
NVIDIA hosts the Isaac ROS Apt Repository on two CDNs (Content Distribution Networks), one in the United States (
.com) and one in China (.cn).Select the appropriate CDN based on your location and other considerations.
sudo apt-get update
Option 1: Specific Version (release-4.0)
Use this option to pin to a specific minor version.
k="/usr/share/keyrings/nvidia-isaac-ros.gpg"
curl -fsSL https://isaac.download.nvidia.com/isaac-ros/repos.key | sudo gpg --dearmor \
    | sudo tee -a $k > /dev/null
f="/etc/apt/sources.list.d/nvidia-isaac-ros.list"
sudo touch $f
s="deb [signed-by=$k] https://isaac.download.nvidia.com/isaac-ros/release-4.0 "
s="${s}noble main"
grep -qxF "$s" $f || echo "$s" | sudo tee -a $f

sudo apt-get update
Option 2: Latest Minor Version (release-4)
Use this option to automatically receive updates for the latest release-4 minor version.
k="/usr/share/keyrings/nvidia-isaac-ros.gpg"
curl -fsSL https://isaac.download.nvidia.com/isaac-ros/repos.key | sudo gpg --dearmor \
    | sudo tee -a $k > /dev/null
f="/etc/apt/sources.list.d/nvidia-isaac-ros.list"
sudo touch $f
s="deb [signed-by=$k] https://isaac.download.nvidia.com/isaac-ros/release-4 "
s="${s}noble main"
grep -qxF "$s" $f || echo "$s" | sudo tee -a $f

sudo apt-get update
Option 1: Specific Version (release-4.0)
Use this option to pin to a specific minor version.
k="/usr/share/keyrings/nvidia-isaac-ros.gpg"
curl -fsSL https://isaac.download.nvidia.cn/isaac-ros/repos.key | sudo gpg --dearmor \
    | sudo tee -a $k > /dev/null
f="/etc/apt/sources.list.d/nvidia-isaac-ros.list"
sudo touch $f
s="deb [signed-by=$k] https://isaac.download.nvidia.cn/isaac-ros/release-4.0 "
s="${s}noble main"
grep -qxF "$s" $f || echo "$s" | sudo tee -a $f

sudo apt-get update
Option 2: Latest Minor Version (release-4)
Use this option to automatically receive updates for the latest release-4 minor version.
k="/usr/share/keyrings/nvidia-isaac-ros.gpg"
curl -fsSL https://isaac.download.nvidia.cn/isaac-ros/repos.key | sudo gpg --dearmor \
    | sudo tee -a $k > /dev/null
f="/etc/apt/sources.list.d/nvidia-isaac-ros.list"
sudo touch $f
s="deb [signed-by=$k] https://isaac.download.nvidia.cn/isaac-ros/release-4 "
s="${s}noble main"
grep -qxF "$s" $f || echo "$s" | sudo tee -a $f

sudo apt-get update
Select Environment Isolation Mode#
Based on your use case, decide on an appropriate level of isolation between Isaac ROS and your host system:
Tip
Docker is the recommended option for most users.
It provides the highest level of isolation from your host system.
Mode |
Debian packages |
Python |
Isolation |
|---|---|---|---|
Docker (recommended) |
Installed inside the container (host unaffected) |
Installed inside the container (host unaffected) |
High (full container isolation) |
Bare Metal (no official support) |
Manually installed on host via |
Manually installed on host via |
None |
This selection will inform subsequent steps in the setup process.
Initialize Isaac ROS CLI#
Install dependencies:
pip install termcolor --break-system-packages
Install the Isaac ROS CLI:
sudo apt-get install isaac-ros-cli
Configure the environment isolation mode you selected earlier:
Install Docker following the official instructions.
Install the NVIDIA Container Toolkit following the official instructions.
Configure
nvidia-container-toolkitfor Docker using the official instructions.Restart Docker:
sudo systemctl daemon-reload && sudo systemctl restart docker
Initialize the Isaac ROS CLI:
sudo isaac-ros init docker
Configuring Docker Environment
The default Isaac ROS Docker image contains a core set of dependencies for basic Isaac ROS usage.
To further customize the Isaac ROS development environment, refer to this page.
The Isaac ROS CLI does not currently support bare metal mode.
Users should reference the various Isaac ROS Dockerfiles to identify all dependencies and install them manually.
Integrate External Data Sources (Optional)#
Many Isaac ROS demos include pre-recorded rosbag data to help you get started as quickly as possible.
Optionally, these demos can also be integrated with external data sources, including cameras and the Isaac Sim simulation platform.
Sensors
Isaac ROS provides setup instructions for specific camera models from the following product lines:
Calibrate your cameras depending on your type of camera and the object it is on:
Isaac Sim
Isaac Sim is NVIDIA’s robotics simulation platform powered by Omniverse.
Isaac Sim can be used to run and test the ROS 2 applications. There are two ways we can configure the system:
Software in the Loop (SIL) refers to a configuration where the software being tested is not running on the target hardware platform. For example, Isaac ROS packages being tested on x86 before deployment on a Jetson device is SIL.
Hardware in the Loop (HIL) refers to a configuration where the software is being tested on the target hardware platform. For example, Isaac ROS packages being tested on a Jetson device before deployment is HIL.
In both the configurations, Isaac Sim runs on a x86_64 machine providing sensor data and world information.
Install Isaac Sim, choosing the appropriate working environment:
Note
This tutorial assumes the Native environment for Isaac Sim.
Follow the Running Native ROS instructions to ensure that ROS 2 and the required packages are installed to successfully enable the ROS 2 Bridge in Omniverse Isaac Sim.
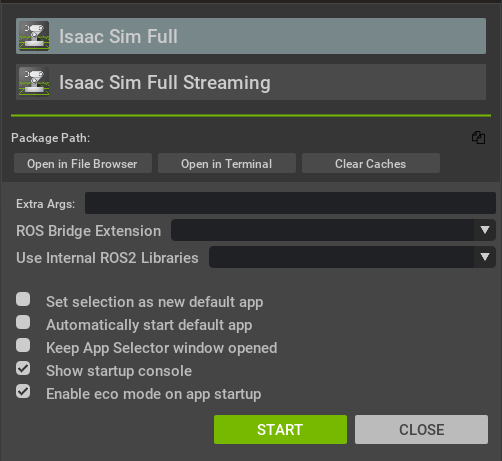
Follow the instructions to launch Isaac Sim App Selector window and then click Open in Terminal button.
If you don’t have a system level ROS 2 install, follow the steps outlined here under
Using Terminal > Ubuntu > Jazzy.If you have a system level ROS 2 install, follow the steps outlined here under
Ubuntu 24.04 > Jazzy. Ensure your ROS 2 install is sourced before proceeding.Optionally, if
ROS_DOMAIN_IDis needed to create a separate logical network, run the following commands.export ROS_DOMAIN_ID=<your_domain_id>
Launch Isaac Sim.
./isaac-sim.sh
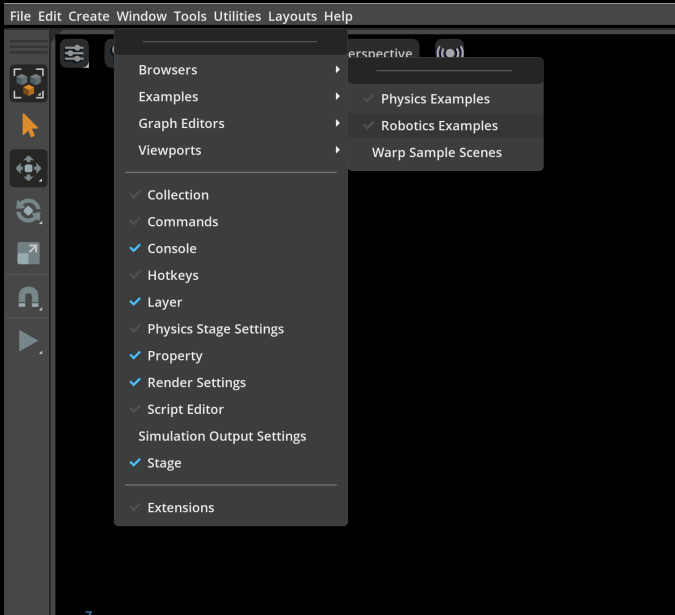
Open Isaac ROS Sample scene as shown below.
First, enable Robotics Examples menu by clicking Window > Examples > Robotics Examples
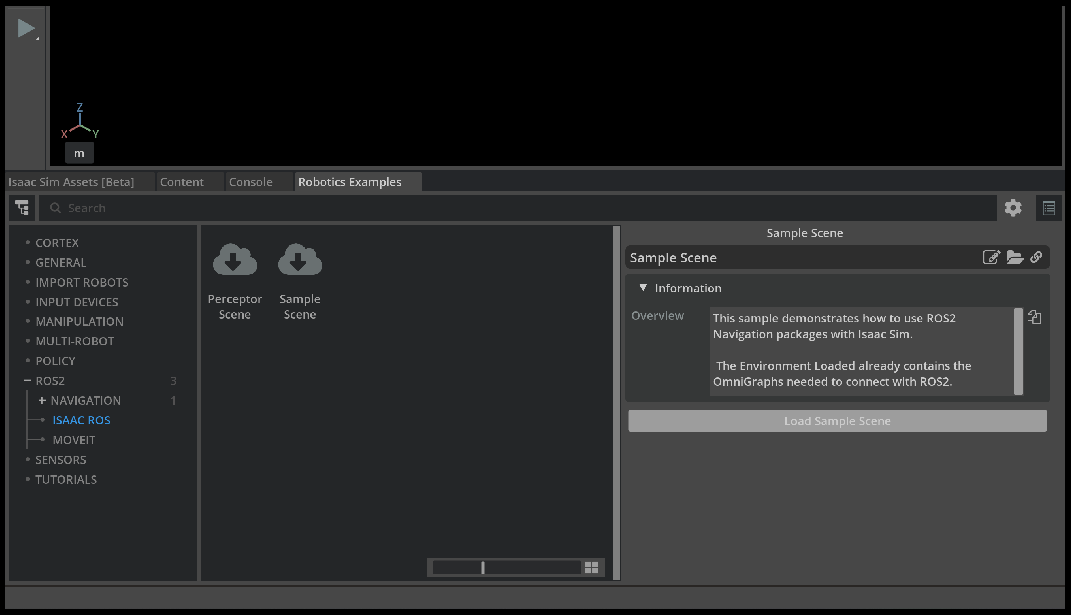
Then, in the Robotics Examples tab, select ROS2 > Isaac ROS > Sample Scene and click Load Sample Scene
Continue with the next steps in your specific Isaac ROS package tutorial.
Note
Make sure to set the
ROS_DOMAIN_IDenvironment variable (if set earlier) before running the sample application.
Isaac Sim Tutorial Links
Isaac ROS includes a number of tutorials that demonstrate integration with Isaac Sim.
Each of these links takes you to a tutorial that is listed under Repositories and Packages. They are linked here as a reference and to help you find them faster.
Note
These tutorials were last validated with Isaac Sim 5.0 and Isaac Sim 5.1.
Run an Isaac ROS Demo#
You’re now ready to run an Isaac ROS demo!
Troubleshooting#
See the troubleshooting section for help with setting up your development environment.