Isaac ROS Mission Client Tutorial#
Docker Setup#
To streamline your development environment setup with the correct versions of dependencies on Jetson and x86_64 platforms, it is recommended that you leverage the Isaac ROS Dev Docker images. To do this, follow the dev environment setup steps.
Note
All Isaac ROS quick start guides, tutorials, and examples have been designed with the Isaac ROS Docker images as a prerequisite.
Tutorial with Isaac Sim#
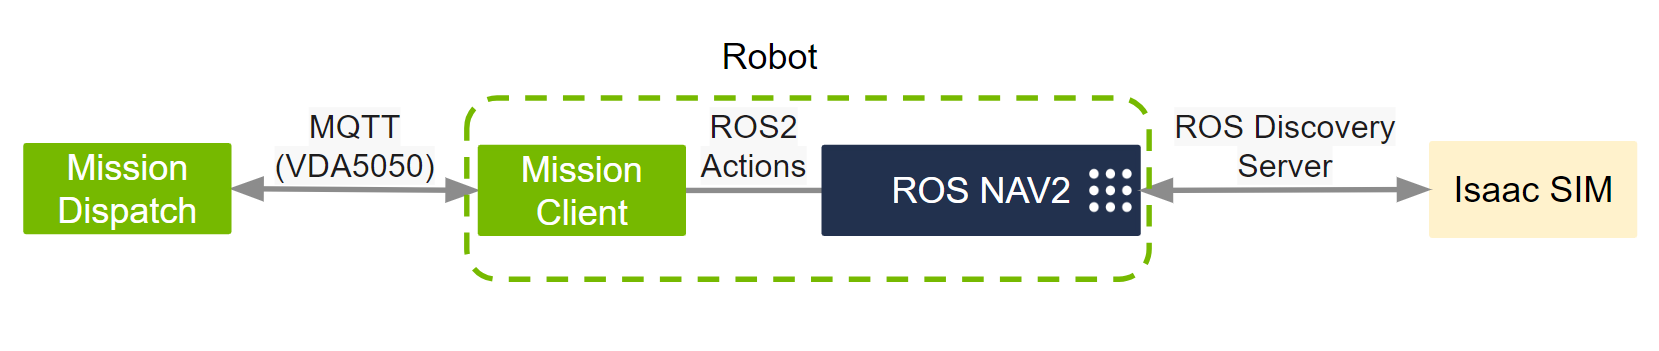
This tutorial walks you through steps to send missions from Mission Dispatch to Isaac ROS Mission Client using the VDA5050 protocol. The Mission Client is attached to an Isaac Sim environment running the Nav2 stack. The summary of steps are as follows:
Set up Isaac Sim
Run Mission Client
Run Mission Dispatch
Send a position setup to Nav2 using Mission Dispatch and Mission Client
Tutorial Walkthrough#
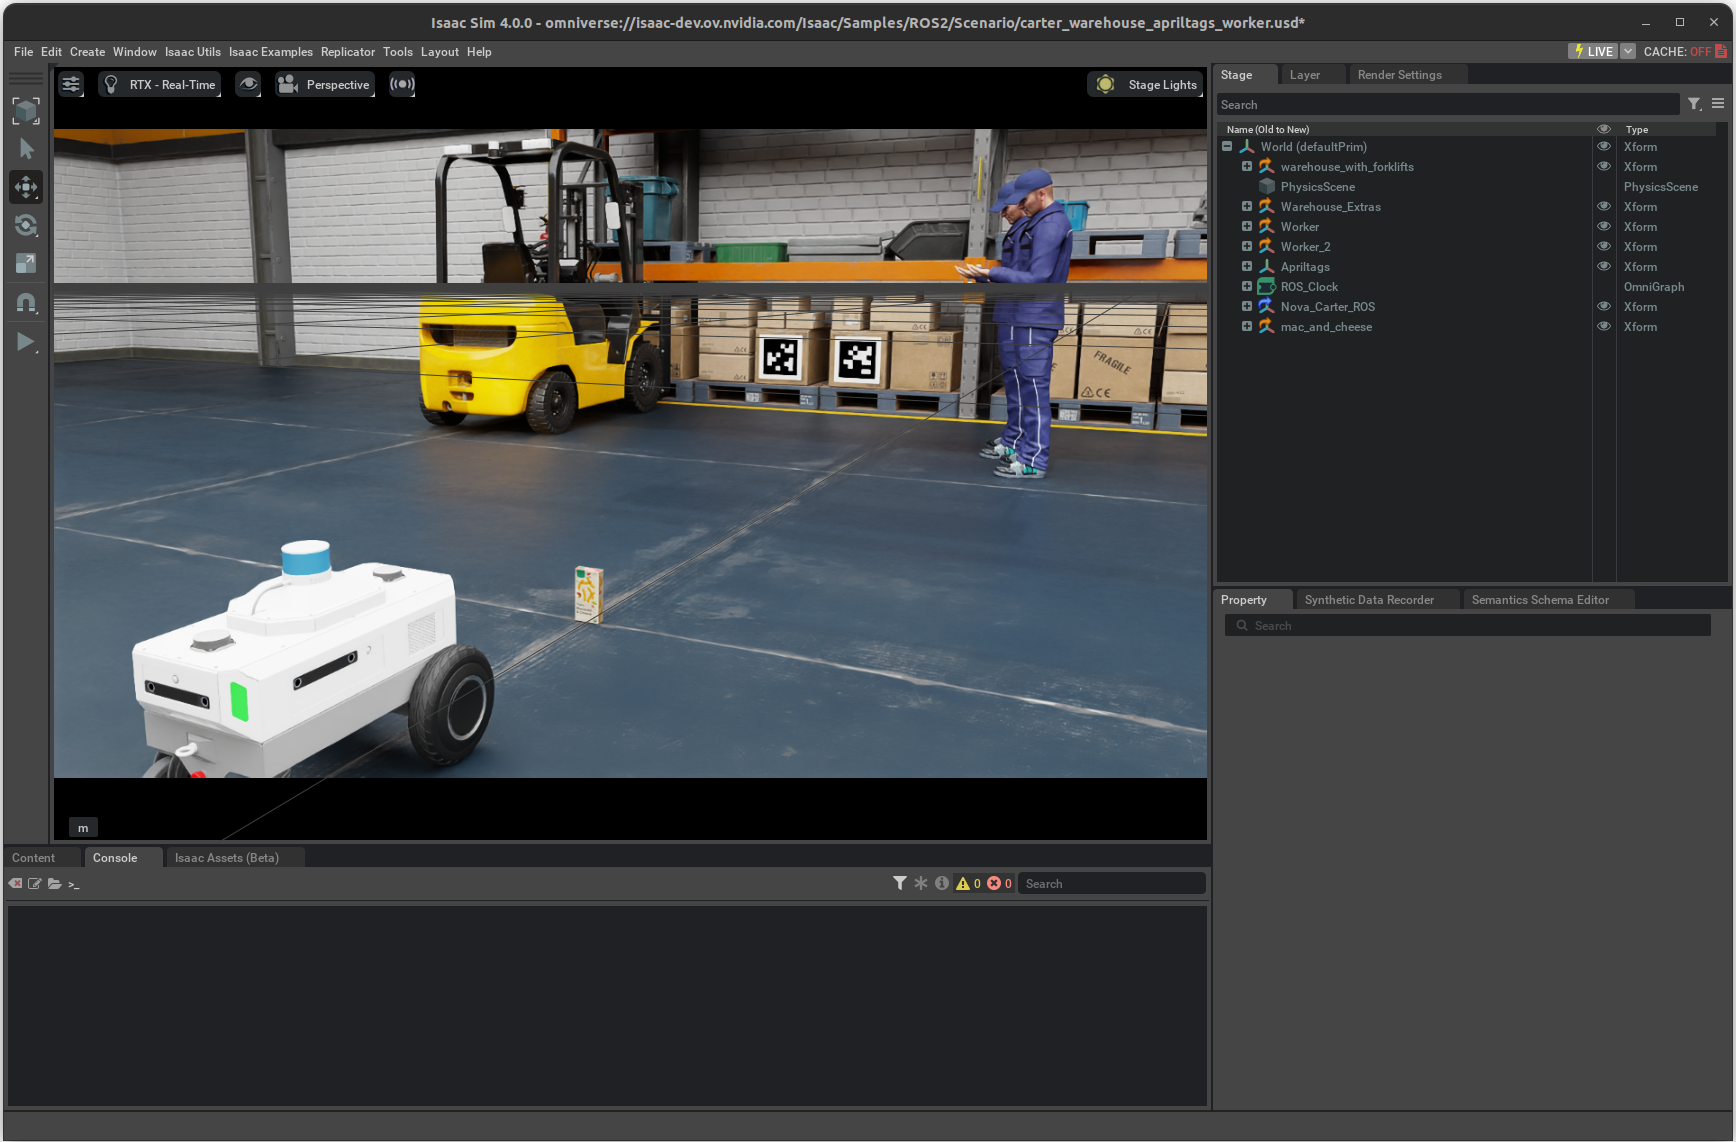
Install and launch Isaac Sim following the steps in the Isaac ROS Isaac Sim Setup Guide.
Set render products:
Select
/World/Nova_Carter_ROS/ros_lidars/front_2d_lidar_render_productin the Stage pane and setenabledto True (checked).Select
/World/Nova_Carter_ROS/ros_lidars/front_3d_lidar_render_productin the Stage pane and setenabledto False (unchecked).Select
/World/Nova_Carter_ROS/front_hawk/left_camera_render_productin the Stage pane and setenabledto False (unchecked).Select
/World/Nova_Carter_ROS/front_hawk/right_camera_render_productin the Stage pane and setenabledto False (unchecked).
Press Play to start publishing data from the Isaac Sim.
Complete Set Up Development Environment and Build isaac_ros_mission_client to build the packages.
Start MQTT broker.
The MQTT broker is used for communication between the Mission Dispatch and the robots. There are many ways to run an MQTT broker, including as a system daemon, a standalone application, or a Docker container. The following example uses mosquitto as the MQTT broker.
Create a file
~/mosquitto.shwith the following contents outside the container:CONFIG_FILE=/mosquitto.conf if [ $# != 2 ] ; then echo "usage: $0 <tcp_port> <websocket_port>" exit 1 fi PORT=$1 PORT_WEBSOCKET=$2 echo "allow_anonymous true" >> $CONFIG_FILE echo "listener $PORT 0.0.0.0" >> $CONFIG_FILE echo "listener $PORT_WEBSOCKET" >> $CONFIG_FILE echo "protocol websockets" >> $CONFIG_FILE mosquitto -c $CONFIG_FILE
Run the command outside the container:
docker run -it --network host -v ~/mosquitto.sh:/mosquitto.sh -d eclipse-mosquitto:latest sh mosquitto.sh 1883 9001
Run the following launch files within the container to spin up
mission_clientand Nav2:ros2 launch isaac_ros_vda5050_client_bringup isaac_ros_vda5050_client_nav2.launch.py init_pose_x:=-2.0 init_pose_yaw:=3.14159
Start Mission Dispatch with Docker.
On the Postgres database:
Set the following environment variable:
export POSTGRES_PASSWORD=<Any password>
Start the Postgres database by running the following:
docker run --rm --name postgres \
  --network host \
  -p 5432:5432 \
  -e POSTGRES_USER=postgres \
  -e POSTGRES_PASSWORD \
  -e POSTGRES_DB=mission \
  -d postgres:14.5
Launch the Mission Database microservice:
Start the API and database server with the official Docker container.
docker run -it --network host nvcr.io/nvidia/isaac/mission-database:4.0.0
To see what configuration options are, run:
docker run -it --network host nvcr.io/nvidia/isaac/mission-database:4.0.0 --help
# For example, if you want to change the port for the user API from the default 5000 to 5002, add –port 5002 configuration option in the command.
Launch the Mission Dispatch microservice:
Start the Mission Dispatch server with the official Docker container.
docker run -it --network host nvcr.io/nvidia/isaac/mission-dispatch:4.0.0
# To see what the configuration options are, add –help option after the command.
Note
Read this tutorial for more deployment options for Mission Dispatch.
Open http://localhost:5000/docs in a web browser.
Use the POST /robots endpoint to create robot objects. See the video below for steps.
Get the status of the robots using the GET /robot endpoint. If the robots are connected, the state should reflect the actual position of the robots.
Note
When using the interactive documentation page, the default value for the the robot object
name in the spec is ‘string’, you must change it from ‘string’ to another name that has
more meaning, like ‘carter01’. Delete the prefix entry as shown in the video.
Send a mission to the robot using the POST /mission endpoint. See the video below for steps.
Note
By default, the value for the robot is ‘string’, so make sure to change it to
the name you used for one of the robot objects you created earlier. For example, if you set the name of the robot
object to ‘carter01’, use that to fill in the robot field for the mission. Also, delete the prefix,
selector, sequence, and action entries as shown in the video.
Return to the Isaac Sim screen. Verify that you can see the robot move to the set goal position, as shown below.

To cancel a mission, use the POST /mission/{name}/cancel endpoint. In the request body, ensure the
namefield is correctly set to the mission’s name that you intend to cancel. Subsequently, observe that the robot stops its motion within Isaac Sim, and that the mission’s state shifts to CANCELED on querying with the GET /mission/{name} endpoint. A mission that has been completed cannot be canceled.
Customize Your Dev Environment#
To further customize your development environment, review this guide.
Troubleshooting#
This tutorial is a computationally complex. If you experience robot collision or localization issues with this tutorial in a less capable development environment, visit here for further troubleshooting. This may help improve sensor synchronization.