
Getting Started#
Isaac ROS is a collection of NVIDIA® CUDA®-accelerated computing packages and AI models designed to streamline and expedite the development of advanced AI robotics applications.
NVIDIA Isaac ROS is built on open-source ROS 2. Through Isaac ROS, developers in the ROS community can take advantage of NVIDIA-accelerated libraries and AI models to fast track their AI robot development and deployment workflows.
System Requirements#
Supported Platforms#
The platforms defined in this table are the only hardware and software combinations that Isaac ROS tests and officially supports.
Users may be able to rely on backward and forward compatibility utilities like cuda-compat to use Isaac ROS on other platform versions.
Platform |
Hardware |
Software |
Storage |
Notes |
|---|---|---|---|---|
Jetson |
128+ GB NVMe SSD |
For best performance, ensure that power settings are configured appropriately for your platform: Jetson Thor power settings or Jetson Orin power settings. |
||
x86_64 |
|
32+ GB disk space available |
||
DGX |
32+ GB disk space available |
For best performance, use the supplied power adapter with the DGX Spark system. |
ROS Support#
All Isaac ROS packages are designed and tested to be compatible with ROS 2 Jazzy.
Initialize Compute#
Install the latest NVIDIA GPU Driver using the official instructions.
Verify the NVIDIA GPU Driver is installed correctly:
nvidia-smi
Confirm that all relevant fields satisfy the requirements.
Driver Version
CUDA Version
GPU Memory
Complete the Jetson AGX Thor Quick Start Guide.
In the JetPack setup guide, complete only the Jetson AGX Thor Install all components section.
After boot, confirm that you have installed the correct version of
Jetpackby running the following command. Confirm that the output has the termsR39 (release), REVISION: 2.0.cat /etc/nv_tegra_releaseSet the power mode to
MAXNusing the Jetson Thor guide.Set the GPU and CPU clock speeds to max using the Jetson Thor guide.
Consider the following recommendations for a better experience:
Complete the Jetson AGX Orin Quick Start Guide. Installing the BSP to an NVMe SSD is recommended when using Virtual Environment or Bare Metal modes.
In the JetPack setup guide, complete only the Jetson AGX Orin Install via apt section.
After boot, confirm that you have installed the correct version of
Jetpackby running the following command. Confirm that the output has the termsR39 (release), REVISION: 2.0.cat /etc/nv_tegra_releaseSet the power mode to
MAXNusing the Jetson Orin guide.Set the GPU and CPU clock speeds to max using the Jetson Orin guide.
Consider the following recommendations for a better experience:
No additional compute initialization is required for DGX Spark in this section. Continue to Create a Workspace.
Create a Workspace#
Create a ROS 2 workspace for experimenting with Isaac ROS:
mkdir -p  ~/workspaces/isaac_ros-dev/src
echo 'export ISAAC_ROS_WS="${ISAAC_ROS_WS:-${HOME}/workspaces/isaac_ros-dev/}"' >> ~/.bashrc
source ~/.bashrc
Create a ROS 2 workspace for experimenting with Isaac ROS:
mkdir -p  ~/workspaces/isaac_ros-dev/src
echo 'export ISAAC_ROS_WS="${ISAAC_ROS_WS:-${HOME}/workspaces/isaac_ros-dev/}"' >> ~/.bashrc
source ~/.bashrc
If the BSP is installed on eMMC rather than NVMe, install an SSD using the Jetson Storage Setup instructions, then create the workspace on the SSD:
mkdir -p  /mnt/nova_ssd/workspaces/isaac_ros-dev/src
echo 'export ISAAC_ROS_WS="${ISAAC_ROS_WS:-/mnt/nova_ssd/workspaces/isaac_ros-dev/}"' >> ~/.bashrc
source ~/.bashrc
If the BSP is installed on NVMe, create the workspace in your home directory:
mkdir -p  ~/workspaces/isaac_ros-dev/src
echo 'export ISAAC_ROS_WS="${ISAAC_ROS_WS:-${HOME}/workspaces/isaac_ros-dev/}"' >> ~/.bashrc
source ~/.bashrc
Create a ROS 2 workspace for experimenting with Isaac ROS:
mkdir -p  ~/workspaces/isaac_ros-dev/src
echo 'export ISAAC_ROS_WS="${ISAAC_ROS_WS:-${HOME}/workspaces/isaac_ros-dev/}"' >> ~/.bashrc
source ~/.bashrc
Configure Isaac ROS Apt Repository#
The NVIDIA Isaac ROS Apt Repository hosts the following categories of packages for all users:
Isaac ROS CLI package for managing Isaac ROS development environments
Pre-built Isaac ROS packages for currently-supported platforms
Auxiliary packages to improve developer experience or to support a legacy OS
To configure the Isaac ROS Apt Repository, follow the steps below:
Set the locale on your host system to UTF-8:
locale  # check for UTF-8

sudo apt update && sudo apt install locales
sudo locale-gen en_US en_US.UTF-8
sudo update-locale LC_ALL=en_US.UTF-8 LANG=en_US.UTF-8
export LANG=en_US.UTF-8

locale  # verify settings
Install the dependencies:
sudo apt update && sudo apt install curl gnupg
sudo apt install software-properties-common
sudo add-apt-repository universe
Source the Isaac ROS Apt Repository:
Select your platform to see the appropriate APT repository sourcing instructions.
Option 1: Specific Version (release-4.6)
Use this option to pin to a specific minor version.
k="/usr/share/keyrings/nvidia-isaac-ros.gpg"
curl -fsSL https://isaac.download.nvidia.com/isaac-ros/repos.key | sudo gpg --dearmor \
    | sudo tee -a $k > /dev/null
f="/etc/apt/sources.list.d/nvidia-isaac-ros.list"
sudo touch $f
s="deb [signed-by=$k] https://isaac.download.nvidia.com/isaac-ros/release-4.6 noble main"
grep -qxF "$s" $f || echo "$s" | sudo tee -a $f

sudo apt-get update
Option 2: Latest Minor Version (release-4)
Use this option to automatically receive updates for the latest release-4 minor version.
k="/usr/share/keyrings/nvidia-isaac-ros.gpg"
curl -fsSL https://isaac.download.nvidia.com/isaac-ros/repos.key | sudo gpg --dearmor \
    | sudo tee -a $k > /dev/null
f="/etc/apt/sources.list.d/nvidia-isaac-ros.list"
sudo touch $f
s="deb [signed-by=$k] https://isaac.download.nvidia.com/isaac-ros/release-4 noble main"
grep -qxF "$s" $f || echo "$s" | sudo tee -a $f

sudo apt-get update
Option 1: Specific Version (release-4.6)
Use this option to pin to a specific minor version.
k="/usr/share/keyrings/nvidia-isaac-ros.gpg"
curl -fsSL https://isaac.download.nvidia.cn/isaac-ros/repos.key | sudo gpg --dearmor \
    | sudo tee -a $k > /dev/null
f="/etc/apt/sources.list.d/nvidia-isaac-ros.list"
sudo touch $f
s="deb [signed-by=$k] https://isaac.download.nvidia.cn/isaac-ros/release-4.6 noble main"
grep -qxF "$s" $f || echo "$s" | sudo tee -a $f

sudo apt-get update
Option 2: Latest Minor Version (release-4)
Use this option to automatically receive updates for the latest release-4 minor version.
k="/usr/share/keyrings/nvidia-isaac-ros.gpg"
curl -fsSL https://isaac.download.nvidia.cn/isaac-ros/repos.key | sudo gpg --dearmor \
    | sudo tee -a $k > /dev/null
f="/etc/apt/sources.list.d/nvidia-isaac-ros.list"
sudo touch $f
s="deb [signed-by=$k] https://isaac.download.nvidia.cn/isaac-ros/release-4 noble main"
grep -qxF "$s" $f || echo "$s" | sudo tee -a $f

sudo apt-get update
Option 1: Specific Version (release-4.6)
Use this option to pin to a specific minor version.
k="/usr/share/keyrings/nvidia-isaac-ros.gpg"
curl -fsSL https://isaac.download.nvidia.com/isaac-ros/repos.key | sudo gpg --dearmor \
    | sudo tee -a $k > /dev/null
f="/etc/apt/sources.list.d/nvidia-isaac-ros.list"
sudo touch $f
s="deb [signed-by=$k] https://isaac.download.nvidia.com/isaac-ros/release-4.6 noble-jetpack main"
grep -qxF "$s" $f || echo "$s" | sudo tee -a $f

sudo apt-get update
Option 2: Latest Minor Version (release-4)
Use this option to automatically receive updates for the latest release-4 minor version.
k="/usr/share/keyrings/nvidia-isaac-ros.gpg"
curl -fsSL https://isaac.download.nvidia.com/isaac-ros/repos.key | sudo gpg --dearmor \
    | sudo tee -a $k > /dev/null
f="/etc/apt/sources.list.d/nvidia-isaac-ros.list"
sudo touch $f
s="deb [signed-by=$k] https://isaac.download.nvidia.com/isaac-ros/release-4 noble-jetpack main"
grep -qxF "$s" $f || echo "$s" | sudo tee -a $f

sudo apt-get update
Option 1: Specific Version (release-4.6)
Use this option to pin to a specific minor version.
k="/usr/share/keyrings/nvidia-isaac-ros.gpg"
curl -fsSL https://isaac.download.nvidia.cn/isaac-ros/repos.key | sudo gpg --dearmor \
    | sudo tee -a $k > /dev/null
f="/etc/apt/sources.list.d/nvidia-isaac-ros.list"
sudo touch $f
s="deb [signed-by=$k] https://isaac.download.nvidia.cn/isaac-ros/release-4.6 noble-jetpack main"
grep -qxF "$s" $f || echo "$s" | sudo tee -a $f

sudo apt-get update
Option 2: Latest Minor Version (release-4)
Use this option to automatically receive updates for the latest release-4 minor version.
k="/usr/share/keyrings/nvidia-isaac-ros.gpg"
curl -fsSL https://isaac.download.nvidia.cn/isaac-ros/repos.key | sudo gpg --dearmor \
    | sudo tee -a $k > /dev/null
f="/etc/apt/sources.list.d/nvidia-isaac-ros.list"
sudo touch $f
s="deb [signed-by=$k] https://isaac.download.nvidia.cn/isaac-ros/release-4 noble-jetpack main"
grep -qxF "$s" $f || echo "$s" | sudo tee -a $f

sudo apt-get update
Option 1: Specific Version (release-4.6)
Use this option to pin to a specific minor version.
k="/usr/share/keyrings/nvidia-isaac-ros.gpg"
curl -fsSL https://isaac.download.nvidia.com/isaac-ros/repos.key | sudo gpg --dearmor \
    | sudo tee -a $k > /dev/null
f="/etc/apt/sources.list.d/nvidia-isaac-ros.list"
sudo touch $f
s="deb [signed-by=$k] https://isaac.download.nvidia.com/isaac-ros/release-4.6 noble-fastos main"
grep -qxF "$s" $f || echo "$s" | sudo tee -a $f

sudo apt-get update
Option 2: Latest Minor Version (release-4)
Use this option to automatically receive updates for the latest release-4 minor version.
k="/usr/share/keyrings/nvidia-isaac-ros.gpg"
curl -fsSL https://isaac.download.nvidia.com/isaac-ros/repos.key | sudo gpg --dearmor \
    | sudo tee -a $k > /dev/null
f="/etc/apt/sources.list.d/nvidia-isaac-ros.list"
sudo touch $f
s="deb [signed-by=$k] https://isaac.download.nvidia.com/isaac-ros/release-4 noble-fastos main"
grep -qxF "$s" $f || echo "$s" | sudo tee -a $f

sudo apt-get update
Option 1: Specific Version (release-4.6)
Use this option to pin to a specific minor version.
k="/usr/share/keyrings/nvidia-isaac-ros.gpg"
curl -fsSL https://isaac.download.nvidia.cn/isaac-ros/repos.key | sudo gpg --dearmor \
    | sudo tee -a $k > /dev/null
f="/etc/apt/sources.list.d/nvidia-isaac-ros.list"
sudo touch $f
s="deb [signed-by=$k] https://isaac.download.nvidia.cn/isaac-ros/release-4.6 noble-fastos main"
grep -qxF "$s" $f || echo "$s" | sudo tee -a $f

sudo apt-get update
Option 2: Latest Minor Version (release-4)
Use this option to automatically receive updates for the latest release-4 minor version.
k="/usr/share/keyrings/nvidia-isaac-ros.gpg"
curl -fsSL https://isaac.download.nvidia.cn/isaac-ros/repos.key | sudo gpg --dearmor \
    | sudo tee -a $k > /dev/null
f="/etc/apt/sources.list.d/nvidia-isaac-ros.list"
sudo touch $f
s="deb [signed-by=$k] https://isaac.download.nvidia.cn/isaac-ros/release-4 noble-fastos main"
grep -qxF "$s" $f || echo "$s" | sudo tee -a $f

sudo apt-get update
Select Environment Isolation Mode#
Based on your use case, decide on an appropriate level of isolation between Isaac ROS and your host system:
Tip
Docker is the recommended option for most users. It provides the highest level of isolation from your host system.
In Virtual Environment or Bare Metal mode, you may need to remove existing packages from your host system to avoid version conflicts with Isaac ROS and its dependencies.
Important
On Jetson AGX Orin, we recommend placing the root filesystem on an NVMe SSD when using Virtual Environment or Bare Metal modes. These modes install Isaac ROS dependencies, including ML frameworks, on the root filesystem and can exceed the default eMMC capacity.
Mode |
Debian packages |
Python |
Isolation |
|---|---|---|---|
Docker (recommended) |
Installed inside the container (host unaffected) |
Installed inside the container (host unaffected) |
High (full container isolation) |
Virtual Environment |
Installed on host via |
Installed into Isaac ROS virtual environment (isolated from system Python) |
Medium |
Bare Metal |
Installed on host via |
Installed into system Python |
None |
This selection will inform subsequent steps in the setup process.
Initialize Isaac ROS CLI#
Install the Isaac ROS CLI:
sudo apt-get install isaac-ros-cli
Configure the environment isolation mode you selected earlier:
Complete platform-specific Docker setup:
Complete the Docker Engine setup using the official Ubuntu instructions.
Install and configure
nvidia-container-toolkitfor Docker using the official instructions:Add your user to the
dockergroup:sudo usermod -aG docker $USER newgrp docker
Complete the Jetson AGX Thor Docker Setup guide or Jetson AGX Orin Docker Setup guide.
Docker and NVIDIA Container Toolkit are already configured on DGX Spark. See the DGX Spark container runtime documentation.
Add your user to the
dockergroup:sudo usermod -aG docker $USER newgrp docker
Restart Docker:
sudo systemctl daemon-reload && sudo systemctl restart docker
Run Docker pre-flight checks:
docker info | grep -E "Runtimes|Default Runtime"
docker run --rm hello-world
docker run --rm --gpus all ubuntu:24.04 bash -lc 'echo "NVIDIA runtime OK"'
Confirm that Docker lists available runtime entries,
hello-worldexits successfully, and the GPU runtime check printsNVIDIA runtime OK.Initialize the Isaac ROS CLI:
sudo isaac-ros init docker
Customizing the Docker Image
The default Isaac ROS Docker image contains a core set of dependencies for basic Isaac ROS usage.
To add additional dependencies (e.g., RealSense camera support), refer to the Docker Mode Configuration documentation.
Configure your host environment for Isaac ROS:
Configure the CUDA apt repository:
wget https://developer.download.nvidia.com/compute/cuda/repos/ubuntu2404/x86_64/cuda-keyring_1.1-1_all.deb
sudo dpkg -i cuda-keyring_1.1-1_all.deb
rm cuda-keyring_1.1-1_all.deb
sudo apt update
wget https://developer.download.nvidia.com/compute/cuda/repos/ubuntu2404/sbsa/cuda-keyring_1.1-1_all.deb
sudo dpkg -i cuda-keyring_1.1-1_all.deb
rm cuda-keyring_1.1-1_all.deb
sudo apt update
No CUDA apt repository setup is required on DGX Spark platforms.
Add NVIDIA binary installation locations to your PATH:
echo 'export PATH="/usr/local/nvidia/bin:/usr/local/cuda/bin:/usr/src/tensorrt/bin:${PATH}"' >> ~/.bashrc
source ~/.bashrc
Nothing required on Jetson platforms.
Nothing required on DGX Spark platforms.
Configure the Jetson apt repository:
curl -fsSL https://repo.download.nvidia.com/jetson/jetson-ota-public.asc | sudo gpg --dearmor | sudo tee /etc/apt/keyrings/nvidia-jetson.gpg > /dev/null
echo 'deb [signed-by=/etc/apt/keyrings/nvidia-jetson.gpg] https://repo.download.nvidia.com/jetson/x86_64/noble r39.2 main' | sudo tee /etc/apt/sources.list.d/nvidia-jetson-apt-source.list
Jetson platforms already include the NVIDIA Jetson APT repository by default, so no additional setup is required for this step.
No Jetson apt repository setup is required on DGX Spark platforms.
Install ROS 2 Jazzy by following the official ROS 2 documentation:
Install ROS 2 development tools:
sudo apt-get update
sudo apt-get install -y python3-colcon-common-extensions python3-rosdep
For convenience, source your ROS 2 installation and enable
colconauto-completion in your.bashrcfile:These instructions are for
bashshells; for other shells, configure accordingly.echo "source /opt/ros/jazzy/setup.bash" >> ~/.bashrc echo "source /usr/share/colcon_argcomplete/hook/colcon-argcomplete.bash" >> ~/.bashrc source ~/.bashrc
Initialize
rosdepand configure the Isaac ROS rosdep definitions:sudo rosdep init sudo curl -o /etc/ros/rosdep/sources.list.d/nvidia-isaac.yaml \ https://raw.githubusercontent.com/NVIDIA-ISAAC-ROS/isaac-ros-cli/release-4.6/docker/rosdep/extra_rosdeps.yaml echo "yaml file:///etc/ros/rosdep/sources.list.d/nvidia-isaac.yaml" | sudo tee /etc/ros/rosdep/sources.list.d/00-nvidia-isaac.list rosdep update
Remove potentially conflicting packages from your host system.
As specified in the Isaac ROS CLI apt preference files, Isaac ROS has been tested with specific versions of the following packages:
CUDA 13.2 (Jetson / x86) / CUDA 13.0 (DGX Spark)
OpenCV 4.6.0
TensorRT 10.16.*
If you have installed different versions of these packages on your host system, you may need to remove them to avoid conflicts.
Note
On Jetson with JetPack 7.2, the OpenCV 4.8.0 packages are installed by default.
Remove the conflicting packages with the following command:
sudo apt-get remove -y libopencv* opencv*
OpenCV 4.6.0 will then be automatically installed by the Isaac ROS packages that require it.
Note
On DGX Spark platforms bare-metal and virtual environment workflows,
rosdep installcommands in later steps may fail with an error like:E: Packages were downgraded and -y was used without --allow-downgrades.This occurs because some DGX OS system packages are at newer versions than those pinned by Isaac ROS, causing
aptto reject the entire installation transaction. This means even unrelated packages fail to install.See rosdep install fails on DGX Spark with package downgrade error for resolution options.
Initialize the Isaac ROS CLI:
sudo isaac-ros init venv
Caution
The
baremetalmode is only recommended for advanced users.This mode installs Isaac ROS packages and their dependencies into your system Python environment.
Without proper care, this has the potential to break your host system.
Configure your host environment for Isaac ROS:
Configure the CUDA apt repository:
wget https://developer.download.nvidia.com/compute/cuda/repos/ubuntu2404/x86_64/cuda-keyring_1.1-1_all.deb
sudo dpkg -i cuda-keyring_1.1-1_all.deb
rm cuda-keyring_1.1-1_all.deb
sudo apt update
wget https://developer.download.nvidia.com/compute/cuda/repos/ubuntu2404/sbsa/cuda-keyring_1.1-1_all.deb
sudo dpkg -i cuda-keyring_1.1-1_all.deb
rm cuda-keyring_1.1-1_all.deb
sudo apt update
No CUDA apt repository setup is required on DGX Spark platforms.
Add NVIDIA binary installation locations to your PATH:
echo 'export PATH="/usr/local/nvidia/bin:/usr/local/cuda/bin:/usr/src/tensorrt/bin:${PATH}"' >> ~/.bashrc
source ~/.bashrc
Nothing required on Jetson platforms.
Nothing required on DGX Spark platforms.
Configure the Jetson apt repository:
curl -fsSL https://repo.download.nvidia.com/jetson/jetson-ota-public.asc | sudo gpg --dearmor | sudo tee /etc/apt/keyrings/nvidia-jetson.gpg > /dev/null
echo 'deb [signed-by=/etc/apt/keyrings/nvidia-jetson.gpg] https://repo.download.nvidia.com/jetson/x86_64/noble r39.2 main' | sudo tee /etc/apt/sources.list.d/nvidia-jetson-apt-source.list
Jetson platforms already include the NVIDIA Jetson APT repository by default, so no additional setup is required for this step.
No Jetson apt repository setup is required on DGX Spark platforms.
Install ROS 2 Jazzy by following the official ROS 2 documentation:
Install ROS 2 development tools:
sudo apt-get update
sudo apt-get install -y python3-colcon-common-extensions python3-rosdep
For convenience, source your ROS 2 installation and enable
colconauto-completion in your.bashrcfile:These instructions are for
bashshells; for other shells, configure accordingly.echo "source /opt/ros/jazzy/setup.bash" >> ~/.bashrc echo "source /usr/share/colcon_argcomplete/hook/colcon-argcomplete.bash" >> ~/.bashrc source ~/.bashrc
Initialize
rosdepand configure the Isaac ROS rosdep definitions:sudo rosdep init sudo curl -o /etc/ros/rosdep/sources.list.d/nvidia-isaac.yaml \ https://raw.githubusercontent.com/NVIDIA-ISAAC-ROS/isaac-ros-cli/release-4.6/docker/rosdep/extra_rosdeps.yaml echo "yaml file:///etc/ros/rosdep/sources.list.d/nvidia-isaac.yaml" | sudo tee /etc/ros/rosdep/sources.list.d/00-nvidia-isaac.list rosdep update
Remove potentially conflicting packages from your host system.
As specified in the Isaac ROS CLI apt preference files, Isaac ROS has been tested with specific versions of the following packages:
CUDA 13.2 (Jetson / x86) / CUDA 13.0 (DGX Spark)
OpenCV 4.6.0
TensorRT 10.16.*
If you have installed different versions of these packages on your host system, you may need to remove them to avoid conflicts.
Note
On Jetson with JetPack 7.2, the OpenCV 4.8.0 packages are installed by default.
Remove the conflicting packages with the following command:
sudo apt-get remove -y libopencv* opencv*
OpenCV 4.6.0 will then be automatically installed by the Isaac ROS packages that require it.
Note
On DGX Spark platforms bare-metal and virtual environment workflows,
rosdep installcommands in later steps may fail with an error like:E: Packages were downgraded and -y was used without --allow-downgrades.This occurs because some DGX OS system packages are at newer versions than those pinned by Isaac ROS, causing
aptto reject the entire installation transaction. This means even unrelated packages fail to install.See rosdep install fails on DGX Spark with package downgrade error for resolution options.
Initialize the Isaac ROS CLI:
sudo isaac-ros init baremetal
Acknowledge the prompt, then confirm to continue.
Unattended/Non-Interactive Installation
In some cases, it may be desirable to skip the prompt when initializing the
baremetalmode.To perform a non-interactive installation, use the
--yesflag:sudo isaac-ros init baremetal --yes
Configuring the Isaac ROS Development Environment
The Isaac ROS CLI uses layered configuration files to manage settings across all isolation modes.
To use these configuration files and customize your development environment, refer to the Isaac ROS Development Environment page.
Integrate External Data Sources (Optional)#
Many Isaac ROS demos include pre-recorded rosbag data to help you get started as quickly as possible.
Optionally, these demos can also be integrated with external data sources, including cameras and the Isaac Sim simulation platform.
Sensors
Isaac ROS provides setup instructions for specific camera models from the following product lines:
Calibrate your cameras depending on your type of camera and the object it is on:
Isaac Sim
Isaac Sim is NVIDIA’s robotics simulation platform powered by Omniverse.
Isaac Sim can be used to run and test the ROS 2 applications. There are two ways we can configure the system:
Software in the Loop (SIL) refers to a configuration where the software being tested is not running on the target hardware platform. For example, Isaac ROS packages being tested on x86 before deployment on a Jetson device is SIL.
Hardware in the Loop (HIL) refers to a configuration where the software is being tested on the target hardware platform. For example, Isaac ROS packages being tested on a Jetson device before deployment is HIL.
In both the configurations, Isaac Sim runs on a x86_64 machine providing sensor data and world information.
Install Isaac Sim, choosing the appropriate working environment:
Note
This tutorial assumes the Native environment for Isaac Sim. The steps below assume Isaac Sim was extracted to an installation directory referred to as
<isaac-sim-root>(for example,~/isaacsim).Set up ROS 2 for Isaac Sim.
Isaac Sim 6.0 ships with full Python 3.12 support and includes the ROS 2 Bridge. You can drive the bridge using either a system-level ROS 2 installation or the internal ROS 2 libraries bundled with Isaac Sim. For additional details, refer to the Running Native ROS instructions.
Because Isaac Sim 6.0 supports Python 3.12, a system-level ROS 2 Jazzy installation can be sourced directly in the same terminal as Isaac Sim. Follow the steps here under
Ubuntu 24.04 > Jazzy, then source your ROS 2 installation before launching Isaac Sim:source /opt/ros/jazzy/setup.bash
If you do not have a system-level ROS 2 installation, export the following environment variables so that the ROS 2 Bridge can load the internal libraries bundled with Isaac Sim. If these variables are not set, the bridge fails to start with an error such as
librcutils.so: cannot open shared object file; Isaac Sim prints these same instructions to its console log when this happens.export ROS_DISTRO=jazzy export RMW_IMPLEMENTATION=rmw_fastrtps_cpp export LD_LIBRARY_PATH=${LD_LIBRARY_PATH}:<isaac-sim-root>/exts/isaacsim.ros2.core/jazzy/lib
To use CycloneDDS instead of the default FastDDS, set
RMW_IMPLEMENTATION=rmw_cyclonedds_cpp.Note
Isaac Sim provides a
setup_ros_env.shhelper at the root of the installation that exports these variables for you:source <isaac-sim-root>/setup_ros_env.sh
This helper only updates
LD_LIBRARY_PATHwhenROS_DISTROis not already set, so run it from a fresh terminal (or export the variables manually) to avoid silently skipping the library path.Optionally, if
ROS_DOMAIN_IDis needed to create a separate logical network, run the following command:export ROS_DOMAIN_ID=<your_domain_id>
Launch Isaac Sim using the launch script from the root of your Isaac Sim installation:
cd <isaac-sim-root>
./isaac-sim.sh
Note
(Optional) NITROS bridge provides zero-copy GPU data transfer between Isaac Sim and Isaac ROS. This feature pre-allocates IPC GPU memory regardless of utilization. To enable NITROS bridge on the Isaac Sim side, run:
./isaac-sim.sh --/exts/isaacsim.ros2.bridge/enable_nitros_bridge=true
Open Isaac ROS Sample scene as shown below.
First, enable Robotics Examples menu by clicking Window > Examples > Robotics Examples
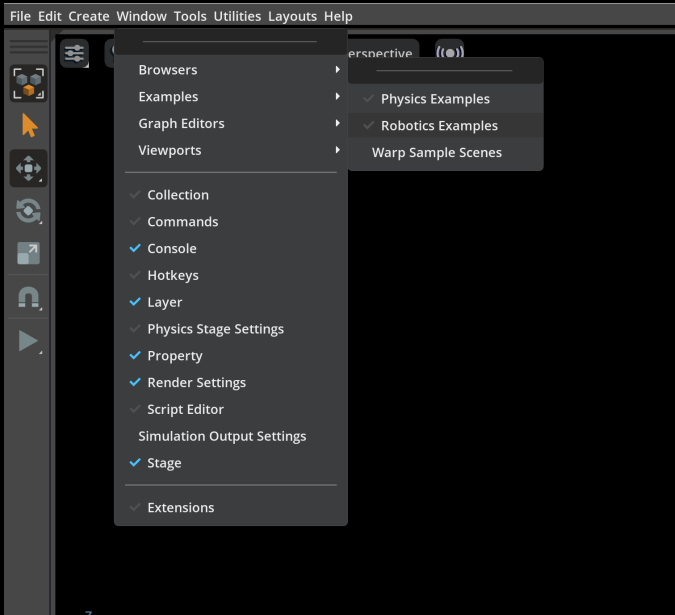
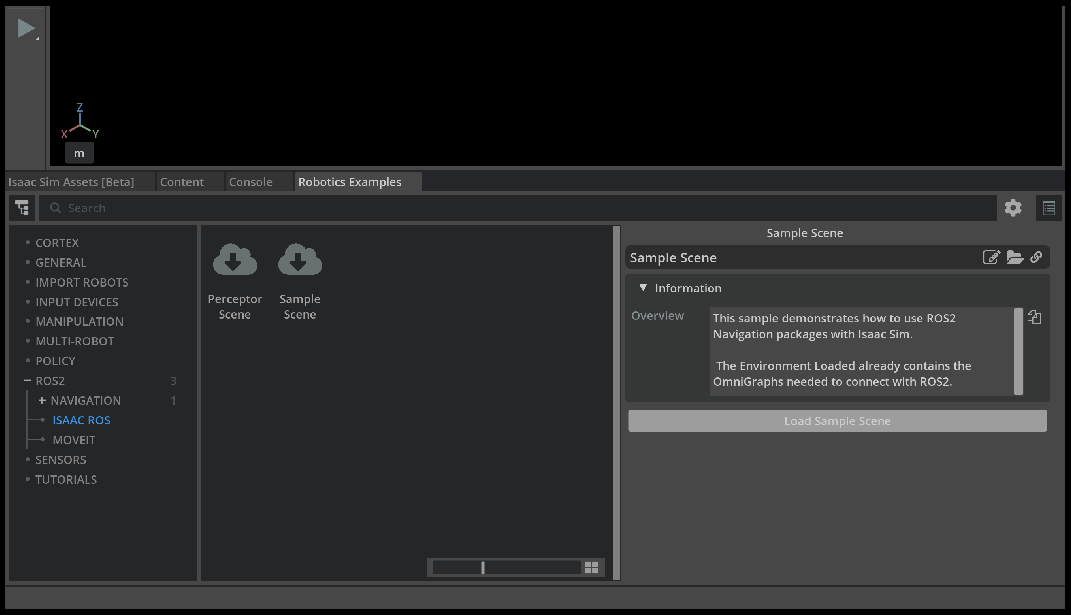
Then, in the Robotics Examples tab, select ROS2 > Isaac ROS > Sample Scene and click Load Sample Scene
Continue with the next steps in your specific Isaac ROS package tutorial.
Note
Make sure to set the
ROS_DOMAIN_IDenvironment variable (if set earlier) before running the sample application.
Install Isaac Sim, choosing the appropriate working environment:
Note
This tutorial assumes the Native environment for Isaac Sim.
Follow the Running Native ROS instructions to ensure that ROS 2 and the required packages are installed to successfully enable the ROS 2 Bridge in Omniverse Isaac Sim.
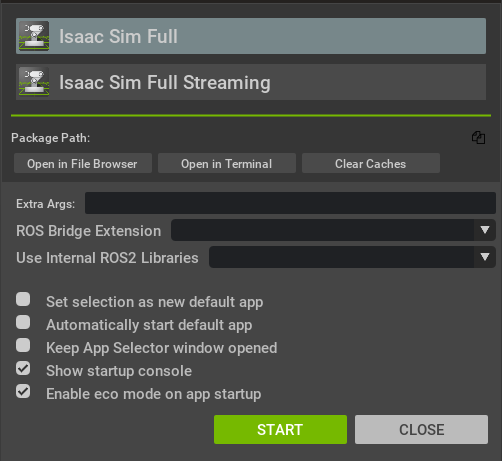
Follow the instructions to launch Isaac Sim App Selector window and then click Open in Terminal button.
Since Isaac Sim 5.1 only supports Python 3.11, follow the steps here under
Ubuntu 24.04 > Jazzy. Ensure that you only run Isaac Sim with the internal ROS 2 libraries. If you have a system level ROS 2 installation, ensure to run Isaac Sim in a clean terminal and run ROS 2 nodes from a second system level ROS-sourced terminal.Sourcing a system level ROS 2 installation in the Isaac Sim terminal will only work with Isaac Sim if it was built from source with Python 3.11.
Optionally, if
ROS_DOMAIN_IDis needed to create a separate logical network, run the following commands.export ROS_DOMAIN_ID=<your_domain_id>
Launch Isaac Sim.
./isaac-sim.sh
Note
(Optional) NITROS bridge provides zero-copy GPU data transfer between Isaac Sim and Isaac ROS. This feature pre-allocates IPC GPU memory regardless of utilization. To enable NITROS bridge on the Isaac Sim side, run:
./isaac-sim.sh --/exts/isaacsim.ros2.bridge/enable_nitros_bridge=true
Open Isaac ROS Sample scene as shown below.
First, enable Robotics Examples menu by clicking Window > Examples > Robotics Examples
Then, in the Robotics Examples tab, select ROS2 > Isaac ROS > Sample Scene and click Load Sample Scene
Continue with the next steps in your specific Isaac ROS package tutorial.
Note
Make sure to set the
ROS_DOMAIN_IDenvironment variable (if set earlier) before running the sample application.
Isaac Sim Tutorial Links
Isaac ROS includes a number of tutorials that demonstrate integration with Isaac Sim.
Each of these links takes you to a tutorial that is listed under Repositories and Packages. They are linked here as a reference and to help you find them faster.
Note
These tutorials were last validated with Isaac Sim 6.0 (recommended). They are also compatible with Isaac Sim 5.0 and Isaac Sim 5.1 releases.
Run an Isaac ROS Demo#
You’re now ready to run an Isaac ROS demo!
Troubleshooting#
See the troubleshooting section for help with setting up your development environment.